Chapter 3
59
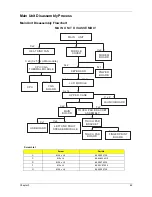
External Module Disassembly Process
External Modules Disassembly Flowchart
The flowchart below gives you a graphic representation on the entire disassembly sequence and instructs you
on the components that need to be removed during servicing. For example, if you want to remove the main
board, you must first remove the keyboard, then disassemble the inside assembly frame in that order.
Screw List
Screw
Part No.
A
M2.5 x L6
86.00E33.736
B
M2 x L4
86.00A02.140
C
M2 x L4
86.9A552.4R0
F
M2 x L3
86.00C07.220
G
M3 x L4
86.9A544.4R0
H
M2.5 x L8
86.00E34.738
EXTERNAL MODULE DISASSEMBLY
WLAN
BOARD
TURN OFF POWER
AND PERIPHERALS
UNPLUG POWER
CABLES
Fx2
LOWER
COVER
Bx7
DIMM
MODULES
OPTICAL DISK
DRIVE MODULE
Ax1
OPTICAL DISK
DRIVE
Cx1
OPTICAL
LOCKER
BRACKET
HDD
MODULE
HARD DISK
RUBBER
ENCLOSURE
HARD DISK
DRIVE
Cx2
Gx4
Summary of Contents for Extensa 5420G
Page 6: ...VI ...
Page 10: ...X Table of Contents ...
Page 65: ...Chapter 2 55 ...
Page 66: ...56 Chapter 2 ...
Page 112: ...102 Chapter 3 ...
Page 126: ...116 Chapter 4 F5h Boot to Mini DOS F6h Clear Huge Segment F7h Boot to Full DOS Code Beeps ...
Page 138: ...128 Chapter 5 ...
Page 172: ...Appendix A 162 ...
Page 178: ...168 Appendix C ...


