background image

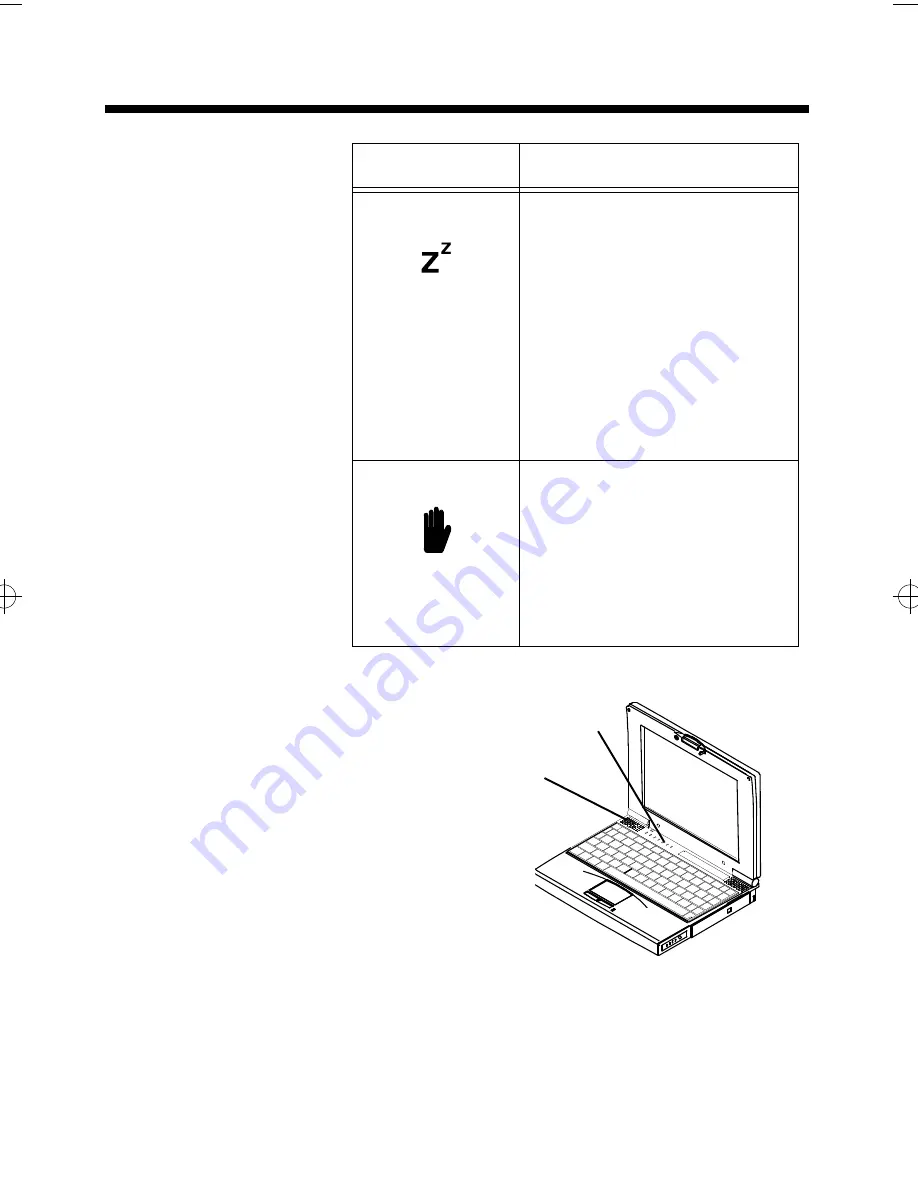
LED Icons

2-14 

Getting Started

Suspend Mode Indicator
Lights when the computer is in 
Suspend mode. Flashes when 
the computer is in the 5V 
Suspend mode.
The computer enters the 5V 
Suspend mode when you press 
the 5V Suspend hot key 
(Fn+F3), the 5 Volt Suspend 
Timeout
 parameter in Setup is 
enabled and expires, or the 
display is closed.

Standby Mode Indicator
Lights when the computer is in 
the Standby mode.
The computer enters the 
Standby mode if the Standby hot 
key (Fn+F3) is pressed or the 
Standby Timeout parameter in 
Setup is enabled and expires.

Icon

Description

LED Indicators

Power Indicator

extugb02.frm  Page 14  Friday, November 15, 1996  2:44 PM

Summary of Contents for Extensa 660

Page 1: ...Extensa 660 Series User s Guide Notebook Computers ...

Page 2: ...rence by one or more of the following measures Reorient or relocate the receiving antenna Increase the separation between the device and receiver Connect the device into an outlet on a circuit different from that to which the receiver is connected Consult the dealer or an experienced radio television technician for help Notice Shielded Cables All connections to other computing devices must be made...

Page 3: ...t accept any interference received including interference that may cause undesired operation Notice Canadian Users This Class B digital apparatus meets all requirements of the Canadian Interference Causing Equipment Regulations Remarque à l intention des utilisateurs canadiens Cet appareil numérique de la classe B respecte toutes les exigences du Règlement sur le matériel brouilleur du Canada ...

Page 4: ...e concerning your unit should include the serial number model number and date of purchase Extensa and livegear are trademarks of Texas Instruments The icons in the Windows Notebook and Startup groups are copyrighted by Texas Instruments IBM AT PS 2 and Token Ring are registered trademarks and OS 2 is a trademark of International Business Machines Corporation Microsoft MS DOS Windows and Xenix are ...

Page 5: ...l Accessories 3 1 Preventing Damage from Static Electricity 3 2 Installing Memory Modules 3 3 Installing Modular Bay Accessories 3 7 Installing PC Cards 3 9 Removing Installing Hard Disk Drives 3 12 Using the CD ROM Drive 3 14 Removing Installing the Primary Battery 3 15 Chapter 4 Setting Up Your Desktop 4 1 Preparing To Install External Accessories 4 2 Connector and Port Icons 4 4 Connecting a Mo...

Page 6: ...lity 7 1 Overview of Mobility 7 2 Disconnecting from the Desktop 7 3 Moving Around 7 4 Taking the Computer Home 7 5 Traveling with the Computer 7 7 Traveling Internationally with the Computer 7 8 Chapter 8 Care and Troubleshooting 8 1 Cleaning the Computer 8 2 Troubleshooting Tips 8 3 Appendix A Where To Get Help A 1 Customer Support Numbers A 1 Texas Instruments Worldwide Sales Offices A 2 Index ...

Page 7: ...me you can operate the notebook away from AC power without having to recharge the battery pack Printed Manuals 1 2 Contents of the User s Guide 1 2 Other printed documents 1 2 Creating Backup Disks 1 3 Windows 95 1 3 Windows for Workgroups 1 3 Features of the Computer 1 4 Standard Features 1 4 Customizing Features 1 5 Environmental Specifications 1 6 Temperature 1 6 Relative Humidity Noncondensing...

Page 8: ...r computer ships with the following printed manuals Manual Information Installation poster Guides you through a first time installation Safety Instructions Contains important precautions about personal safety Warranty Card Describes the limitations of your warranty protection Software license agreement Describes your rights and obligations concerning use of included software Windows 95 documentati...

Page 9: ... Creating backup System Disks for Windows 95 requires approximately 43 formatted 3 5 inch 1 44 MB floppy disks Labels for the floppy disks are included with the manual To create the disks use the create System Disk tool from Windows 95 Windows for Workgroups Creating backup System Disks for MS DOS and Windows for Workgroups requires approximately 20 formatted 3 5 inch 1 44 MB floppy disks To creat...

Page 10: ...ure Large screen STN or TFT color display 1 5 MB EDO video memory and fast video graphics accelerator 16 bit stereo audio Fast infrared communication and standard I O ports NiMH Nickel Metal Hydride or optional Li Ion Lithium Ion battery pack High capacity hard disk drive Built in keyboard and touchpad pointing device Microphone LCD CD ROM Floppy or 2nd Battery Keyboard Touchpad Left Speaker Right...

Page 11: ...umeric keypad or mouse 9 pin serial port for connecting external devices such as a modem or mouse Simultaneous display with an external CRT Two Type I II or one Type III Cardbus PC Card slots lower slot accepts Zoomed Video port enabled PC cards Parallel port with EPP and ECP for connecting to a printer Easy memory expansion using a 16 MB 32 MB or 64 MB soDIMM module Advanced PCI Card support APCI...

Page 12: ...nsing Operating 20 to 85 Storage 20 to 85 Shock Operating Maximum 5g pulse in X Y and Z orientations Storage Maximum 50g pulse in X Y and Z orientations Vibration Operating Sinusoidal 5 to 25 6 Hz limited to 0 015 inch peak to peak maximum displacement 0 5g 25 6 to 250 Hz Storage Sinusoidal 5 to 27 1 Hz limited to 0 016 inch peak to peak maximum displacement 2 0g 27 1 to 500 Hz ...

Page 13: ... timeouts when the computer is on battery power Disable Disables all timeouts Types of power management timeouts You can define the following power management timeouts Standby Timeout The amount of time the computer needs to be idle before the computer enters Standby mode 5V Suspend Timeout The amount of time the computer needs to be idle before the computer enters the 5V Suspend mode 0V Suspend T...

Page 14: ...he computer will not permit any of the power management timeouts under the following conditions The hard disk drive CD ROM or floppy disk drive is active The Auto Insert Notification option is enabled in the CD ROM setting This factory default setting for this option is Disabled ...

Page 15: ...abled in the System Setup and a modem ring or alarm occurs 5V Suspend Mode In 5V Suspend mode the computer saves the current computer state into your system memory then shuts off power to most of the devices except the system memory When the computer resumes from 5V Suspend mode it restores the computer to the saved state With a fully charged battery your computer can remain in 5V Suspend mode for...

Page 16: ...o your hard disk drive then shuts off When you turn the computer on again it returns to the saved state within about a minute Press the 0V Suspend hot key Fn F2 to enter 0V Suspend mode 0V Suspend mode also occurs if the 0V Suspend Timeout parameter in Setup is enabled and times out or if the Battery Low Suspend option is enabled and your batter runs down to a critically low level To resume normal...

Page 17: ...g 3 Sufficient time 2 3 Access to AC power 2 3 Certificate of Authenticity 2 3 Language 2 3 Printer type 2 3 Which operating system to load 2 4 When to back up your system files 2 4 Running the Setup Program 5 Starting the computer for the first time 2 5 Loading DOS WFW 2 6 Loading Windows 95 2 6 Contents of the demo program 2 7 Stopping the demo program 2 7 Running the demo again 2 7 Deleting the...

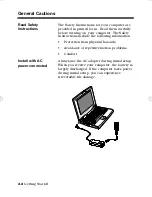
Page 18: ...your computer The Safety Instructions include the following information Protection from physical hazards Avoidance of repetitive motion problems Comfort Install with AC power connected Always use the AC adapter during initial setup When you receive your computer the battery is largely discharged If the computer loses power during initial setup you can experience irreversible file damage ...

Page 19: ... Authenticity during Windows 95 Setup This certificate is part of the Windows 95 documentation kit You need this number even if you are installing Windows for Workgroups Language During initial setup you choose the following Language for Windows displays Language for keyboard installed Your language selection is final You will not be able to change the language after installation is complete Print...

Page 20: ... compatible with Windows 95 Check with your network administrator to determine whether Windows 95 is compatible Although most software that is compatible with DOS WFW is also compatible with Windows 95 it is possible that the existing software you are using will not run in Windows 95 If you have a critical software application that you intend to copy to your new computer check with the manufacture...

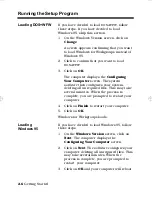
Page 21: ...ram displays the Welcome to Windows Setup screen 2 Click on Next The program displays the Regional Settings screen 3 Select the language and keyboard then click on Next The program displays the User Information screen 4 Type in your name and company then click on Next The next three screens include license agreement information 5 Click your agreement to the license conditions The program prompts y...

Page 22: ...re then configures your system deleting all unrequired files This may take several minutes When the process is complete you are prompted to restart your computer 4 Click on Finish to restart your computer 5 Click on OK Windows for Workgroups loads Loading Windows 95 If you have decided to load Windows 95 follow these steps 1 On the Windows Version screen click on Next The computer displays the Con...

Page 23: ...s available for your computer The software loaded on your computer How to get service and technical support More about Texas Instruments Stopping the demo program To stop the demo press the left mouse button or tap the touchpad Running the demo again To run the demo program do one of the following In Windows 95 1 Double click on the About Your Extensa icon on the desktop Follow the directions to u...

Page 24: ...ll Demo icon on the desktop 2 When the Uninstall window appears you can choose a complete or partial uninstall If you want to keep some parts of the demo you can deselect those parts then click on OK Windows for Workgroups 1 In the Program Manager double click on the Texas Instruments Multimedia group 2 Double click on the Uninstall Demo icon 3 When the Uninstall window appears you can choose a co...

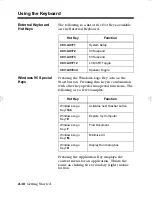
Page 25: ...itional keys at the same time Hot Key Function Fn F1 CMOS Setup Fn F2 0 Volt Suspend Fn F3 5 Volt Suspend Fn F4 Standby Fn F6 Scroll Lock Fn F7 Number Lock Fn F11 LCD Backlight On Off Fn F12 Toggle LCD CRT Both Fn T Touchpad Enable Disable Fn right arrow Contrast Up Fn left arrow Contrast Down Fn Up arrow Brightness Up Fn Down arrow Brightness Down Fn PgUp Increase Speaker Volume Fn PgDn Decrease ...

Page 26: ...are a few examples Pressing the Application Key displays the context menu for an application This is the same as clicking the secondary right mouse button Hot Key Function Ctrl Alt F1 System Setup Ctrl Alt F2 0V Suspend Ctrl Alt F3 5V Suspend Ctrl Alt F12 LCD CRT Toggle Ctrl Alt End Speaker Toggle Hot Key Function Windows Logo Key Tab Activates next Taskbar button Windows Logo Key E Explore my Com...

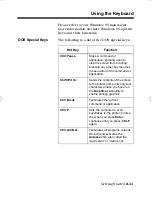
Page 27: ...other key resumes the execution of the command or application Shift Prt Sc Sends the contents of the screen to the printer port prints only text characters unless you have run the Graphics com utility to enable printing graphics Ctrl Break Terminates the current command or application Ctrl P Sets the computer to echo keystrokes to the printer prints a line when you press Enter continues until you ...

Page 28: ...rol Panel to display the Control Panel window 3 Double click on the Synaptics Touchpad icon 4 Select the touchpad tab to customize the touchpad to your preference 5 Click on Enhancements to bring up additional features and to get to the online help for the Synaptics Touchpad drivers In Windows for Workgroups 1 From the Program Manager double click on the Main program group 2 Double click on the Co...

Page 29: ...or reads from the hard disk drive Power Battery low Indicator Lights when the computer is on and there is power to the computer Flashes when the battery power is low Connect a powered AC adapter to the computer as soon as possible Caps Lock Indicator Lights when the caps lock function is toggle ON using the Caps Lock Key Num Lock Indicator Lights when the embedded numeric keypad is toggled ON usin...

Page 30: ...n you press the 5V Suspend hot key Fn F3 the 5 Volt Suspend Timeout parameter in Setup is enabled and expires or the display is closed Standby Mode Indicator Lights when the computer is in the Standby mode The computer enters the Standby mode if the Standby hot key Fn F3 is pressed or the Standby Timeout parameter in Setup is enabled and expires Icon Description LED Indicators Power Indicator ...

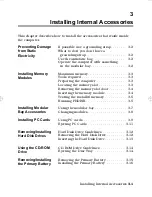
Page 31: ...he computer 3 3 Locating the memory slot 3 3 Removing the memory slot door 3 4 Inserting the memory module 3 4 Testing the installed memory 3 5 Running PHDISK 3 5 Installing Modular Bay Accessories 3 7 Using the modular bay 3 7 Changing modules 3 8 Installing PC Cards 3 9 Using PC cards 3 9 Ejecting PC Cards 3 11 Removing Installing Hard Disk Drives 3 12 Hard Disk Drive Guidelines 3 12 Removing th...

Page 32: ...tatic electricity Follow these steps before opening the computer or handling internal accessories 1 Sit down Static electricity builds up as you walk around 2 Touch a large grounded appliance for example an external monitor to discharge static electricity It is now safe to open the computer or handle internal accessories Use the antistatic bag If you received the internal accessory in an antistati...

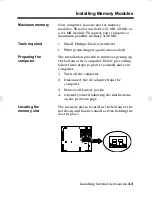
Page 33: ...ver Wrist grounding straps recommended Preparing the computer The installation procedure involves opening up the bottom of the computer Before proceeding follow these steps to protect yourself and your computer 1 Turn off the computer 2 Disconnect the AC adapter from the computer 3 Remove all battery packs 4 Ground yourself following the instructions on the previous page Locating the memory slot T...

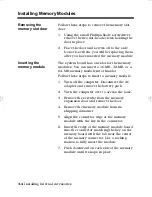
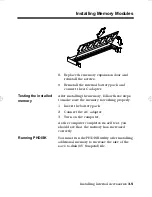
Page 34: ...or a 64 MB memory module into this slot Follow these steps to insert a memory module 1 Turn off the computer Disconnect the AC adapter and remove the battery pack 2 Turn the computer over to access the base 3 Remove the screw s from the memory expansion door and remove the door 4 Remove the memory module from its shipping container 5 Align the connector edge of the memory module with the key in th...

Page 35: ...ed memory After installing the memory follow these steps to make sure the memory is working properly 1 Insert the battery pack 2 Connect the AC adapter 3 Turn on the computer As the computer completes its self test you should see that the memory has increased correctly Running PHDISK You must run the PHDISK utility after installing additional memory to increase the size of the save to disk 0V Susp...

Page 36: ...g Windows 95 1 From the Taskbar select Start then Shut Down 2 Select the Restart the Computer in MS DOS mode 3 Click on Yes 4 Type PHDISK C F at the DOS prompt and press Enter 5 The DOS screen appears and shows the save file name and size Press any key to reset the system The computer will reboot In Windows for Workgroups Follow these steps if your computer is running MS DOS and Windows for Workgr...

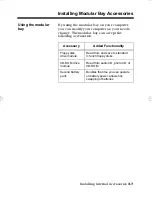
Page 37: ...you can modify your computer as your needs change The modular bay can accept the following accessories Accessory Added Functionality Floppy disk drive module Read from and save to standard 3 5 inch floppy disks CD ROM drive module Read from audio CD photo CD or CD ROM Second battery pack Doubles the time you can operate on battery power allows hot swapping of batteries ...

Page 38: ...change modules 1 Turn off the computer 2 Press the release latch on the bottom of the computer 3 Pull out the accessory currently in the modular bay 4 Remove the new accessory from its carrying container 5 Slide the new accessory into the modular bay and push the accessory until it latches into place 6 Place the original accessory into an optional carrying container if available and store in a saf...

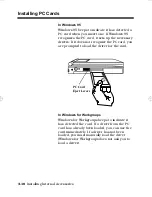
Page 39: ... or A The Speakerphone option is supported by either PC slot The following PC cards are available from Texas Instruments PC Card Added Functionality 28 8 kB second Speakerphone Modem High speed data fax uses computer microphone and speaker for speakerphone 28 8 kB second cellular modem High speed data fax connects to cellular phone Token Ring Connects to a token ring local area network Ethernet 10...

Page 40: ...vers If it does not recognize the PC card you are prompted to load the driver for the card In Windows for Workgroups Windows for Workgroups beeps to indicate it has detected the card If a driver from the PC card has already been loaded you can use the card immediately If a driver has not been loaded you must manually load the driver Windows for Workgroups does not ask you to load a driver PC Card ...

Page 41: ...95 Follow these steps to eject a PC card if your computer is running Windows 95 1 Open the Control Panel 2 Click on the PC card icon 3 Select the card you want to eject 4 Click on Stop 5 When Windows 95 responds with the message You may safely remove this device click OK flip out the eject lever and lift and push it to eject the PC card In Windows for Workgroups Windows for Workgroups has no speci...

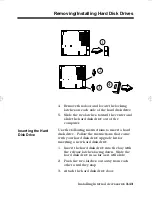
Page 42: ...ive is damaged you can lose data To reduce the impact of data loss back up data frequently Removing the Hard Disk Drive You can remove your hard disk drive for safe keeping away from your computer or to swap drives with other 660 computers The following steps show you how to remove and install your hard disk drive You can also purchase upgrades to your current hard disk drive by contacting Texas I...

Page 43: ... computer Inserting the Hard Disk Drive Use the following instructions to insert a hard disk drive Follow the instructions that came with your hard disk drive upgrade kit for inserting a new hard disk drive 1 Insert the hard disk drive into the bay with the release latches facing down Slide the hard disk drive in as far as it will slide 2 Push the two latches out away from each other until they st...

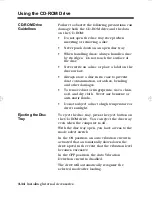
Page 44: ...amination scratches bending and other damages To remove dust or fingerprints use a clean soft and dry cloth Never use benzene or anti static fluids Do not subject a disc to high temperature or direct sunlight Ejecting the Disc Tray To eject the disc tray press the eject button on the CD ROM drive You can eject the disc tray even when the computer is off With the disc tray open you have access to t...

Page 45: ...ing the Primary Battery Use the following procedure to remove a battery from the notebook 1 Turn off the computer Disconnect the AC adapter 2 Turn the computer over and locate the battery release switch 3 Slide the switch outward with one hand and remove the battery with the other hand Battery Latch Release Primary Battery ...

Page 46: ...ttery To install the battery use the following procedure 1 Turn off the computer 2 Refer to the following figure and insert the battery into the primary battery slot with labels facing upwards Slide battery in until it clicks into place 3 Reconnect the AC adapter if needed Label side facing Up ...

Page 47: ...and Port Icons 4 4 Connectors 4 4 Connector Icons 4 4 Connecting a Monitor 4 7 Supported monitors 4 7 Operating the computer with an external monitor 4 7 Required cables connectors 4 8 Connecting directly to the computer 4 8 Installing PS 2 Devices 4 9 Required cables connectors 4 9 Connecting directly to the computer 4 9 Connecting a Printer 4 10 Required cables connectors 4 10 Connecting directl...

Page 48: ...ons for your computer The one exception is relative humidity On cold winter days the relative humidity indoors often falls below 20 During the winter you should protect your computer and external accessories from electrostatic discharge by spraying the carpet around your work area with antistatic spray or by installing an antistatic mat Advantage Example Increased functionality Printers higher res...

Page 49: ...en external keyboard is not attached Monitor Larger viewing area increased resolution more comfortable viewing height Printer Hard copy Sound Headphone more powerful speakers microphone Kensington lock Theft deterrence Port Replicator Duplicates all ports on the computer and allows easy connect disconnect to from the desktop environment External FDD Allows use of CR ROM and floppy by connecting fl...

Page 50: ...nnectors Connector Icons VGA Port Parallel Port PS 2 Port Serial Port FIR Port Port Replicator Bus Audio Connectors Icon Connector External Monitor 15 pin Connects to an external analog monitor Line Out Connects to a line out device such as headphones or amplified speakers Line In Connects to a line in device such as a synthesizer stereo walkman or audio CD player Microphone In Connects to an exte...

Page 51: ...r printer without the use of a cable or cord Transmits up to 4 Megabits per second Expansion 120 pin Connects to the Extensa Port Replicator PS 2 Connects to an external PS 2 keyboard numeric keypad or mouse If you are connecting a keyboard with a 5 pin DIN connector you need to purchase a 6 pin mini DIN adapter DC In Connects the AC adapter output connector to this jack to recharge the battery an...

Page 52: ...Up Your Desktop PC Card The PC Card slots supports one Type III or two Type I II PC Cards Advanced PCI Slot Insert a Texas Instruments Advanced PCI card in this slot Memory Module Insert the memory DIMM modules in this slot Icon Connector ...

Page 53: ...e correct driver Operating the computer with an external monitor By pressing the Fn F12 hot key you can select whether you want the visual image displayed on the external monitor on the local screen or on both Note External monitors can use many resolutions that are incompatible with the screen on the computer When this is the case you cannot view both the computer screen and the monitor at the sa...

Page 54: ...ed cables connectors External monitors usually have a built in cable Monitor cables use a standard connector so an adapter will probably not be required Connecting directly to the computer Connect the cable to the video out port on the rear of the computer ...

Page 55: ...onnector Most pointing devices have a PS 2 connector although some may have a serial connector Connecting directly to the computer The computer has only one PS 2 port Attach the selected PS 2 device to the PS 2 port If you attach an external PS 2 type keyboard to the computer and also wish to connect an external mouse connect a serial mouse to the notebook s serial port PS 2 Port Serial Port ...

Page 56: ... using a standard Centronics type parallel cable Connecting directly to the computer If you are connecting a printer directly to your computer connect it to the parallel port on the back of the computer Installing a printer driver Your operating system supports a wide range of printers If your printer is not supported by the operating system follow the instructions provided with your printer to in...

Page 57: ...uction and increase convenience When purchasing external sound equipment keep the following in mind Speakers connect to the audio out port on the computer they must have their own source of power Headphones connect to the audio out port on the computer Microphone connects to the microphone port on the computer Connecting directly to the computer The following illustration shows the audio connectio...

Page 58: ...isaster Required lock You can secure your computer using a standard Kensington lock If your computer store does not carry Kensington locks you can buy one directly from Texas Instruments Connecting the Kensington lock Follow these instructions to secure your computer using a Kensington lock 1 Secure the looped end of the Kensington lock cable to a permanent fixture within reach of your computer 2 ...

Page 59: ...vides some guidance to help you select and install software Selecting Software for the Computer 5 2 Purchasing new software 5 2 Using existing software 5 2 Loading Software 5 3 Loading software from floppy disks 5 3 Why you should use the CD ROM drive module 5 3 Loading software from CD ROM 5 3 Special Considerations 5 4 Screen resolution 5 4 Sound settings 5 4 ...

Page 60: ...unctions that work only on Windows 95 Some programs work only on Windows for Workgroups MS DOS based software should work regardless of the operating system you loaded on your computer Minimum requirements Make sure your computer has enough memory screen resolution and processor speed for the software Using existing software If you already have some software you want to load on the computer you mi...

Page 61: ...drive module Many software packages are available only on CD ROM Many others that are available on floppy disks have additional files and reference material that is only available on the CD ROM versions Software manufacturers frequently charge more sometimes much more for floppy disk versions Loading software packages from floppy disks takes longer and is more cumbersome Loading software from CD R...

Page 62: ...lly VGA for optimal performance If you have selected a different resolution you may need to adjust the screen resolution before running the software Sound settings Some mostly older software packages require you to provide information about your sound card Here are the default settings for the sound board Audio Chip ESS ES1878 I O Port 220H DMA 1 IRQ 5 ...

Page 63: ...ery 6 3 Charging Batteries 6 4 Determining current charge 6 4 Charging the battery in the computer 6 4 Charging the battery in an external battery charger 6 4 Prolonging Battery Life 6 5 Reducing screen brightness 6 5 Caching the hard disk drive 6 5 Lowering inactivity timeouts 6 5 Suspending operation while idle 6 6 Responding to a Low Battery Condition 6 7 Saving files 6 7 Turning off the alarm ...

Page 64: ... be followed when handling and replacing all batteries Dispose of a used battery promptly Do not dispose of batteries in fire or water Keep batteries away from children Do not puncture the battery case or disassemble If a battery is leaking do not touch the electrolyte Do not short circuit the battery Burns may result Do not expose to temperatures greater than 60 C Primary Primary Secondary Type N...

Page 65: ...s available in some areas Contact your computer dealer or call Texas Instruments at 1 800 TI TEXAS for information about battery recycling programs Ordering a spare battery The computer ships with a single battery To order a secondary battery for use in the modular bay or to order a spare primary battery call your computer dealer or call Texas Instruments at 1 800 TI TEXAS ...

Page 66: ...o charge 3 to 6 hours Note If you have both batteries installed in the computer it will take longer to charge the batteries since the batteries charge in parallel Charging the battery in an external battery charger An optional external battery charger allows you to charge a battery while you are using the computer Use only the battery charger designed for your computer Follow the directions that c...

Page 67: ...g the brightness to the lowest acceptable level increases battery life To reduce the brightness press Fn Caching the hard disk drive By caching the hard disk drive you can reduce the length of time the hard disk drive is rotating and using energy Both Windows 95 and Windows for Workgroups use a disk caching program by default As long as you have not disabled these programs you can take advantage o...

Page 68: ...onsumption even further by pressing either Fn F3 Suspend or Fn F4 Standby as soon as you no longer need the computer to be active Pressing Fn F4 Standby turns off the screen Pressing Fn F3 Suspend turns off the screen stops the hard disk drive and reduces energy usage to the lowest level possible without turning off the computer Press the Shift key to resume activity from Suspend or Standby mode ...

Page 69: ...ower and reduce the possibility of data loss Saving files Save all open files frequently while the computer is in a low battery condition Turning off the alarm Turn off the audible alarm by pressing Fn End Mute Reducing screen brightness Reduce screen brightness by pressing Fn Connecting the AC adapter If you have access to AC power connect the computer to the AC adapter You can do this without tu...

Page 70: ... the computer If you cannot insert the spare battery into the modular bay suspend operations to disk by pressing Fn F2 and replace the battery When you turn on the computer the computer returns to the saved state Saving to Disk When the battery power becomes critically low less than 5 charge remaining the computer saves the current state of the computer to disk and turns off When you turn the comp...

Page 71: ... Disconnecting from the Desktop 7 3 Disconnecting from a port replicator 7 3 Disconnecting from external accessories 7 3 Moving Around 7 4 Preparing the computer 7 4 What to bring for short meetings 7 4 What to bring for long meetings 7 4 Taking the Computer Home 7 5 Preparing the computer 7 5 What to bring with you 7 5 Special considerations 7 5 Setting up a home office 7 6 Traveling with the Com...

Page 72: ...for example taking it with you to meetings Taking the computer home Since you are taking the computer to the same place every night you can save yourself time and effort by setting up a home desktop Traveling with the computer The farther you get away from home or office the more important it is to bring the necessary equipment and supplies with you International traveling Traveling internationall...

Page 73: ...ides of the port replicator to eject the computer 6 Disconnect the Kensington lock if you are using one to secure the computer Disconnecting from external accessories If your computer is connected directly to external accessories follow these steps 1 Save your work in progress 2 Shut down the operating system 3 Turn off the computer 4 Disconnect the cord from the AC adapter 5 Disconnect the keyboa...

Page 74: ...g for short meetings A fully charged battery runs the computer for 2 3 hours under most circumstances If your meeting is shorter than that you probably do not need to bring anything with you other than the computer What to bring for long meetings If your meeting will last longer than 3 hours or if your battery is not fully charged you may want to bring the AC adapter with you to plug in your compu...

Page 75: ...cking items next to the top cover of the computer Pressure against the top cover can damage the screen What to bring with you Unless you already have some items at home bring the following items with you AC adapter Modular bay accessories that you might need The printed user s manual Special considerations Follow these guidelines to protect your computer while traveling to and from work Minimize t...

Page 76: ... frequently work on your computer at home it may be worthwhile purchasing a second AC adapter for use at home With a second AC adapter you can avoid transporting the extra weight to and from home If you use your computer at home for significant periods of time you might also want to add some of the external accessories described in Chapter 4 Which external accessory to add depends on your use of t...

Page 77: ...ing the following items with you AC adapter Modular bay accessories that you might need Spare fully charged battery packs Additional printer driver files if you plan to use another printer The printed user s manual Special considerations In addition to the guidelines for taking the computer home follow these guidelines to protect your computer while traveling Always take the computer as carry on l...

Page 78: ...items with you AC adapter Power cords that are appropriate to the country to which you are traveling Modular bay accessories that you might need Spare fully charged battery packs Additional printer driver files if you plan to use another printer Proof of purchase in case you need to show it to Customs officials The printed User s Manual Special considerations Follow the same special considerations...

Page 79: ...n keyboard and case to ensure trouble free computing If you do experience a problem use the troubleshooting guide in this chapter to help you correct it quickly Cleaning the Computer 8 2 Cleaning the case 8 2 Cleaning the screen 8 2 Troubleshooting Tips 8 3 Errors at startup 8 3 Keyboard 8 3 Battery 8 4 Accessories 8 4 ...

Page 80: ...reen Cleaning the case Keep the case of the computer free of dust Apply a small amount of mild liquid cleaner to a dry lint free cloth and wipe the case with the cloth Cleaning the screen The surface of the screen is covered with a protective plastic film that may become smeared and accumulate dust during use Avoid touching the screen with your fingers Clean the screen regularly by applying a smal...

Page 81: ...er is on but the screen is blank Press Fn to increase screen brightness Press Spacebar to terminate Suspend mode The computer may be set to use the external monitor Press Fn F12 to switch to the internal screen Save to disk file is too small This message occurs when you add memory Use the MS DOS program PHDISK to increase the size of the save to disk file Save to disk file is missing Use the MS DO...

Page 82: ...he battery may be completely discharged Recharge overnight and recheck If the problem persists call service Computer does not recognize the media device Check the configuration in Device Manager Ensure the correct drivers are installed Computer does not recognize the accessory Check the configuration in Device Manager Ensure the correct drivers are installed Error occurs when using new Ethernet PC...

Page 83: ... manuals To comment on the manuals for your computer send email to PUBT msg ti com Phone US Canada 800 TI TEXAS Option 3 2 2 Phone International 817 771 5856 Fax 817 774 6660 TDD 800 735 2989 BBS 817 774 6809 Email WWWS msg ti com Mail Customer Satisfaction Line P O Box 6102 MS 3258 Temple TX 76503 6102 Phone US Canada 800 TI TEXAS Option 2 1 Phone International 817 774 6969 Fax 800 44FAX TI TDD 8...

Page 84: ...rk Texas Instruments A S Borupvang 2D DK 2750 Ballerup Tel 45 44 68 74 00 Fax 45 44 68 64 00 Telex 35123 TEXIN Deutschland Germany Texas Instruments Deutschland GmbH Personal Productivity Products Haggertystraße 1 85356 Freising Tel 0180 2326878 Fax 0180 2326879 Eire Ireland Texas Instruments Ireland Ltd Call United Kingdom España Spain Texas Instruments España S A C Gobelas 43 Ctra de la Coruña K...

Page 85: ...all Taiwan Latin America Region Texas Instruments P O Box 149149 MS 2223 Austin Texas 78714 9149 U S A Tel 512 250 4051 Fax 512 250 7456 Malaysia Texas Instruments Malaysia Sdn Bhd Asia Pacific Division 100 Jalan Tun Perak Lot 36 1 Menara Maybank 50050 Kuala Lumpur Tel 60 3 2085708 60 3 2086001 Fax 60 3 2306605 Middle East and Africa Texas Instruments Italia S p A Personal Productivity Products Ce...

Page 86: ...mi Finland Texas Instruments OY Tekniikatie 12 SF 02150 Espoo Finland Tel 90 435 42033 Fax 90 467 323 Sverige Sweden Texas Instruments International Trade Corporation Sverigefilialen Box 30 S 164 93 Kista Isafjordsgatan 7 Tel 08 752 58 00 Fax 08 751 97 15 Taiwan Texas Instruments Taiwan Ltd 26F 216 Sec 2 Tun Hua S Road Taipei Taiwan R O C Tel 886 2 3762710 Fax 886 2 3772908 United Kingdom Texas In...

Page 87: ...ging batteries 6 4 cleaning computer case 8 2 computer screen 8 2 computer adjusting to temperature changes 7 5 7 6 cleaning 8 2 low battery condition 6 7 packing 7 5 securing 4 12 starting for the first time 2 2 2 6 suspending operations 6 6 taking home 7 5 7 6 traveling with 7 7 connecting headphones 4 11 Kensington lock 4 12 microphone 4 11 printer 4 10 sound equipment 4 11 speakers 4 11 D dele...

Page 88: ...computer 7 5 printed manuals 1 2 printer 2 3 connecting 4 10 installing driver 4 10 protecting against static electricity 4 2 S Safety Instructions 2 2 save to disk 6 8 screen adjusting brightness 6 5 cleaning 8 2 screen resolution 5 4 securing computer 4 12 selecting operating system 2 4 Windows 95 2 6 Windows for Workgroups 2 6 setting up home office 7 6 software loading 5 3 purchasing 5 2 requi...

Page 89: ...ndex 3 suspending to disk 6 8 T timeouts inactivity 6 5 traveling with computer 7 7 troubleshooting 8 3 8 4 U User s Guide contents 1 2 W Windows 95 selecting 2 6 Windows for Workgroups selecting 2 4 2 6 ...

Page 90: ......

Page 91: ...9813212 0001 ...

Reviews: