background image

11

English

Adjusting the OSD position

1

Press the Menu key to bring up the OSD.

2

Using the directional keys, select 


OSD from the onscreen display. 

Then navigate to the feature you wish to adjust.

Summary of Contents for H213H

Page 1: ...Acer LCD Monitor User Guide...

Page 2: ...espondence concerning your unit should include the serial number model number and purchase information No part of this publication may be reproduced stored in a retrieval system or transmitted in any...

Page 3: ...re of the LCD screen an afterimage of the previous screen may remain after switching the image when the same image is displayed for hours In this case the screen is recovered slowly by changing the im...

Page 4: ...These openings must not be blocked or covered The openings should never be blocked by placing the product on a bed sofa rug or other similar surface This product should never be placed near or over a...

Page 5: ...ding pin also provides good protection from unexpected noise produced by other nearby electrical devices that may interfere with the performance of this product Use the product only with the supplied...

Page 6: ...ane or butane and areas where the air contains chemicals or particles such as grain dust or metal powders Additional safety information Your device and its enhancements may contain small parts Keep th...

Page 7: ...US Department of Energy DOE In the average home 75 of all electricity used to power home electronics is consumed while the products are turned off ENERGY STAR qualified home electronic products in the...

Page 8: ...rward and or leaning backward stand up and walk around regularly to remove the strain on your leg muscles Taking care of your vision Long viewing hours wearing incorrect glasses or contact lenses glar...

Page 9: ...0 E mail easy_lai acer com tw Hereby declare that Product LCD Monitor Trade Name Acer Is compliant with the essential requirements and other relevant provisions of the following EC directives and that...

Page 10: ...e received including interference that may cause undesired operation The following local manufacturer importer is responsible for this declaration Product name LCD Monitor Model number SKU number x 0...

Page 11: ...of Conformity x Unpacking 1 Attaching the base for selected models 2 Attaching the base for selected models 3 Screen position adjustment 4 Connecting the power cord 4 Power saving 4 Connecting the doc...

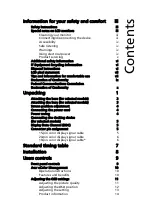
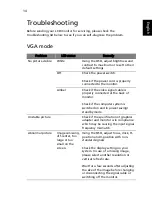
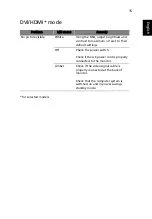
Page 12: ...Troubleshooting 15 VGA mode 15 DVI HDMI mode 16...

Page 13: ...ems are present when you unpack the box and save the packing materials in case you need to ship or transport the monitor in the future LCD monitor Quick start guide D sub cable DVI cable only dual inp...

Page 14: ...packaging Carefully place the monitor face down on a stable surface use a cloth to avoid scratching the screen 1 Attach the the monitor stand arm to the base 2 Ensure that the base is locked onto the...

Page 15: ...nlet and plug the other end into an AC outlet For units using 120 V AC Use a UL listed cord set type SVT wire and plug rated 10 A 125 V For units using 220 240 V AC Use a cord set consisting of H05VV...

Page 16: ...the host system about its capabilities for example supported resolutions and corresponding timing The monitor supports the DDC2B standard Connector pin assignment 15 pin color display signal cable PIN...

Page 17: ...ata 19 TMDS data 0 5 shield 8 NC 20 NC 9 TMDS data 1 21 NC 10 TMDS data 1 22 TMDS clock shield 11 TMDS data 1 3 shield 23 TMDS clock 12 NC 24 DDC TMDS clock PIN No Description PIN No Description 1 TMD...

Page 18: ......

Page 19: ...one end of the 24 pin DVI cable to the back of the monitor and the other end to the computer s port 3 Connect one end of the 19 pin HDMI cable to the back of the monitor and the other end to the comp...

Page 20: ...ly optimize the display position focus and clock of your display Empowering Key Press the Empowering Key to open the Acer eColor Management OSD and access the scenario modes 10 for more details Input...

Page 21: ...nu item Description User mode User defined Settings can be fine tuned to suit any situation Text mode Optimal balance of brightness and contrast to prevent eyestrain The most comfortable way to read o...

Page 22: ...djust the picture quality OSD position and general settings For advanced settings please refer to following page Adjusting the picture quality 1 Press the Menu key to bring up the OSD 2 Using the keys...

Page 23: ...11 English Adjusting the OSD position 1 Press the Menu key to bring up the OSD 2 Using the directional keys select OSD from the onscreen display Then navigate to the feature you wish to adjust...

Page 24: ...g 1 Press the Menu key to bring up the OSD 2 Using the keys select Setting from the OSD Then navigate to the feature you wish to adjust 3 The Setting menu can be used to adjust the screen Menu Languag...

Page 25: ...13 English Product information 1 Press the Menu key to bring up the OSD 2 Using the keys select Information from the OSD Then the basic information of LCD monitor will show up for current input...

Page 26: ...of monitor Check if the computer system is switched on and in power saving standby mode Unstable picture Check if the specification of graphics adapter and monitor is in compliance which may be causi...

Page 27: ...ghtness and contrast to maximum or reset to their default settings Off Check the power switch Check if the AC power cord is properly connected to the monitor Amber Check if the video signal cable is p...

Reviews: