background image

,'0+RXVLQJ

,QVWDOODWLRQ*XLGH


Summary of Contents for IDM2

Page 1: ... 0 RXVLQJ QVWDOODWLRQ XLGH ...

Page 2: ...isclaims any warranties merchantability or fitness for any particular purpose Any software described in this manual is sold or licensed as is Should the programs prove defective following their purchase the buyer and not this company its distributor or its dealer assumes the entire cost of all necessary servicing repair and any incidental or consequential damages resulting from any defect in the s...

Page 3: ...ed The openings should never be blocked by placing the product on a bed sofa rug or other similar surface This product should never be placed near or over a radiator or heat register or in a built in installation unless proper ventilation is provided 7 This product should be operated from the type of power indicated on the marking label If you are not sure of the type of power available consult yo...

Page 4: ...nel under the following conditions a When the power cord or plug is damaged or frayed b If liquid has been spilled into the product c If the product has been exposed to rain or water d If the product does not operate normally when the operating instructions are followed Adjust only those controls that are covered by the operating instructions since improper adjustment of other controls may result ...

Page 5: ...f power supply cord set provided in your keyboard manual accessories box for this unit It should be a detachable type UL listed CSA certified type SVT SJT rated 6A 125V minimum VDE approved or its equivalent Maximum length is 15 feet 4 6 meters ...

Page 6: ...ation If this equipment does cause harmful interference to radio or television reception which can be determined by turning the equipment off and on the user is encouraged to try to correct the interference by one or more of the following measures 1 Reorient or relocate the receiving antenna 2 Increase the separation between the equipment and receiver 3 Connect the equipment into an outlet on a ci...

Page 7: ...formation you need to install the system housing Conventions The following conventions are used in this manual NOTE Gives bits and pieces of additional information related to the current topic CAUTION Suggests precautionary measures to avoid potential hardware or software problems ...

Page 8: ...Installation Guide viii ...

Page 9: ...rnal Structure 4 4 Opening the Housing Panels 5 4 1 Front Panel 5 4 2 Left Panel 6 5 Installing Disk Drives 7 5 1 3 5 inch Drive 7 5 2 5 25 inch Drives 8 5 3 Hard Disk 9 6 Installing a System Board 13 7 Installing an Expansion Board 15 8 Installing a CPU or Memory Board 16 9 SCSI Backplane Board 18 9 1 Jumper and Connectors 18 ...

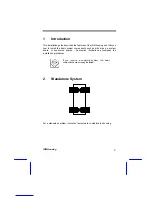
Page 10: ...tall the basic system components such as disk drives a system board or expansion boards Descriptive illustrations accompany the installation procedures If you receive a complete system the basic components are already installed 2 Standalone System For a standalone system rotate the feet outward to stabilize the housing ...

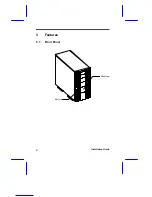
Page 11: ...Installation Guide 2 3 Features 3 1 Front Panel Keylock Panel Door ...

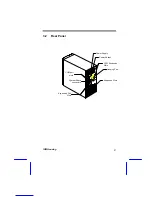
Page 12: ...IDM Housing 3 3 2 Rear Panel Power Supply Power Socket COM port slots Expansion Port Slots Expansion Slots SCSI Expansion Slots Housing Fan System Board connectors ...

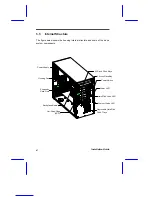
Page 13: ...ing internal structure and some of the basic system components Power Supply Backplane Board Hot Swap Cage SCSI 5 25 inch Drive Bays Expansion Card Slots Housing Fan 3 5 inch Drive Bay Hard Disk Drive LED Power Switch System Status LED Power LED Removable Hard Disk Drive Trays ...

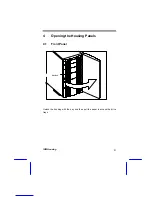
Page 14: ...IDM Housing 5 4 Opening the Housing Panels 4 1 Front Panel Unlock the housing with the key and then pull the panel to access the drive trays Keylock ...

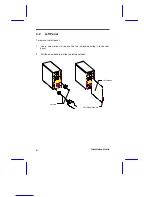
Page 15: ... Guide 6 4 2 Left Panel To remove the left panel 1 Use a screw driver to remove the two screws securing it to the rear panel 2 Pull the panel handle to slide the left panel open Left Panel Handle Left panel screws ...

Page 16: ...r removing diskette drives 5 1 3 5 inch Drive 1 Open the front panel and remove the left panel of the housing See section 4 for more information on opening the housing panels 2 Remove the screws attaching the 3 5 inch drive frame 2 pieces to the housing 3 Secure a 3 5 inch drive on the drive frame with four screws as shown below ...

Page 17: ... a CD ROM digital audio tape DAT hard disk diskette drive or any other 5 25 inch device into the drive bay 1 Open the front panel See section 5 for more information on opening the housing panel 2 Remove the screws attaching the 5 25 inch drive frame 2 pieces to the housing 3 Attach the drive guides on the sides of a 5 25 inch drive with two screws on each side ...

Page 18: ...e box includes the following components One hot swap cage with back plane board attached Three hard disk drive tray One system board connector cable Two Hard disk drive fault LED connector cable To install the hot swap cage into the housing 1 Open the front panel and remove the left panel of the housing See section 4 for more information on opening the housing panels ...

Page 19: ...Installation Guide 10 2 Attach the drive guides on the sides of the hot swap cage with two screws on each side 3 Insert the hot swap cage into the housing and secure the hot swap cage with two screws ...

Page 20: ...d For the location of the SCSI connector please refer to the system board manual Single Hot swap Cage Configuration There are two kinds of HDD Fault LED cable supplied The cable with two 4 pin connector should be use with AcerAltos 1100 and AcerAltos 11000 systems The other cable with AcerPro Station 7000 System board connector cable SCSI Terminator Power connector CN3 Connect to system board s HD...

Page 21: ... for the availability of this cable System Board Connector Cable CN1 To system board connector cable 1st hot swap cage 2nd hot swap cage SCSI Connector cable CN1 CN8 Power connector Power connector SCSI Terminator Red Strip Connect this side to the 1st hot swap Connect this side to the system board CN3 Connect to system board s HDD Fault LED connector CN3 Connect to 2nd hot swap cage HDD Fault LED...

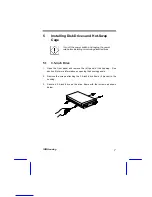
Page 22: ...your finger to release the drive tray as shown below and then pull it out 2 Place a hard disk on the tray Secure it with four screws and four metal support braces as shown below Red Strip Connect this side to the 1st hot swap Connect this side to the 2nd hot swap cage ...

Page 23: ...lling a System Board The housing accommodates various system board sizes You can rearrange the pegs on the system board plate to fit the board that you wish to install Align the system board holes to the pegs with the external ports facing the rear of the housing Secure the board with eight screws System Board ...

Page 24: ...ion Board 1 Remove an expansion slot bracket cover Save the screw to secure the expansion board 2 Align an expansion board with the open slot and insert the golden fingers into the expansion bus connector 3 Secure the board with the screw ...

Page 25: ...PU or memory board if your system board does not include them 1 Remove a bracket opposite the CPU or memory board slot 2 Insert the board into the slot Make sure that the board is properly seated in the slot 3 Secure the board with a screw 4 Align the plastic support bar with the board edge ...

Page 26: ...IDM Housing 17 5 Insert the right end of the bar into the hole near the hard disk drive frame and the left end into the hole on the rear panel Left End Right End ...

Page 27: ...th active terminator built in The SCA II connector design allows for the addition and removal of SCSI drives without shutting down the system 9 1 Jumpers and Connectors Jumper Setting Function JP1 1 2 2 3 I 2 C Buffer ID 21h 23h JP4 Short Open Terminator Power Source Both from Backplane and Host Only from Host Connector Description CN1 SCSI 68 pin P connector In CN2 Front power LED connector CN3 I...

Page 28: ...IDM Housing 19 Connector Description CN7 Slot 2 CN8 SCSI 68 pin connector Out CN9 Slot 3 JP5 Power connector S1 Slot 1 ID switch S2 Slot 2 ID switch S3 Slot 3 ID switch ...

Reviews: