87
Installing and removing the SATA
software RAID activation key
The system supports SATA software RAID 5 through the installation of
a RAID activation key on the mainboard.
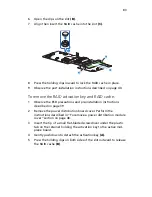
To install the RAID activation key:
1
Observe the ESD precautions and pre-installation instructions
described on page 39.
2
Remove the power distribution board cover. Perform the
instructions described in “To remove a power distribution module
cover” section on page 48.
3
Locate the SATA software RAID activation key connector on the
mainboard.
4
Remove the RAID activation key from its protective packaging.
5
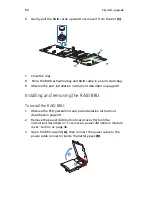
With the lighter colored edge of the RAID activation key pointing
to the edge of the mainboard, push the key onto the connector on
the mainboard.
6
Observe the post-installation instructions described on page 40.
Summary of Contents for Network Device Altos R520
Page 1: ...Acer Altos R520 Series User s Guide...
Page 10: ...x...
Page 11: ...1 System tour...
Page 38: ...1 System tour 28...
Page 39: ...2 System setup...
Page 47: ...3 System upgrade...
Page 99: ...4 BIOS setup...
Page 136: ...4 BIOS setup 126...
Page 137: ...5 Troubleshooting...
Page 158: ...5 Troubleshooting 148...
Page 159: ...Appendix A Acer Altos R520 rack installation guide...
Page 160: ...This appendix shows you how to set up the Acer Altos R520 server in a rack mount configuration...
Page 172: ...Appendix A Acer Altos R520 rack installation guide 162...
Page 173: ...Appendix B RAID configuration...
Page 184: ...174...

