


English
Acer LCD Monitor Quick Start Guide (QSG)
Important safety instructions
Please read the following instructions carefully.
1. To clean the LCD monitor screen:
• Turn off the LCD monitor and unplug the power cord.
• Spray a non-solvent cleaning solution onto a rag and clean the screen gently.
2. Do not place the LCD monitor near a window. Exposing the monitor to rain, moisture or sunlight can severely
damage it.
3. Do not apply pressure to the LCD screen. Excessive pressure may cause permanent damage to the display.
4. Do not remove the cover or attempt to service this unit yourself. An authorized technician should perform
servicing of any nature.
5. Store the LCD monitor in a room with a temperature of -20° to 60°C (-4° to140°F). Storing the LCD monitor
outside this range may result in permanent damage.
6. Immediately unplug your monitor and call an authorized technician if any of the following circumstances
occur:
• Monitor-to-PC signal cable is frayed or damaged.
• Liquid spills onto the LCD monitor or the monitor is exposed to rain.
• The LCD monitor or case is damaged.
Attaching the monitor to the stand
1. Remove the monitor bracket and base from the packaging and place it on a stable and level workspace.
2. Remove the monitor from the packaging, by aligning the front-end of the bracket with the corresponding
screw holes on the back of the display,Replace the four screws that secure the monitor to the bracket.
Tighten the screws firmly.
3. Attach the footstand to the base. Turn clockwise to lock. Ensure that the base in locked onto the stand.
4. Secure the base to the stand by turning the screw using the intergrated tab or a suitable coin.
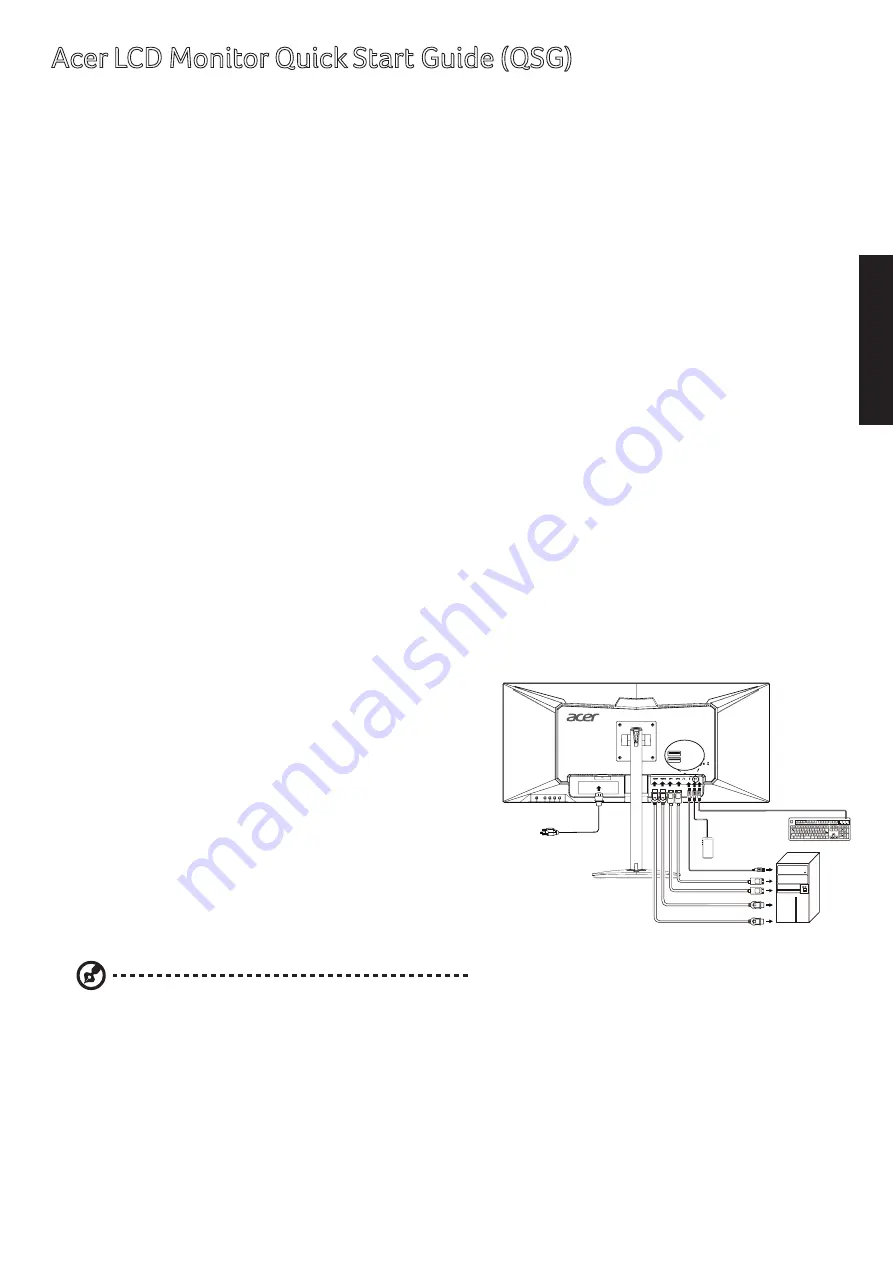
Connecting your monitor to a computer
1. Turn off your computer and unplug your computer's power
cord.
2. Connect the signal cable to the DP (optional) and/or HDMI
(optional) input socket of the monitor, and the DP (optional)
and/or HDMI (optional) output socket of the graphics card
on the computer. Then tighten the thumbscrews on the
signal cable connector.
3. USB Upstream/USB Downstream (Battery Charger)/USB
Downstream
Connect one end of the USB cable to the USB terminal of
the monitor, and connect the other end of the USB cable to
an appropriate USB port on your device.
Note:
The USB downstream port does not provide power
while the monitor switch is off. USB output: 5V/2.1A
Note:
In some circumstances when using USB 3.0 devices (hard drives or flash drives) and 2.4GHz USB
wireless devices(for example wireless mouse, keyboard, or headphone) at the same time, USB 3.0 devices
radio frequency interference may impact on 2.4GHz USB wireless devices, result in a drop in throughput on
the wireless transmission. User may feel delayed response to mouse or keyboard inputs, missing keyboard
characters or mouse commands, decreased operating distance between the 2.4 GHz USB wireless device and
its receiver.
Please refer to the following ways which helps to reduce this radio frequency interference.
1. Wireless dongle was moved away from the USB 3.0 device as possible as you can.
2. If the USB wireless receiver and USB 3.0 device have to be connected at the sameside, Position your USB
wireless receiver as close as possible to your wireless peripheral device (mouse, keyboard, headphones,
etc.). Or use a standard USB extender cable or Hub to position your USB wireless receiver as far away as
possible from your USB 3.0 port.
PC
USB Downstream
USB Downstream
USB Downstream
(Battery Charger)
USB Downstream
(Battery Charger)
USB Down tream
(Battery Charger)
USB Downstream
USB Downstream
USB Down tream
(Battery Charger)
Summary of Contents for NITRO XV0 Series
Page 1: ...USERGUIDE LCD Monitor NITRO XV0Series XV340CK ...
Page 2: ......


