background image

MP3 Player

Using the Player

12  


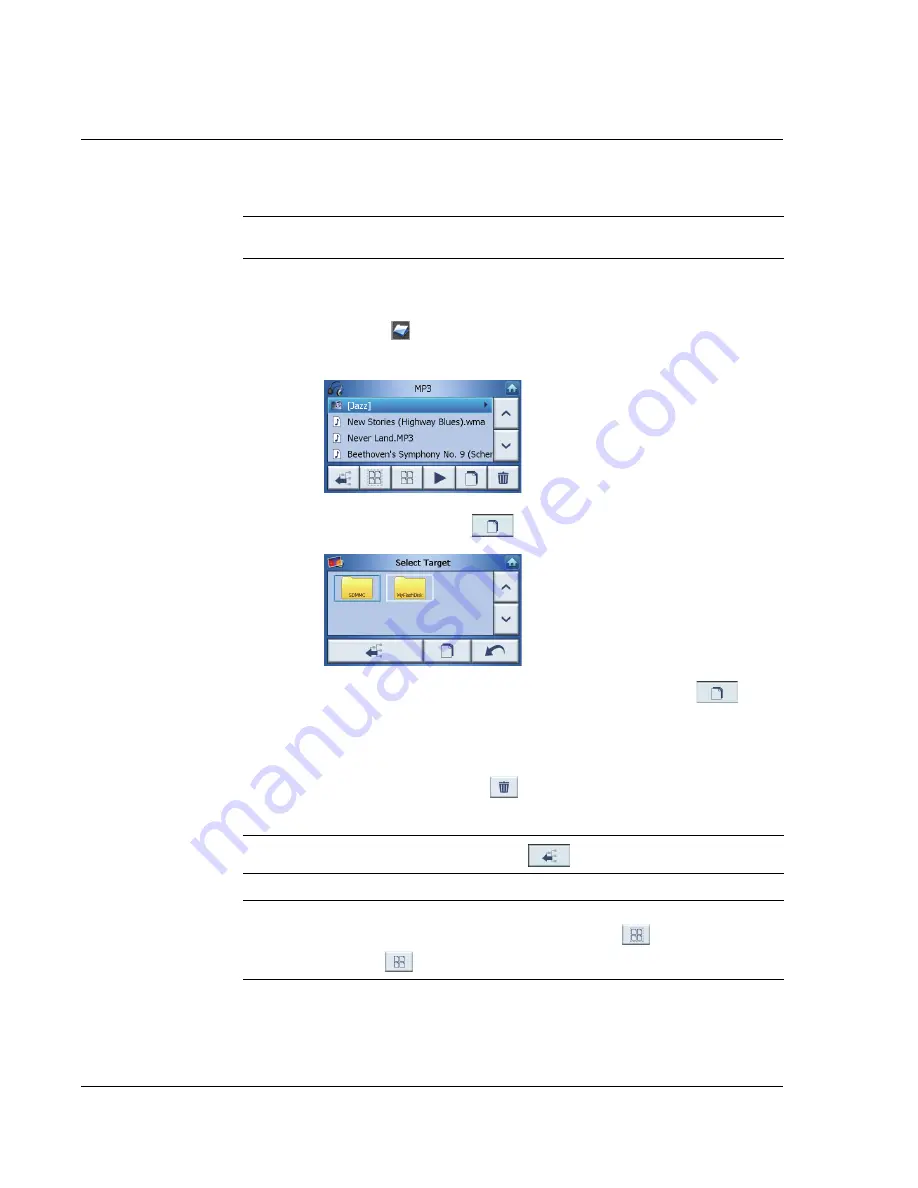
Browsing for music files

Tap the Browse button 

 .

The following screen will now appear in the display:

To copy a track, highlight it and tap 

 .You will now see the following screen:

Browse to the place where you would like to paste the track(s), then tap 


again. 

The track(s) will then be copied to this place.

Deleting a Track

To delete a track, highlight it and tap 

 .

NOTE: The appearance of the Select linear/repeat button changes depending on the current 
mode. 

NOTE: To move up one level while browsing, tap 

NOTE: To deselect a highlighted track, simply tap it again. You will see that it is no longer 

highlighted. You can also highlight all tracks by tapping Select all 

, or deselect all tracks 

by tapping Deselect All 

.

Summary of Contents for p600 Series

Page 1: ...Acer p600 Series Portable Navigator ...

Page 2: ...chanically by photocopy recording or otherwise without the prior written permission of Acer Incorporated Acer p600 Series Portable Navigator Model number __________________________________ Serial number ___________________________________ Date of purchase ________________________________ Place of purchase ________________________________ Acer and the Acer logo are registered trademarks of Acer Inc...

Page 3: ...ecycled or disposed of according to local state or federal laws For more information contact the Electronic Industries Alliance at www eiae org For lamp specific disposal information check www lamprecycle org Important safety instructions Read these instructions carefully Save them for future reference Follow all warnings and instructions marked on the product Unplug this product from the wall out...

Page 4: ...fied service personnel Unplug this product from the wall outlet and refer servicing to qualified service personnel under the following conditions When the power cord or plug is damaged or frayed If liquid has been spilled into the product If the product has been exposed to rain or water If the product does not operate normally when the operating instructions are followed Adjust only those controls...

Page 5: ...0 operating system Samsung 400 MHz processor SiRF Star III LP chipset and firmware solution Rechargeable 1200 mAh Lithium Ion battery Certain models only Wide and accurate GPS coverage Intuitive and Intelligent Navigation software Integrated chip antenna for optimum satellite pick up Mobile design Compact and lightweight body makes it easy for users to carry it anywhere while driving or hiking Car...

Page 6: ...th backlight illumination Simple easy to use user interface with large icons and command buttons Multi language support for user interface Advanced power saving options Multimedia programs MP3 for your musical entertainment Photo for your favourite digital pictures Contacts management program Program for managing contact information on your device ...

Page 7: ... Acer p600 Series Portable Navigator Thank you for purchasing the Acer p600 Series Portable Navigator The Acer p600 Series Portable Navigator box contains all of the items listed below Acer p600 Series Portable Navigator unit Car mount kit Car mount Car holder ...

Page 8: ...Unpack the Acer p600 Series Portable Navigator vi Car charger Wall charger Manufacture option Mini USB Sync and charge cable ...

Page 9: ...Acer p600 Series Portable Navigator Warranty Booklet Manufacture option Navigation software Quick Starter Guide Manufacture option Navigation software CD Manufacture option NOTE Report any product defects or missing items to the place of purchase immediately Save the boxes and packing materials for future use Some models may include optional accessories that might not be shown in the above illustr...

Page 10: ...hardware interface of the Acer p600 Series Portable Navigator and its peripherals Instructions for setting up the device and some basic system operations are also discussed System tour This section gives you a tour of the device hardware interface Front and Rear Panels 1 2 3 4 6 7 5 ...

Page 11: ...4 NAV Home Navigation button Pressing this button while in the Main Menu panel will bring you to the Navigation panel Pressing this button while in any panel other than the Main Menu will bring you to the Main Menu 5 Microphone Internal microphone is used during phone communication 6 Volume up button Turns up the volume of the speaker 7 Speaker Emits system sounds NOTE For more information on how ...

Page 12: ... hard reset of the device For more information on performing a hard reset see Performing a hard reset on page 33 5 Docking connector Manufacture option Connects to Car Mount Kit 6 USB port Connects the device to computer running on the Microsoft Windows platform Also serves as the power connector for charging the device Connects to external TMC module Selected models only 7 Soft reset button Used ...

Page 13: ...first System tour xi Left and right panels No Icon Component Description 1 SD MMC slot Accepts SD and MMC storage cards allowing you to use audio image and map files stored in it for use with internal applications 1 ...

Page 14: ...tly loosen the knob to adjust the viewing angle in a left right direction 3 Vertical angle adjustment knobs Slightly loosen the knobs to adjust the viewing angle in an up down direction 4 Extendable rod Extend the rod to adjust the device position in a front to rear direction 5 Suction cup locking lever Secures the vacuum seal of the car mount 6 Suction cup Fixes the car mount on the selected moun...

Page 15: ...First things first Peripherals tour xiii Chargers Car charger Wall charger USB cable The included USB cable is also used to transfer files from your computer to your device ...

Page 16: ...on tasks to start using the device straight out of the box 1 Unpack the device 2 Turn on and configure the device 3 Set up the device in your vehicle NOTE After powering your device on for the first time by moving the power switch to the right see diagram above you should not use the power switch again unless you want to do a hard reset See Performing a hard reset on page 33 for more information I...

Page 17: ...ion cup For dashboard installation procedures using the self adhesive power disc connector refer to the Acer p600 Series Portable Navigator Getting Started Guide 1 Clean the mounting surface with a glass cleaner and a clean cotton cloth 2 If the ambient temperature is below 15 C 60 F warm the mounting area and the suction cup e g with a hair dryer to ensure a strong suction bond 3 Install the car ...

Page 18: ... sure that the suction bond is strong enough before proceeding to the next step Insert the pegs on the car mount s holder plate to the holes on the back of the car holder then move the car holder downwards until both parts are engaged 4 Insert the Navigation software SD card into the device ...

Page 19: ...ging NOTE If the car engine is turned off you may be required to switch the vehicle ignition back into the Accessories position Consult your vehicle owner s manual NOTE The device comes with the battery pre charged to at least 30 capacity You can start using it once it is mounted in your vehicle and connected to the cigarette lighter However for maximum usage time you need to charge your device to...

Page 20: ...er calibrating the screen the Main Menu screen displays This is also referred to as the Home screen To configure system settings If you intend to start using your Acer p600 Series Portable Navigator at once we recommend that you configure the language and date time settings first The rest of the user preferences can be set up later 1 Tap Settings on the Main Menu panel 2 To set the system language...

Page 21: ...reen For more information on the rest of the system configuration options go to Settings on page 24 Congratulations Your new Acer p600 Series Portable Navigator is now ready for use Proceed to Acer p600 Series Portable Navigator fundamentals on page 1 for more information on the device s user interface or you can refer to the Navigation software Quick Starter Guide to start using the device in nav...

Page 22: ...vigator fundamentals 1 Hardware interface 1 Using the touch screen backlight 1 Using the SD MMC slot 1 Establishing device PC connection 3 Recharge the device via the USB connection 3 Installing Microsoft ActiveSync 3 Minimum installation requirements 3 To install Microsoft ActiveSync on your computer 4 Recharging the Acer p600 Series Portable Navigator 5 To recharge the device using the car charg...

Page 23: ...ing Sending contacts 19 Importing 19 Exporting 20 Sending the Contact Information to Another Device 21 6 Bluetooth 22 Bluetooth Options 22 7 Settings 24 Accessing the Settings Screen 24 Adjusting the Settings 25 Setting the Volume 25 Choosing the Language 26 System Information 27 Power 28 Standby Settings 28 Setting the Date Time 29 Changing the Time Zone 29 Choosing Daylight Saving 30 Changing th...

Page 24: ... countries 35 LCD pixel statement 35 Radio device regulatory notice 36 General 36 European Union EU 36 List of applicable countries 36 The FCC RF safety requirement 36 Canada Low power license exempt radio communication devices RSS 210 37 Exposure of humans to RF fields RSS 102 37 FAQs 38 Customer support 40 Product warranty 40 System specifications 41 Hardware features 41 Software specifications ...

Page 25: ...itions viewing the information on your device may be difficult If this is the case activate the backlight by tapping on the screen to illuminate the touch screen Using the SD MMC slot Your Acer p600 Series Portable Navigator has an SD MMC slot compatible with a range of SD and MMC storage cards Also the Acer p600 s GPS navigation system has its core on the Navigation software program Using this pr...

Page 26: ...ill signal that the card is already properly seated within the slot The card is secure when it is not protruding from the slot To remove a storage card 1 Hold the device securely then push against the top of the card as if you were pushing it further into the slot letting the card spring out An audible system sound will signal that the card has been released 2 Gently remove the card from the slot ...

Page 27: ...ation between your Acer p600 Series Portable Navigator and a computer running on the Microsoft Windows platform Minimum installation requirements Microsoft Windows XP 2000 ME and 98 SE Microsoft Internet Explorer 5 0 or later Hard disk drive with 12 to 65 MB of available hard disk space Available USB port CD ROM drive NOTE If you have a previous version of the Microsoft ActiveSync installed in you...

Page 28: ...table Navigator CD into your computer s CD ROM drive The CD s welcome page will be displayed 3 Click the installation language of your choice 4 Click Install ActiveSync on the Please select your task screen The installation wizard will automatically begin 5 Follow the on screen instructions After installation the ActiveSync icon will appear on your computer s system tray on the lower right hand co...

Page 29: ...However this may be difficult when there s no available computer on hand When your device battery is drained while on the road you can still recharge your device by using either the car charger cable bundled with your device Recharging time varies depending on type of charge but a charge from empty to full capacity is recommended at about 3 5 hours NOTE If the battery level reaches very low status...

Page 30: ...ehicle To recharge the device using the USB cable The Mini USB Sync and charge cable that comes with your device enables you to connect your device to a computer running on the Microsoft Windows platform When connected the device battery is also recharged via the USB connection Go to the Establishing device PC connection on page 3 for instructions on how to connect your Acer p600 Series Portable N...

Page 31: ...gation screen Using the Acer p600 Series Portable Navigator touch screen The Acer p600 Series Portable Navigator touch sensitive screen allows for a more natural way of entering information into the device using fingers instead of a stylus no more wasted time finding a lost stylus or fumbling with an awkwardly shaped one In this Guide the tap and hold and drag actions are done by Tap Touch the scr...

Page 32: ... more information on this status icon There are five program icons on the Main Menu panel Tap to display the Navigation panel Refer to the Navigation software Quick Starter Guide or the Navigation software User s Guide for more information on how to use the device in navigation mode Tap to launch MP3 for music mode operation Go to MP3 Player on page 10 for more information Tap to launch Photo for ...

Page 33: ... Function Switch the unit on and tap Navigation in the Main Menu screen After the application loads the main Navigation menu will appear For more information regarding the Navigation function please see the Navigation software Quick Starter Guide or the Navigation software User s Guide ...

Page 34: ... the track s you want to play If you cannot see the track s you want to play use the scroll buttons to search further up down the list Tap to play the track s The media player screen will appear see next image and the first song will begin to play NOTE Music must be loaded to the SD memory card from your computer See Establishing device PC connection on page 3 for more information NOTE The followi...

Page 35: ... To adjust the volume slide the volume control to the right increase or left decrease Alternatively you can use the hot keys to adjust the volume Changing the order of tracks To choose between playing tracks in random or sequential order tap the Shuffle Sequential button Repeating tracks To choose between repeating tracks or not tap the Linear Repeat button Song title Distance Main Menu Browse Lin...

Page 36: ...k s then tap again The track s will then be copied to this place Deleting a Track To delete a track highlight it and tap NOTE The appearance of the Select linear repeat button changes depending on the current mode NOTE To move up one level while browsing tap NOTE To deselect a highlighted track simply tap it again You will see that it is no longer highlighted You can also highlight all tracks by t...

Page 37: ...u screen The Photo Viewer screen will now appear in the display Using the Photo Viewer You can view either individual photos or slideshows on your device Viewing photos If you cannot immediately see the photo thumbnails you are looking for but see folders then you can tap these to access their contents You can also tap Scroll up or Scroll down to search up or down the list of folders or photos ...

Page 38: ... are defined as follows Zoom in slide up or zoom out slide down Go to previous photo Go to next photo Browse photos View photo full screen Start slideshow Rotate photo 90 Return to Main Menu NOTE When not all of the photo is viewable due to using the zoom function you can drag the photo by tapping anywhere on the photo and moving it in any direction ...

Page 39: ...se to the place where you would like to paste the photo s then tap again The photos will then be copied to this place Deleting photos To delete a photo tap which photo s you would like to delete and then tap The photo s will then be deleted NOTE To deselect a highlighted photo simply tap it again You will see that it is no longer highlighted You can also highlight all images by tapping Select all ...

Page 40: ...tails including importing exporting and sending to other Bluetooth enabled devices Accessing Contacts Switch the unit on and tap Contacts in the Main Menu screen The Contacts screen will now appear in the display Scroll up Scroll down Create new contact Edit contact Select All Deselect All ...

Page 41: ... GPS device or send panic information to these contacts through your Bluetooth enabled phone Managing Contacts Creating a New Contact To create a new contact tap the Create new contact button The following screen will now appear Delete contact Import Export Send contact Return to Main Menu scroll up scroll down previous contact Next contact Enter into navigator ...

Page 42: ...our panic list tick the Used for panic checkbox If you want to immediately feed this contact s address into your GPS navigator tap the Enter into navigator button If you have not yet saved the contact information you may be asked if you wish to do so now To leave this screen and return to your list of contacts tap Back Editing a contact To edit a contact tap Scroll up or Scroll down to highlight a...

Page 43: ... or export a contact tap the Import Export send contact button from the main contacts list You will now see the following screen To import a contact from the SD MMC card to the main memory tap Import The following screen will now appear You can either Tap the checkboxes beside each contact to select tapping again will deselect or Tap Select All to select all contacts or Tap Deselect All to deselec...

Page 44: ...contact from the main memory to the SD MMC card tap Export The following screen will now appear You can either Tap the checkboxes beside each contact to select tapping again will deselect or Tap Select All to select all contacts or Tap Deselect All to deselect all contacts Once you have selected the contact s you wish to export tap Export ...

Page 45: ...ion to Once the search is finished a list of available devices will be shown as follows Tap the down arrow to display a drop down list and choose the device you want to send contact information to The information will now be sent NOTE It may be necessary to input a pin code on your other Bluetooth device before contact information is sent If this is the case then please enter 1111 when asked for a...

Page 46: ...nnect mobile Bluetooth must be enabled and phone must be paired with device NOTE Bluetooth function is for selected models only NOTE Before you can use the Connect mobile or Dial features your phone must be paired with your Acer p600 Series Portable Navigator To go through the pairing procedure please consult your mobile phone s user guide You must enable Bluetooth on your Acer p600 Series Portabl...

Page 47: ...ed and phone must be paired with device A keypad will then appear on screen as follows Use the keypad enter a number then tap Dial To end a call tap Back When this call is ended your device will still be paired with your phone and will continue to act as a speakerphone until you disable Bluetooth ...

Page 48: ...Switch the unit on and tap Settings in the Main Menu screen The Settings screen will now appear in the display From this screen you can access Volume Set the default volume Language Select the default language Sys Info View system information Power Adjust power saving options Date Time Set the date time Misc Adjust other settings ...

Page 49: ... Volume screen will now appear in the display Tap the or buttons to increase or decrease the volume Alternatively you can use the hot keys to increase or decrease the volume Check the Enable sounds for taps option if you would like to hear a clicking sound each time you tap a button Once you have finished tap Back ...

Page 50: ...een will now appear in the display To change the Text language tap the down arrow to display a drop down list of languages then tap a language from the list To change the Voice language tap the down arrow to display a drop down list of languages then tap a language from the list Once you have finished tap Back ...

Page 51: ...System Info screen will now appear in the display Here you can see your device s Product ID Serial Number OS Version GPS firmware version PCB Version Bluetooth MAC Address Used Capacity of flash disk Manufacturer and Copyright statement trademark logo 2006 Acer Inc To leave this screen tap Back ...

Page 52: ...the or buttons beside Backlight To adjust how long the backlight will stay on while using battery power tap the or buttons beside Battery To adjust how long the backlight will stay on while using external power tap the or buttons beside AC Power Standby Settings At the bottom left hand corner of the Power screen you can see the current battery status ...

Page 53: ...ff when on battery power only Once you have finished tap Back Setting the Date Time Tap Date Time on the Settings screen The Date Time screen will now appear in the display Changing the Time Zone To change the time zone tap the down arrow beside Time Zone From the drop down list that appears tap on the time zone you want to use standby settings screen ...

Page 54: ... will now appear To adjust the year tap the or buttons beside Year To adjust the month tap the or buttons beside Month To adjust the day tap the or buttons beside Day Once you have finished tap Back Changing the Time To change the time tap Time on the Time Date screen The Time screen will now appear To choose 24 hour or 12 hour format tap either the 24HR or 12HR checkbox To adjust the hour tap the...

Page 55: ...device back to factory default settings tap Back to Factory Default To recalibrate the screen tap Calibration and follow the on screen instructions to calibrate the device To send an emergency message to your chosen contact s tap Send Panic Info For more information on setting up contacts to receive panic information see Creating a New Contact on page 17 To exit this screen tap Back ...

Page 56: ...reen A soft reset allows your device to get a fresh start similar to rebooting a computer This will restart your device and adjust memory allocation All records and entries are retained after a soft reset GPS settings are also retained Performing a soft reset Hold the device securely then press the soft reset button on the right side of your device NOTE Performing a soft reset will not clear the R...

Page 57: ...These default settings have been selected to optimize your device s performance To load the factory default settings 1 Tap Settings on the Main Menu panel 2 Tap Misc on the Settings panel 3 Tap Back to Factory Default on the Misc screen 4 Tap OK on the dialog box 5 After the factory reset reconfigure your device s user preferences NOTE Performing a hard reset will clear the RAM in the unit and res...

Page 58: ...tal device pursuant to Part 15 of the FCC rules These limits are designed to provide reasonable protection against harmful interference in a residential installation This device generates uses and can radiate radio frequency energy and if not installed and used in accordance with the instructions may cause harmful interference to radio communications However there is no guarantee that interference...

Page 59: ... any interference received including interference that may cause undesired operation Notice Canadian users This Class B digital apparatus complies with Canadian ICES 003 Remarque à l intention des utilisateurs canadiens Cet appareil numerique de la classe B est conforme a la norme NMB 003 du Canada Declaration of Conformity for EU countries Hereby Acer declares that this Acer p600 Series Portable ...

Page 60: ...e countries EU member states as of May 2004 are Belgium Denmark Germany Greece Spain France Ireland Italy Luxembourg the Netherlands Austria Portugal Finland Sweden United Kingdom Estonia Latvia Lithuania Poland Hungary Czech Republic Slovak Republic Slovenia Cyprus and Malta Usage allowed in the countries of European Union as well as Norway Switzerland Iceland and Liechtenstein This device must b...

Page 61: ...rference and 2 This device must accept any interference including interference that may cause undesired operation of the device Operation in 2 4 GHz band To prevent radio interference to the licensed service this device is intended to be operated indoors and installed outdoors is subject to licensing Exposure of humans to RF fields RSS 102 The Acer p600 Series Portable Navigator employs low gain i...

Page 62: ...Settings on page 31 for instructions Multimedia mode Why can t I view my picture files You may be trying to view an image that is not supported by Photo Go to Photo Viewer on page 13 for a list of supported image formats Why can t I play my music files You may be trying to play a file that is not supported by the MP3 Player Go to MP3 Player on page 10 for a list of supported file formats Navigatio...

Page 63: ... by using the Factory Reset button on the System Info screen Go to Loading the factory default settings on page 33 for instructions What should I do if the system stops functioning normally Perform a soft reset on the device Go to Performing a soft reset on page 32 for instructions Power I couldn t turn on the device The battery power may be depleted Recharge the device Go to Recharging the Acer p...

Page 64: ...User Guide on your regional Acer web site Go to http global acer com support If the problem still persists you will need technical assistance Refer to the http global acer com about webmaster htm web site for information on how and where to contact the Acer Service Centers available in your area Product warranty Refer to the Acer p600 Series Portable Navigator Warranty Booklet Manufacture option f...

Page 65: ...ating system and embedded applications Model with 2 GB Flash memory is also available Power High density rechargeable 1200 mAh Lithium Ion battery 3 5 hours charging time from empty to full capacity Certain models only Recharging options Wall charger Manufacture option Car charger USB cable Power status LED indicator Display 4 inch screen for a wider viewing angle Audio 1W built in speaker 3 5 mm ...

Page 66: ...ontact entries Integrated with your Navigation software for faster navigation using address entries as destination points Multimedia applications MP3 supports MP3 WMA and WAV formats Photo supports BMP GIF still images JPEG and PNG formats Bluetooth Manufacture option Bluetooth Version 2 0 HS Headset HF Hands free Send location TMC Traffic Message Channel Manufacture option Real time traffic and w...

Page 67: ...for multi angle adjustment for optimum viewing position Software Multi language user interface options Contacts integration with navigation function System configuration based on individual user preferences Power saving options Auto off function for touch screen backlight Mobile design Suction based car mount facilitates multi vehicle usage Compact and lightweight body makes it easy for users to c...

Page 68: ...ar charger Wall charger Manufacture option USB cable Accessory options External GPS antenna External TMC module with antenna Aspect Description Temperature Operating 0 C to 40 C Storage 20 C to 60 C Relative humidity non condensing Operating 20 to 90 RH Non operating 20 to 90 RH Aspect Description ...

Reviews: