


English 29
* Specifications and external appearance may change due to improvement.
PlasMaster
is a worldwide trademark of Acer PDP and is a registered in Taiwan, U.S.A. and other
countries or areas.
Regulation---Acer PDP 7859
* UL, CSA (FCC Class A)
* TUV
* CE
* CCIB
* BCIQ
* C-Tick
* VCCI
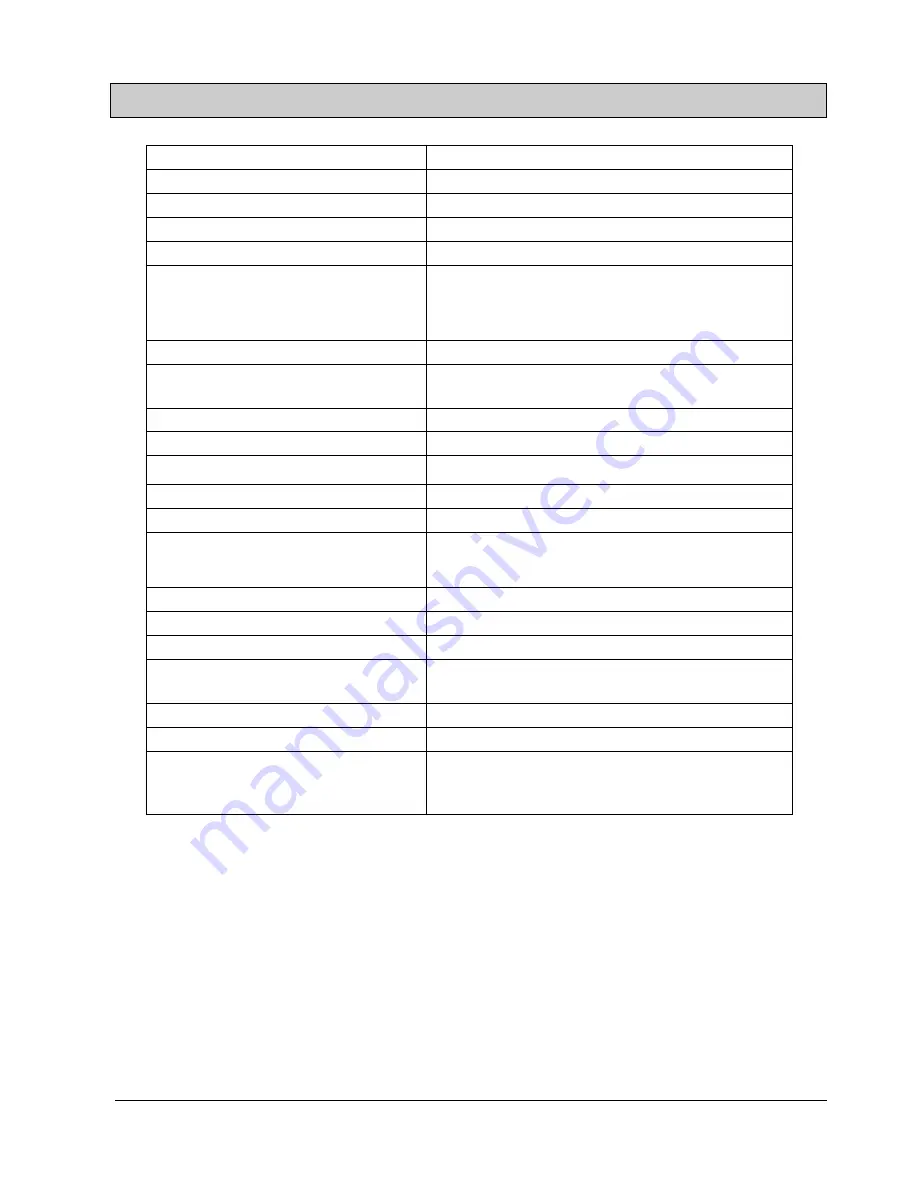
SPECIFICATION
Model
Acer PDP 7859
Screen Size
42” wide screen
Dimension
1029W × 630.5H × 106.8D (mm)
Effective Display Area
920.16 W × 518.4 H (mm)
Aspect Ratio
16: 9 (Wide)
Number of pixel (Resolution)
852 H (×3) × 480 V dots (each pixel contains 3 sub-
pixels R, G, B respectively)
WVGA
Pixel Pitch
1.08 H × 1.08 V (mm)
Display Modes
Composite Video input, S-Video input, Component
Video input, and RGB input
Colors
16.77 million (for each of 256 RGB gradations)
Gray scale level
256 (8-bit color for each R, G, B)
Brightness
260 cd/m
2
(panel only)
Contrast Ratio
450: 1 (panel only; with Vsync= 60 Hz)
Viewing Angle
Over 160º
Operating Conditions
Temperature: 0
°
to 45
° C
Humidity: 20% to 85%
Total Weight
33.6 Kg (without stand)
Power Supply
90 ~ 264V
Power Consumption
350 W
External Equipment Terminals
Composite input, S-Video input, Component input,
RGB input, and PS2 terminal
External Speaker Output Terminal
Effective Max. Output: 10W+10W, 8
Ω
Applicable TV Systems
NTSC/PAL-M/PAL-N/SECAM
Other Accessories
1 Remote Control, 2 AAA Batteries, 1 User
Manual, 1 Warratny Card, 1 Power Cable, 1 PC D-
Sub Signal Cable, 1 Component-Video, 1 S-Video
Summary of Contents for PDP 7859
Page 4: ...English 3 oil ...
Page 9: ...English 8 Accessories ...


