background image

1

Smart Touch Kit

USER MANUAL

Summary of Contents for Smart Touch Kit

Page 1: ...1 Smart Touch Kit USER MANUAL ...

Page 2: ...oduction and Features 3 Hardware Installation 5 System Debugging 8 Calibration Software 13 Gesture recognition Introduction 21 Application Software 22 Troubleshooting 28 Important information 29 Sales Feedback Form 30 ...

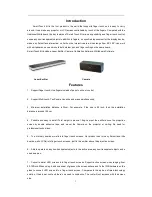
Page 3: ...eously 3 Minimum installation distance is 35cm For example if the size is 80 inch then the installation distance is around 100cm 4 Portable and easy to install Total weight is around 1 6kg Just put the emitter above the projection screen by double adhesive tape and mount the Camera on the projector or ceiling No need for professional technicians 5 Turn ordinary boards or walls into finger touch sc...

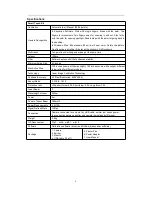
Page 4: ...40 inches Max Active Size 120 inches rooms without sunlight 100 inches rooms with sunlight different throw ratios for different models Technology Laser Image Calibration Technology Positional Accuracy 3 Pixel Resolution 4096 4096 Aspect Ratio 4 3 16 9 16 10 Projection ratio Ultra short throw 0 28 Short throw 0 34 Long throw 1 34 Laser Beam 2 Wavelength of Laser 940nm Power 5w Power of Laser Beam 2...

Page 5: ... screen and the inner frame of the whiteboard for emitter installation 5 Before installing the emitter please put one piece of 3M adhesive tape on the back side of emitter body Measure the central point of the top side of projection screen paste and fix emitter 3cm above the central point Note the central point of emitter and the central point of projection screen should be on the same straight li...

Page 6: ...tter by 4 screws as shown in Pic Note if it s a Dual Screen Smart Touch Kit one emitter should be installed 3cm above the top of projection screen on the left side of whiteboard the other emitter should be installed 3cm above the top of projection screen on the right side of whiteboard red mark refers to the central point as shown in pic Emitter emitter emitter ...

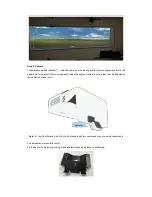
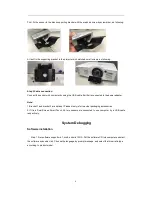
Page 7: ...vent it from moving wobbly Adjust the angle of camera to ensure that it can be detected by the emitter as shown in pic Note If it is a Dual Screen Smart Touch Kit please install two cameras on two projectors respectively 2nd installation method Bracket 2 Fix the sensor to projector by using matched black supporting bracket as following camera ...

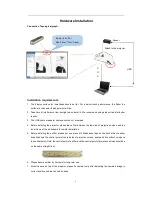
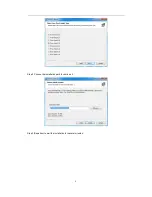
Page 8: ...ected to the power adapter Note 1 Bracket 1 and bracket 2 are optional Please kindly refer to actual packaging accessories 2 if it is a Dual Screen Smart Touch Kit two sensors are connected to one computer by a USB cable respectively System Debugging Software installation Step 1 Our software support win7 win8 and win10 OS Put the software CD into computer and start the software by double click Cho...

Page 9: ...9 Step 2 Choose the installation path to continue it Step 3 Be patient to wait the installation for several minutes ...

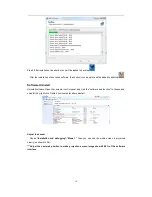
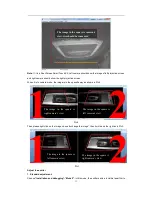
Page 10: ...ninstall software Open the computer control panel and click the software and function to choose and uninstall it by right click Restart your computer after uninstall Adjust the sensor Chose Installation and debugging Mode 1 then you can see the whole screen is projected clearly as shown in Pic Adjust the camera s position to make projection screen image show 60 80 of the software interface ...

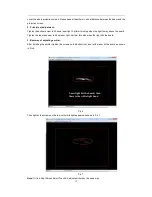
Page 11: ...n the image chose exchange the image then it will be on the right as in Pic5 Pic 5 Adjust the emitter 1 Standard adjustment Choose Installation and debugging Mode 2 In this mode the emitter emits a invisible laser film to The image in the square is camera s view it is should be trapezoid The image in the square is right camera s view The image in the square is left camera s view The image in the s...

Page 12: ...he top side screw to tilt up laser light Perform this step when the light hits the board 3 Best way of adjusting emitter After installing the emitter tighten the screws on the bottom first and let the laser hit the board as shown in Pic6 Pic 6 Then tighten the screws on the top until white light appears as shown in Pic 7 Pic 7 Note If it is a Dual Screen Smart Touch Kit adjust emitters by the same...

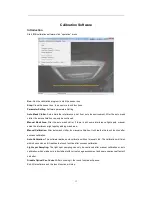
Page 13: ...ed the interference light spot by adding mask area Manual Calibration After auto mask clutter do manual calibration It will realize the touch function after success calibration Auto Calibration The software realizes auto calibration without manual click The calibration will finish within 5 seconds and it realizes the touch function after success calibration Light spot Sampling The light spot sampl...

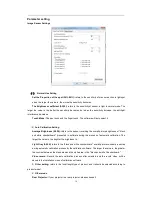
Page 14: ...e overall picture brightness of black and white checkerboard presented in software during the process of automatic calibration The larger the value is the brighter the brightness is Light Gray 0 255 refers to the black and white checkerboard overall picture contrast presented during automatic calibration process by the calibration software The larger the value is the greater the contrast between t...

Page 15: ...esture Settings Start All Windows Gesture refers to the switcher of Windows Gesture Palm in multiples of spot 3 7 refers to the sensitivity of palm gesture The lower the value is the better the sensitivity is 2 GLBoard Gesture Settings Start All GLBoard Gesture refers to the switcher of GLBoard gesture Eraser in multiples of spot 3 7 refers to the sensitivity of palm eraser gesture The lower the v...

Page 16: ...xceptional Process In Exceptional Process you can add exceptions Click Add exception to select the process to be added to Exceptional List Select the process added in Exceptional List and then Gesture recognition can be applied to the program you want to use The user can start and close any gesture recognition based on their requirements This function is setting gesture recognition for third party...

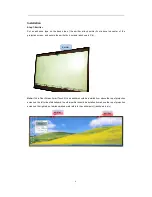
Page 17: ...om Mask Bitmap Edit or press Ctrl Shift A The program will specify the active area automatically Manual Calibration After auto mask clutter click manual calibration and Then you will see Use finger or IR pen tip to do calibration by touching crosshair When it finishes the software will be minimized to taskbar and it will realize the touch function ...

Page 18: ...return to projection image When you open the software the image is as below and hint auto calibration succeeded Lightspot Sampling After the auto calibration and manual calibration click lightspot sampling and the projection image will change to lightspot sampling interface Use finger or IR pen to touch the red box and continue the next one when the red box change to green ...

Page 19: ...e interface Adjust the projection image into the red frame according to the camera debugging requirement 2 Tuning Laser Transmitter Image Mode In this mode emitter emits a set of invisible laser film 4mm above the whiteboard and the beam should be parallel with the whiteboard The light spot size should be not less than 9 pixels when you use finger to touch 4 corners ...

Page 20: ... you can do multi touches in Windows 6 Touch Pad Aspect Ratio The default mode is auto selected When the deviation of touch pad accuracy is more than 3cm you can try following 3 aspect ratios 16 9 16 10 4 3 to rectify it 7 Update Firmware Don t use it in normal usage condition When you meet the abnormal image in camera mode such as black screen white screen etc please contact our technical person ...

Page 21: ... finger tap twice quickly at the same position Right Click single finger stays for 2 or 3 seconds at the same position for right click function Scroll Bar open a website scroll the page up and down by single fingers directly Gesture recognition in Windows Gesture recognition in education software GLBoard ...

Page 22: ...eas shown as the following Function of each button on the tool bar Icon Name Function Start menu Open the menu list Resource Local resource Click to find many pictures Network resource Click to search any picture you likeon the web New page There are four options Back Go back to the previous page Forward Forward to the next page Work area picture or text editing Toolbar ...

Page 23: ...ert text frame then edit the words Fill Fill geometric shapes with different colors Select stroke Select the handwriting on the page and drag and zoom Select picture Move geometric shapes text and pictures Zoom in and out Zoom in or zoom out the picture Pen color Adjust color of the pen Fill color Choose the color to fill Pen width Set stroke width and line type Eraser Three options Undo Cancel th...

Page 24: ...ction Windows Back to the desktop Pen Write like a ball pen New page Open a new white page New page Open a new black page Back Go back to the previous page Forward Forward to next page Eraser Erase by stroking Back Go back to the main page of GLBoard Note page Make the window screen as the background ...

Page 25: ...ll be shown Open Open an existed PPT PDF PTS file Save Save the file under editing Save As Save as a new file Export Export as an image file to Windows Print Preview After print settings for the document are set the user can preview the print result of the document Print Any words images or visible data in GLBoard could be output on media like paper through the printer Screenshot Go back to Window...

Page 26: ...ool for math Triangle Common teaching tool for math Ruler Common teaching tool for math Timer Timing tool Media Player Media player Video Capture The window for playing video in GLBoard Mask Similar to a movie screen for the teacher to explain examples Questions and answers are displayed separately Magnifying glass Magnify the important part to facilitate teaching Spotlight Spotlight can highlight...

Page 27: ...27 Slide page navigation Show the slides in the PPT First open a PPT file and then use this function to show Playback Replay Online resource Pep com cn Connect to pep com cn Exit Exit GLBoard ...

Page 28: ...e requirements and whether the image is clear or not 2 Toggle tuning webcam image mode and tuning laser transmitter image mode repeatedly to observe if the brightness of the image changes If the image is always black please change the sensor 3 Observe the picture after the calibration failure and analyze the overall brightness of the black and white checkerboard If it is too bright please adjust t...

Page 29: ...he bulb of the projector as it will harm your eyes Warning When installing the projector brackets two persons are needed to work together Warning When fixing the camera on the projector at a high position extra caution is needed Warning The product cannot be installed in a place exposed to direct sunlight Warning When installing the USB cable and the cable of the adapter should be securely fixed t...

Page 30: ...will continuously help to improve product quality plays a very important role for your cooperation our heartfelt thanks to we can further cooperation Thank you for your cooperation with us and hope we can reach further cooperation in the future User Name Add Email Tel Fax Contact Person Delivery Date Product Name Quantity Specification Contract No Project Name Usage Time Usage Description Service ...

Reviews: