background image

Microphone Descriptions

1

2

3

4

5

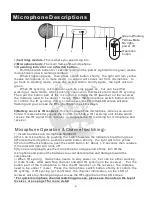
1)

Cartridge module

- This is where you would sing into.

2)

Microphone body

- The main frame of the microphone.

3)

Operating indicator


and


Hold the switch


button for 1 second to turn on the  power. Light will turns green means 

microphone is now in working condition. 


When it lights up green

then


press


switch


button


shortly

the


light


will


turn


yellow

,


means


microphone


is


in


mute


mode

no


sound


will


comes


out


from


microphone

to


go


back


to


working


mode

press


the


switch


button


shortly


again

the


light


will


turn


green. 


When


IR


syncing

microphone


needs


to


stay


power


on

but


can


be


either


working


or


mute


mode

After


switching


channel


on


the


receiver and


start


IR


syncing

Then


put


the


button


part


of


the


microphone


to


face


the


IR


launcher


on


the


receiver

the


distance


need


to


be


under


1


meter

Press


the


microphone


switch


button


shortly


to


confirm


the


IR


syncing

.

 If IR sync successes, the CH in the LCD screen will stop 

flashing and you can see the RF signal bar on the LCD screen.  

5)Battery cover


&


IR


receiver

- This is the base of the microphone 


where you


would 

hold it. It is also a battery cover. the


bottom


part


has


a


IR


receiving


unit


inside


which


receive


the


IR


signal


from


receives


to


complete


the


IR


matching


for


microphone


and


receiver

4)Switch


button-

Indicate
Light


Green

=

Working

Yellow

=

Mute

No


light

power


off

Microphone Operation & Channel switching):

1

)

Install


batteries into microphone handheld

.

2)Turn


on


microphone


by


pushing


the


switch towards, the indicator should turn green.

3)To mute the microphone, push the switch button


shortly

the


light


will


turns


yellow

.

4)To turn off the microphone, push the switch button


for


about


1

~

2


seconds


then


release 

it, the indicator light


will


turns


off

.

5)If you are not going to use the microphone for a long period of time, turn off the 
microphone and pull out the batteries to avoid deterioration and damage toward the 
components.

6)

When


IR


syncing

microphone


needs


to


stay


power


on

but


can


be


either


working


or


mute


mode

After


switching


channel


and start


IR


syncing on


the


receiver 

.  

Put


the


button


part


of


the


microphone


to


face


the


IR


launcher


on


the


receiver

the


distance


need


to


be


under


1


meter

Press


the


microphone


switch


button


shortly


to


confirm


the


IR


syncing

if


IR


syncing


got


confirmed

the


channel


information


on


the


LCD


of


receiver


will


stop


flashing and you can see the RF signal bar on the LCD screen.  

* For quick microphone channel matching process, please see the note on the top of 
receiver, or see page 7 for more  detail

6

Operation 
button

Summary of Contents for UHF-1208X

Page 1: ...ork safely and to its fullest potential please read this user s manual carefully before operation and keep for future reference www acesonic com The Leader in Professional Equipment UHF 1208X DUAL DIV...

Page 2: ...maintenance servicing instructions in the literature accompanying the appliance 1 This equipment has been tested and found to comply with the limits for a Class B digital device pursuant to part 15 o...

Page 3: ...manufacturer 23 Wet location marking Apparatus shall not be exposed to dripping or splashing and no objects filled with liquids such as vases shall be placed on the apparatus 1 Read These Instruction...

Page 4: ...ower adapter 1 l UHF 1208X receiver 1 Be sure to keep original packaging in case of re shipping is needed l l Antenna 2 l User manual warranty card 3 ft male to male cable 1 1 Check to see whatever th...

Page 5: ...eiver channel 2 Scan use to start auto channel scanning process usually will need about 90 seconds to complete the process after scanning receiver will pick the best channel 3 IR to start IR sync chan...

Page 6: ...de which receive the IR signal from receives to complete the IR matching for microphone and receiver 4 Switch button Indicate Light Green Working Yellow Mute No light power off Microphone Operation Ch...

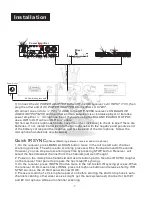
Page 7: ...ry correspond the negative and positive end of the microphone Screw the microphone handle back on clockwise HF 1208X AC Power adapter cable to cable Mic Input Mic Input Mic Input Power Outlet Installa...

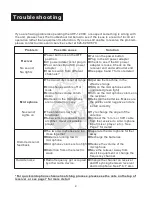
Page 8: ...he AC power adapter l Check to see if the AC power adapter is loose Check on the receiver end and wall outlet end l See page 6 and 7 for more detail l The transmitter is out of range l Microphone swit...

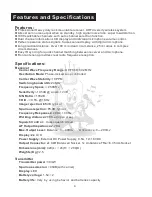
Page 9: ...Wave Frequency Range UHF 668 692 MHz Oscillation Mode Phase locked Loop controlled Carrier Wave Stability 10PPM Switching bandwidth 24MHz Frequency Space 250KHz Sensitivity 105dB sinad 12 dB S N Ratio...

Page 10: ...ation Contact Info 1 Year Manufacturer Warranty Lifetime Tech Support 626 820 0670 Design in U S A Tech Support Address 161 S 8th Avenue City of Industry CA 91746 3208 USA Website www acekaraoke com 6...

Reviews: