background image

Installer’s Guide


24


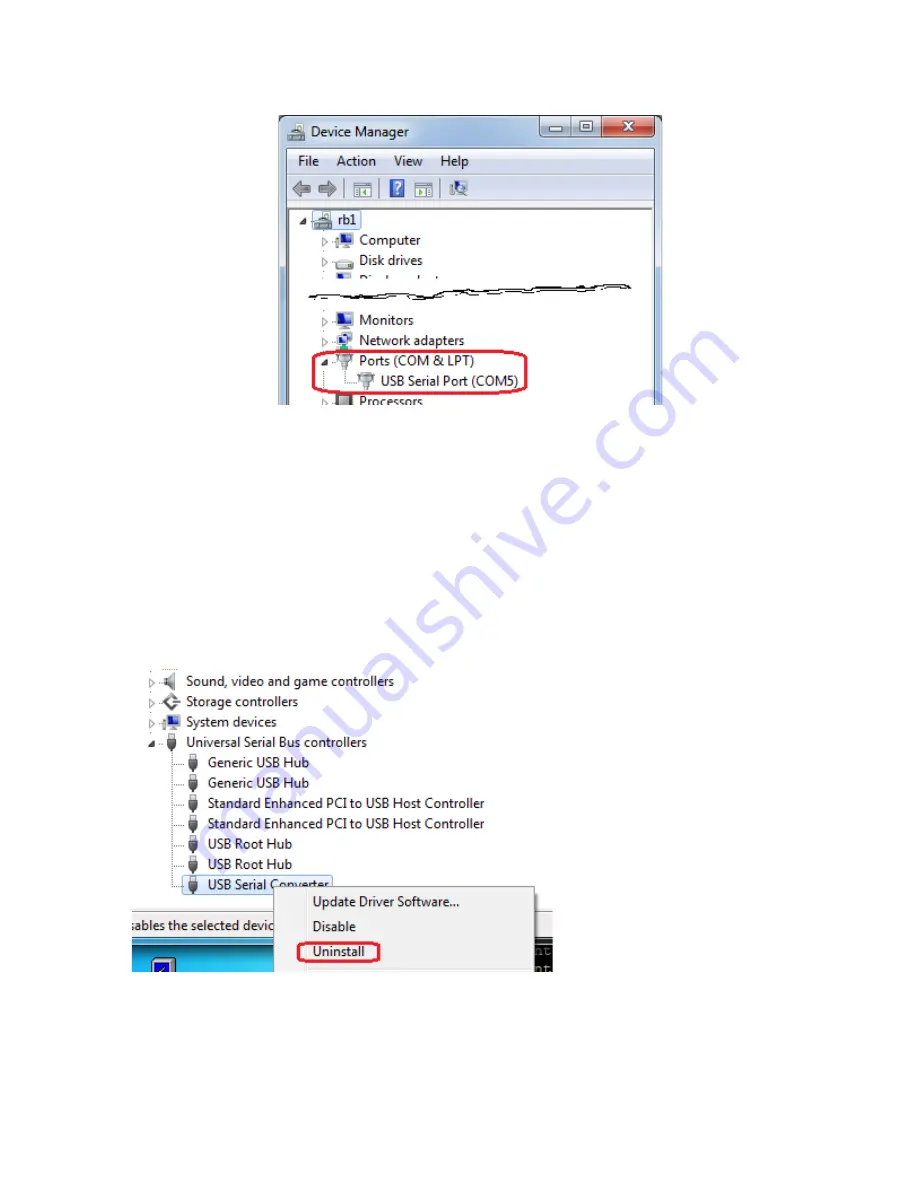
In the resulting list, look for the number of the COM port that your computer has 
assigned to the 

VGM-1041


If you don’t see

 the 

USB Serial Port

installed (this is possible even if you received the “Installing Device Driver Software” 
message).  Here’s how to correct this condition:


In 

Device Manager

, look for the heading, 

list, then 

right-click


USB Seri

menu.  Confirm this uninstall if asked.


Unplug the 

VGM-1041

This time, the driver should install correctly.


Tip


– Use the same USB port


In the resulting list, look for the number of the COM port that your computer has 

1041’s USB Serial Port

 (in the case shown it’s COM

USB Serial Port

 listed in 

Device Manager

, its driver has not completely 

installed (this is possible even if you received the “Installing Device Driver Software” 
message).  Here’s how to correct this condition: 

, look for the heading, 

Universal Serial Bus controllers

USB Serial Converter 

and choose 

Uninstall

 from its drop

menu.  Confirm this uninstall if asked. 


1041

 from the USB port.  Wait five seconds, then plug it back in.  

This time, the driver should install correctly. 

Use the same USB port on your computer, each time you connect the mixer


In the resulting list, look for the number of the COM port that your computer has 

it’s COM

 5

). 

, its driver has not completely 

installed (this is possible even if you received the “Installing Device Driver Software” 

Universal Serial Bus controllers

.  Open this 

from its drop-down 

USB port.  Wait five seconds, then plug it back in.  

ach time you connect the mixer.


Summary of Contents for VGM-1041

Page 1: ...VGM 1041 DSP Gated Mixer EQ Installation and Use ACI AppliCAD Inc Version 1 1 Applies to Serial Number Series 114580100xxx 732 751 2555 www aci applicad com ...

Page 2: ......

Page 3: ...ion Operator s Guide 6 Front Panel Controls Indicators Managing Microphones How Sound Gating Works Installer s Guide 14 Mounting Rear Panel Wiring Switches Line Outputs Adjusting Power Amplifier Gain USB Settings In Case of Difficulty 37 Troubleshooting Phone Support Warranty Specifications 39 Index 40 ...

Page 4: ......

Page 5: ......

Page 6: ......

Page 7: ...ssion Limits unusually loud sounds LED indicates when active Listeners remain comfortable Built in Equalizers Pink Noise Gen Separate mic aux parametric EQs pink noise for setup Saves space and cost compared to a separate equalizer Selectable De Esser Advanced DSP algorithm limits sibilance while preserving highs Spares audience from terribly excessive S and T sounds USB Setup Port Allows configur...

Page 8: ... flat surface Audio Source Using a stereo RCA cable the sort that often comes with audio components connect a CD player or a similar line level audio source to both AUX inputs Amplifier Connect your amplifier s balanced line level not mic level input to it to the mixer s MAIN balanced output Leave the amplifier switched OFF for the moment MAIN OUT MAIN OUT MUSIC OUT MONITOR OUT Connect your amplif...

Page 9: ...its front panel l Level Meter Start your audio source playing On your mixer s front panel increase both AUX controls until you see an indication about halfway up on the LED level meter Is This Thing Working Turn down your amplifier s gain or volume control and then power it ON Advance the control until you hear your sound playing It s In Your Head If you have a pair of headphones handy plug them i...

Page 10: ...ust insert the bare wire end and close the lever Connect your microphone to the cable s free end If your microphone is a condenser type activate phantom power this is how condenser mics get their supply by setting the appropriate rear panel switch MIC 1 Switch ON Phantom Power if your mic needs it MIC 10 input shown MIC 2 PHANTOM POWER AUX 1 AUX 2 Connect your mic here MIC 10 MIC wiring Shield in ...

Page 11: ...e mixer s USB port covered in the Installer s Guide section The factory setting activates compression for all mic channels except MIC 3 If you play the audio source you have connected to the AUX inputs earlier you ll hear both the mic and the audio together it s a mixer after all from both your amplifier and the front panel headphone jack Prefade While listening to the mix on your headphones press...

Page 12: ...cement about halfway to 2 3 up should provide good usable level If not ask your system s installer whether they have set the rear panel gain preset switches see Page 16 The gating and compression features mean you ll do less knob turning than would be needed with non automatic mixers Gate Clip LEDs above each microphone gain control Each lights green when the mixer gates that microphone ON Use the...

Page 13: ...at the VGM 1041 s balanced output Each LED above or below this point represents a change of approximately 4 dB in output level If your power amplifier s gain control has been set up according to the recommended procedure on page 18 a comfortable level for spoken material often reaches the first or second yellow LED Dramatic or musical material can often be played louder covering the entire yellow ...

Page 14: ...ps yellow on level peaks If totally dark you may want to turn up that channel On the other hand if the COMPRESS LED illuminates red the channel in use is set too high and constantly hitting the compression In this case reduce that mic level If you find that the COMPRESS LED remains dark for enabled mics in all conditions or lights red even though the sound is barely adequate adjust the volume of y...

Page 15: ...low sound as if your participants were speaking into an oil drum Pros call this effect ringing Your audience finds this effect distracting and tiresome If you turn your mics down to zero you guarantee no feedback and no ringing but no benefit as well As you increase your mic controls the audience gets to hear more of the program as amplified sound overcomes background noises The sound becomes loud...

Page 16: ...at the audience Proper miking lets everyone be heard with lower gain resulting in sufficient sound without feedback problems The VGM 1041 s sound gating automatically increases your available gain before feedback by muting unused microphones Unneeded mics receive no useful sound only feedback and noise You win about 30 more gain before feedback for each mic gated off Don t use excessive compressio...

Page 17: ...ging by watching the mixer s GATE LEDs while listening for the ringing Mics gated off cannot contribute to ringing at that moment The COMPRESS LED may glow green or perhaps yellow momentarily at high points in the material That s good it indicates you re providing maximum usable sound When accidents happen a dropped mic a cough or a feedback howl the mixer limits these nasty sounds the COMPRESS LE...

Page 18: ...icated Auxiliary inputs are not gated thus they operate concurrently along with mics If the VGM 1041 has not been set up properly at installation you may find that the sound gating performs less than optimally If for example the gating is not sensitive enough you may notice Mics remaining dead for very soft speakers Missed syllables when someone begins speaking In these cases first be sure to turn...

Page 19: ...Operator s Guide 13 This Page Intentionally Left Blank Don t you love it when they say that ...

Page 20: ... the included adapter into a switched outlet so it goes ON with the rest of your system Connect the adapter s DC cord here Compressed RCA Output RCA jack for connecting Recording devices Telephone interface transmit FM transmitter MIC 10 MIC 9 MIC 8 MIC 7 MIC 6 MIC 5 MIC 4 MIC 3 MIC 2 MIC 1 PHANTOM POWER MAIN MONITOR VOICE MUSIC VGM 1041 Rear Panel Phantom Power For condenser microphones Down ON G...

Page 21: ... the existing connectors adapt them to the new plugs with short cables For example your present mic cables might terminate in A3M connectors In this case purchase some short 18 cables with female connectors on both ends cut them in half and wire the cut ends to your new mixer s tool less plugs as above This saves you the trouble of soldering a bunch of A3F connectors We recommend that you strain r...

Page 22: ... amplifying ability can be set to better match levels of different mics A rotary switch above each input connector adjusts that input s gain in four 10dB choices Adjust if needed with a small screwdriver Generally condenser mics are hot and can use a lower gain setting Dynamic mics typically need more gain the older the mic the more gain needed We suggest adjusting each input s gain preset so that...

Page 23: ...ng at the amplifier input assumes the amp has a XLR input connector Follow the amplifier s wiring instructions generally R value Atten 600 ohm 6 dB 300 ohm 10 dB M I X A M P 3 2 1 3 2 1 Four balanced outputs are available MAIN It provides the complete mixed and equalized output normally connected to the system s power amplifier for auditorium listening MUSIC A separate mix of only music the two AU...

Page 24: ...ce At this point the mixer output has reached its consistent compressed level The level display should peak within its yellow range Now turn up your power amplifier s gain until your assistant s voice fills your auditorium to a fully satisfying but still comfortable listening level Enable your external equalizer if equipped The overall level shouldn t change much but adjust the EQ s gain control f...

Page 25: ...an combine these methods for example leaving some settings preset setting others via the USB port and then running Auto EQ How What Why When Factory Preset below All functions pre set Works out of the box Default EQ is acceptable Auto EQ Page 36 Voice EQ adjusts to your auditorium Still easy setup with improved EQ Try when the preset EQ isn t working for you USB Setup Page 21 Allows you to select ...

Page 26: ...und out of the box Of course you can alter these via USB you can also automatically set the Voice EQ via Auto EQ see page 36 Voice EQ Frequency Bandwidth Gain Atten 141 Hz 1 3 octave 6 dB 355 Hz 3 2 octave 6 dB 1002 Hz 1 3 octave 3 dB 1261 Hz 1 3 octave 3 dB 1782 Hz 1 2 octave 3 dB 4477 Hz 1 3 octave 3 dB 7962 Hz 3 2 octave 4 dB Music EQ 71 Hz 1 octave 4 dB 316 Hz 2 octaves 6 dB 7962 Hz 3 2 octave...

Page 27: ... parametric EQ for the Music path Compression ON OFF at each microphone input De ess ON OFF for each pair of microphones mics 1 and 2 3 and 4 etc Stage Monitor bus ON OFF for each mic input In addition a Pink Noise generator is available while the USB is in use to help you set up your EQs To make these settings you need a computer with a TTY terminal program The instructions that follow assume you...

Page 28: ...eeds no installation Click through the usual warning The PuTTYtel application opens displaying its Configuration screen Before doing anything there proceed to the next page to connect your VGM 1041 Connecting your Mixer Attach the supplied USB cable to the mixer s rear panel jack Plug the other end into a free USB port on your computer Power ON the mixer You may see the usual Installing Driver mes...

Page 29: ...o find out what COM port you computer has assigned to the This is easier on some Windows versions than others Start Menu then type Device Manager in the Search Start Menu click Computer then System Properties Device Manager which brings up the box shown next page to find out what COM port you computer has assigned to the Search box System Properties which brings up the box shown next page ...

Page 30: ... Device Manager its driver has not completely installed this is possible even if you received the Installing Device Driver Software message Here s how to correct this condition look for the heading Universal Serial Bus controllers USB Serial Converter and choose Uninstall from its drop menu Confirm this uninstall if asked 1041 from the USB port Wait five seconds then plug it back in This time the ...

Page 31: ...ss the space bar on your keyboard screen s Settings PuTTYtel first click the Serial choice Then set the Serial Line COM port found above and the Speed box to 115200 Finally click the on your keyboard you should now see the mixer Serial Line box to the Finally click the Open button mixer s filter setting ...

Page 32: ...eft Right Or use your keyboard s Down ypass all filters press again to restore filters Toggle pink noise ON OFF Increase gain by 10 dB to test for feedback press again for normal Switch to the Microphone settings screen Switch back to the Filter screen ave present settings not hotkey options to nonvolatile memory at any time Saved settings automatically load when your system so no computer is requ...

Page 33: ...or option for all mics used nearby Turn ON for most mic uses An exception is the main or chairperson s mic which is often used when calling a noisy meeting to order Compression would defeat this purpose so choose OFF for this mic ibilance Esses and Tees can become painfully provide plenty of treble response to provide best speech intelligibility which we recommend The VGM 1041 features an advanced...

Page 34: ...rium while observing display should reach 1 2 yellow LEDs when your sound has comfortable customary level if compression is enabled on this mic you ll also see the If not repeat the adjustment procedure on page observe the sound gating performance using two or more mikes Note if the gating is operating to your satisfaction If not you can fine tune the mi decision process by adjusting each mic s Ba...

Page 35: ... to connect your line level source to the mic channel This is the best and easiest method Follow the instructions which accompany your box Build a simple attenuator with resistors recommended if your high gement like this shown below may be suitable Remember you can also use the input s rear panel gain preset to accommodate input although this alone won t cover line level inputs you have your sour...

Page 36: ...tings Press F to enter the Filter screen Each parametric equalizer filter allows you to set its Center Frequency from 20 Hz to 20 KHz in 1 6 Octave steps many more than shown below Bandwidth from 1 6 Octave to 3 Octaves in nine steps ...

Page 37: ...125 Hz 20 dB to 10 dB in 1 dB steps below Equalizer Does parametric This section introduces parametric unfamiliar with them We ll begin with the familiar graphic equalizer often found and MP3 players A typical one is pictured below You can adjust how this equalizer handles ten distinct frequency bands as labeled When set as shown here this sort of equalizer might produce a frequency response curve...

Page 38: ...pical graphic equalizer yet you can do so Below the three Music filters have been set as shown The corresponding filter response curve appears below This filter curve appears extreme yet it equalizes a cheap pair of computer produce decent sound Of course this only works within the sound system s limitations Perhaps we would like our video presentations to shine with sparkling highs and movie syst...

Page 39: ...ppose your wireless mics sound different from all the others You can set their channel EQs to minimize this difference For example here s the published response for an Electro Voice 767 RE2 mic The solid curve represents normal response the dotted line is for close range use Since no one eats the mic in our example application we can safely ignore the dotted line We re left with a response that br...

Page 40: ...cate your response peaks Basically you increase a mic s gain until you begin to hear feedback For example it s evident that the peak or feedback node labeled 1 here will sound off first as gain is increased We then tune one of the EQ filters to flatten the peak that caused this feedback This allows you to turn up the mic further in turn discovering the next feedback node Continue this process unti...

Page 41: ...ring filter settings among your channels may cause erroneous results when mixing several Pink Noise inputs Temporarily set this mic channel s options see page 28 o Disable gating switch De Ess OFF and Compression ON On your RTA note the frequency and height of the largest peak Set a Voice Filter to its closest frequency Experiment with this filter s gain and BW controls to minimize the peak Locate...

Page 42: ... for quiet conditions in an empty auditorium Have a volunteer stand at your main mic as if using it use any mic MIC 10 or any converted to Music inputs While they speak turn up this input to get a satisfying level Have them stand there silently for the rest of this procedure controls to zero EQ Function Switch your sound system including the VGM 1041 OFF Hold both Prefade buttons for MIC 9 and MIC...

Page 43: ...s Do you have a FM transmitter or recording device connected to your mixer s output If so see if it works If it does this indicates that the problem is most likely after your mixer for example in the power amplifier or speaker wiring Level meter not responding Is Prefade yellow LED activated on any input The level meter responds to this input only ignoring the others Low volume Mics turned down ca...

Page 44: ...Time to get help with installing using or troubleshooting your mixer If it appears that your mixer is defective we ll issue a RMA Return Material Authorization number for factory service Your limited warranty is one year from date of purchase Out of warranty our present repair charge is a flat rate of 75 00 plus shipping subject to change Please note that this product uses surface mount and digita...

Page 45: ...24 bits overall with 56 bit EQ filters Latency filters OFF 1 5 mS Power 9 Watts from included 24VDC wall adapter Audio Specs Max Output Level balanced 23dBm at clipping unloaded less 6dB 600 Ω load o Meter zero VU first yellow LED 4dBm less 6dB 600 Ω load RCA Output Level unbalanced Approx 10 dBm when compressed MIC Gain To balanced output control and preset maximum 78 dB MIC Gating Selectable wav...

Page 46: ... 5 Installation Setup 14 36 Level Meter 7 Line Outputs 17 Main Output 2 17 MIC Inputs 4 14 16 configure as aux 29 Microphones 4 15 condenser 4 16 EQ 33 35 management 9 wireless 15 wiring 4 15 Mounting 15 Music EQ 33 Music output 17 Nodes feedback 34 Operating tips 9 11 Parametric EQ 31 Phantom power 4 16 Pink Noise Gen 35 Phone number ACI 1 38 Power 3 14 39 Power Amplifier gain adjustment 18 Prefa...

Page 47: ......

Reviews: