Automation Components, Inc.
2305 Pleasant View Road | Middleton, WI 53562
Phone:
1-888-967-5224 |
Website:
workaci.com
Page 3
MOUNTING INSTRUCTIONS
(Continued)
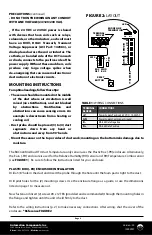
Refer to the wiring instructions (p. 2) to make necessary
connections. After wiring, twist the cover until the
enclosure is tightly sealed.
*Reference FIGURE 2
BACnet MS/TP and Modbus RTU
INTERFACE
The BACnet Master-Slave/Token-Passing (MS/TP)
and Modbus Remote Terminal Unit (RTU) data link
protocol uses EIA-485 as a two-wire, daisy chain
network. A branch is a discrete chain of devices
connected to a controller. The max number of
devices per segment is 32, as per the BACnet and
Modbus specifications. 4000 ft (1219.2 m) is the
maximum recommended length for a segment,
which includes all devices from the controller to the
last device in the daisy chain.
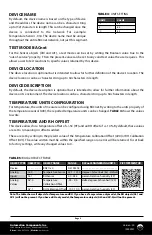
BAUD RATE SELECTION
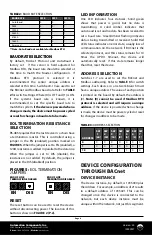
By default, BACnet Protocol and Auto-Baud is
factory set. If the sensor is field adjusted for
Modbus RTU, the baud rate should be selected at
this time to match the Master configuration. If
Modbus RTU protocol is selected it is
recommended the sensor unique address is
selected at this time. Switches 8-10 are used to set
the BACnet and Modbus baud rate. Refer to
TABLE
2
for switch settings. Where (0) is OFF and (1) is ON.
If the system’s baud rate is known, it is
recommended to set the specific baud rate to
match the system.
If the device is powered when a
change is made, the device must be power cycled
or reset for changes in baud rate to be made.
EOL TERMINATION RESISTANCE
SELECTION
RS-485 requires that the last device in a chain have
a termination resistor. This is controlled using a
jumper in the EN (enabled) position marked on
FIGURE 5
. When the jumper is set to EN (enabled), a
120Ω resistance is added in parallel to the data line.
When the jumper is set to DIS (disable), the
resistance is not added. By default, the jumper is
placed in the DIS (disabled) position.
FIGURE 4:
SW4 DIPSWITCH
SETTINGS
DIP 1 – PAR2 (only applies to Modbus)
DIP 2 – PAR1(only applies to Modbus)
DIP 3 – OPEN (For Future Use)
DIP 4 -- OFF is BACNET, ON is MODBUS
SW4
OFF
ON
1
ON
2
3
4
Version: 2.0
I0000927
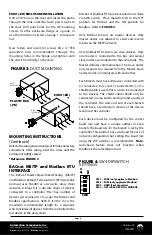
FIGURE 3:
DUCT MOUNTING
PLASTIC BOX
(-PB)
0.875"
(22.23 mm)
0.375"
(9.525 mm)
EURO (-EH)
PRECAUTIONS
(Continued)
• DO NOT RUN THE WIRING IN ANY CONDUIT
WITH LINE VOLTAGE (24/120/230 VAC).
• If the 24 VDC or 24VAC power is shared
with devices that have coils such as relays,
solenoids, or other inductors, each coil must
have an MOV, DC/AC Transorb, Transient
Voltage Suppressor (ACI Part: 142583), or
diode placed across the coil or inductor. The
cathode, or banded side of the DC Transorb
or diode, connects to the positive side of the
power supply. Without these snubbers, coils
produce very large voltage spikes when
de-energizing that can cause malfunction or
destruction of electronic circuits.
MOUNTING INSTRUCTIONS
For optimal readings, follow these tips:
• The sensor should be mounted in the middle
of the duct where air circulation is well
mixed (no stratification), and not blocked
by obstructions. Stratification and
obstructions can cause sensing errors. An
example is downstream from a heating or
cooling coil.
• Duct probe should be placed (3) to (4) duct
segments down from any bend or
obstructions and away from 90° bends.
• Mount the sensor on the top or sides of duct work; mounting on the bottom risks damage due to
moisture.
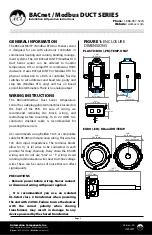
The BACnet/Modbus RTU Duct Temperature-only sensor uses the Plastic Box (-PB) enclosure. Alternatively,
the Euro (-EH) enclosure is used for the Relative Humidity (RH) sensor and RH/Temperature Combo sensor
(see
FIGURE 1
). Be sure to follow the instructions listed for your enclosure.
PLASTIC BOX (-PB) ENCLOSURE INSTALLATION
Drill a 3/8” hole in the duct and insert the probe through the hole until the foam pad is tight to the duct.
Drill pilot holes for the (2) mounting screws. Use the enclosure flange as a guide, or use the dimensions
listed on page 1 to measure out.
Now fasten and insert (2) screws #8 x ¾” TEK (provided and recommended) through the mounting holes in
the flange and tighten until the unit is held firmly to the duct.
Refer to the wiring instructions (p. 2) to make necessary connections. After wiring, shut the cover of the
enclosure.
*Reference FIGURE 2
BACnet or Modbus RTU protocol selection is done
via SW4 switch. Place dipswitch #4 to the OFF
position for BACnet and the ON position for
Modbus. Refer to
FIGURE 4
.
ACI’s BACnet sensors are master devices. Only
master nodes are allowed to send and receive
tokens on the MSTP network.
ACI’s Modbus RTU sensors are slave devices. Only
one master is connected to the bus and several
slave nodes are connected to the same trunk. The
Master initiates communication. The slave nodes
only respond to a request from the Master. Slave
nodes do not communicate with each other.
Each branch must have all devices connected with
(+) connected to (+) and (-) connected to (-). If a
shielded cable is used, this is not to be connected
to the devices. The shield cable should only be
connected on one end to earth ground, usually at
the controller. The start and end of each branch
should have a termination resistor at the device
level or at the controller.
Each device must be configured for the correct
baud rate and have a unique address in each
branch. The baud rate for the branch is set by the
controller. This product has auto-baud for ease of
network configuration but setting the baud rate
using the DIP switches is recommended.
Note:
Auto-baud feature does not function when
Modbus is the selected protocol.
EURO (-EH) ENCLOSURE INSTALLATION
Drill a 7/8” hole in the duct and insert the probe
through the hole until the foam pad is tight to
the duct. Drill pilot holes for the (2) mounting
screws. Use the enclosure flange as a guide, or
use the dimensions listed on page 1 to measure
out.
Now fasten and insert (2) screws #8 x ¾” TEK
(provided and recommended) through the
mounting holes in the flange and tighten until
the unit is held firmly to the duct.
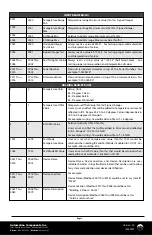
LED INFORMATION
One LED indicates four statuses. Solid green
shows that power is good, but no data is
transmitting. A solid Amber indicates that
auto-baud is set and no data has been received to
set a baud rate. Green/Amber flashing indicates
data is being transmitted or received. Solid Red
LED status indicates an error state, usually loss of
communication on the network. If BACnet is the
selected protocol, and this status remains for 10
times the APDU timeout, the device will
automatically reset. If this state remains longer
than that, reset the device.
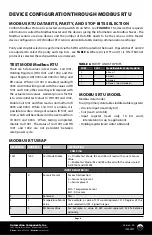
ADDRESS SELECTION
Switches 1-7 are used to set the BACnet and
Modbus addressing. Refer to
TABLE 3
for switch
settings. Each device in a network branch must
have a unique address. The value of each position
is printed on the board. By default, the address is
(0).
Note: (0) cannot be used if Modbus RTU
protocol is selected and will require a unique
address.
If the device is powered when a change
is made, the device must be power cycled or reset
for changes in address to be made.
DEVICE CONFIGURATION
THROUGH BACnet
DEVICE INSTANCE
The Device Instance, by default, is 1035000 plus
the Address. For example, an Address of 21 results
in a default address of 1035021. This can be
changed once the device is connected to the
network, but each device instance must be
unique within the network, not just this segment.
RESET
The reset button can be used to reset the device
without disconnecting power. The location of this
button is shown in
FIGURE 2 (P.2).

