background image

Installation parameters

INSTALLER

24

ADIP

Installation Guide

System 

description

Installation 

parameters

Events

Accessories

Supervision

Configuration 

and cabling

Tables

Data

Compatible 

elements

Functions 

description

Delete

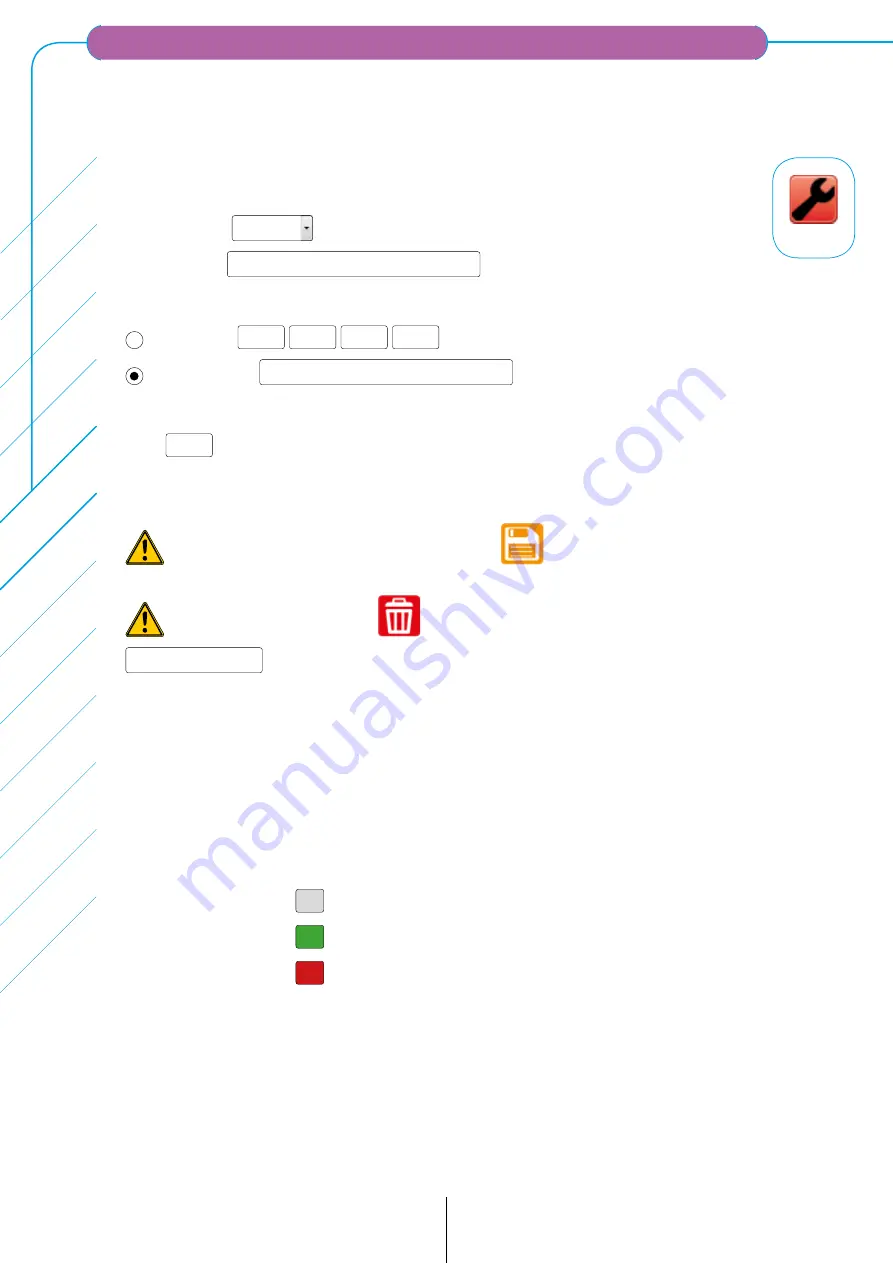
It could have up to 32 networked devices. The IP parameters must be entered locally on 

each, but it is necessary to do this also on this table.

Access point:


 select from 1 to 32

Designation: 

Click on one of the two options :


Adresse IP:


.

.

.


DynDNS Host: 

********************************

Indicate the port :

Port: 

 Do not forget to save the changes made with 

 If you want to Delete , press 

 NO MASTER to indicate that this controller is not the MASTER.

Status: 

indicates whether the devices are located on the network.

01

02

03

04

05

06

07

08

09

10

11

12

13

14

15

16

17

18

19

20

21

22

23

24

25

26

27

28

29

30

31

32

 Indicates device not installed

 Indicates the device is localized and in communication

 Indicates device not located or without communication

Identification of Access Point

Summary of Contents for ADIP

Page 1: ...on Guide http www acie adip com Au départ usine l USER est adip et the PASSWORD installateur est insta ACIE Rue de l industrie 19 Ctre entrep Joncaux 64700 Hendaye FRANCE In accordance with the Webserver y Firmware versions ADIP 10Y_ ...

Page 2: ...SLAVE 13 Ethernet network connection PC MASTER 31 SLAVES 13 Internet Connexion PC MASTER 31 SLAVES 13 Functions descriptions Input functions 14 Output functions 14 15 SAS operation 16 Area counters 16 Visits 16 17 Free access 17 Antipassback 17 Anti Timeback 17 Degraded mode 17 PUSH Notifications 18 20 Installation parameters IP Adressing procedure for the ADIP controller 21 22 IP Device Configura...

Page 3: ... to reset the antipassback monthly 44 Synchronize data 45 Tables Users by number 46 Users by name 47 Time tables 48 Time Areas 49 Security areas controlled 50 Access Group 51 Access points 52 Delete Delete events 53 Delete data Delete users 54 Delete visits 54 Delete time tables 54 Delete time areas 54 Delete access groups 54 Firmware update BOOTLOADER 55 Supervision 56 Events General list of even...

Page 4: ...EGAND or DATA CLOCK with all the inputs to manage 1 or 2 doors Economy of installation No need to instal the communication BUS The système use the Ethernet network Use peer to peer connection between controllers allows to have a bigger autonomy of operation Even in degraded mode without network the controller remains at 80 of its functionality It does not control the antipassback User interface in...

Page 5: ... b l e s D a t a C o m p a t i b l e e l e m e n t s F u n c t i o n s d e s c r i p t i o n D e l e t e S u p e r v i s i o n TCP IP NETWORK ADIP CONTROLLERS COMPUTER PC or MAC TABLET Android iOS Windows Phone etc SMARTPHONES Android iOS Windows Phone etc The network is local Ethernet type but Internet also The IP connection must have a speed of at least 3 Mbps The devices that can be part are th...

Page 6: ...e of the tag cannot be represented in BDC 10 characters it is recommended to use format BCD 13 TIME DESCRIPTION MIN TYP MAX UNIT Tset Data setup time 5 1 6 Tclock µs Trm Data hold time 0 8 2 3 Tclock µs Twidth Clock pulse width 1 3 Tclock µs Tclock Clock pulse rate 80 1000 1500 µs Ttotal Timeout read operation 76 Tclock FORMAT OF TRANSMISSION DATA TRANSMITED DATA CLOCK 10 0012345678 DATA CLOCK 13 ...

Page 7: ...nctions table Tamper of tamper alarm A P Interconnection of 2 controllers for SAS management Software in the memory of the Webserver device DynDns Integrated into the device Communication peer to peer to distribute zone information 32 ADIP maximum connectable network controllers 65 000 users common to all network controllers synchronized Over 130 000 events in memory per access point 32 Access Gro...

Page 8: ... A P Reader Connection nº1 The reader can be powered by the and Vout terminals 12v DC 500mA max The controller can receive the reader in Wiegand or Clock Data formats via the W0 CK and W1 DT terminals Fresh out of the factory The IN1 PB1 input C is dedicated to the door control relay 1 by pushbutton normally open at idle The IN2 G1 input C is dedicated to the supervision of the door by normally cl...

Page 9: ...ctory It can be controlled by time range input func tion by badge PB 1 push putton input It can operate in timed mode on off or tracking of an input NC NO C NC RL1 Door relay 2 The relay N 2 is a programmable relay 5A under 30Vdc dedicated to door control 2 as it left the factory It can be controlled by time range input func tion by badge PB 2 push putton input It can operate in timed mode on off ...

Page 10: ... Place the programming bridge in position P we have 5s to do it beep beep beep 6 Set the programming bridge to position N end of beeps 7 After 12 seconds beeps Now you can address the name of the device or HOST NAME The factory set HOSTNAME is ADIP01 Then introduce this HOSTNAME on the browser and validate Factory reset Procedure of the factory reset This procedure will erase all programmed data a...

Page 11: ...fferent configuration phases One blinking and one beep when power is turned on 2 flashes with beep during authorization 5 flashes with beep when denied Flashes and beeps continuously when the N P bridge is forgotten in position P Factory reset procedure DHCP adressing procedure Passwords recovering procedure On permanently in degraded mode Operation of the connectors RJ45 lights The network connec...

Page 12: ...AT 7 Can transmit data at speeds of 10 Gbps Can reach fre quencies of 600 MHz not with RJ45 connectors but with special TERA connectors 100m Network cable type Use shielded category 5 6 or 7 cable The cable must be symmetrical with a twisted conductor structure in pairs an outer sheath and shielding against electromagnetic disturbances Shielded twisted pair STP or Foiled twisted pair FTP shielding...

Page 13: ...h with its advantages and disadvantages With a direct connection via the second RJ45 connector you can also connect the com puter to the first RJ45 connector on the MASTER or SLAVE controller Forming a local area network through an Ethernet switch In this way it is possible to connect the maximum number of controllers 32 This network can be made wirelessly with WI FI access points connecting up to...

Page 14: ...es for example to connect a buried magnetic loop so that the reader operates only when there is a present vehicle This input also allows to realize a SAS with two doors equipped with an input reader and an output pushbutton without SAS time Output Functions Output Functions Explanation Door lock 1 associated with input PB 1 The relay is dedicated to the door control 1 on identification by reader 1...

Page 15: ...t Stop mode Authorized access group 26 Activates with an authorized access of an user of group 26 The relay can operate in timed mode or Start Stop mode Authorized access group 27 Activates with an authorized access of an user of group 27 The relay can operate in timed mode or Start Stop mode Authorized access group 28 Activates with an authorized access of an user of group 28 The relay can operat...

Page 16: ...outer door I Inhibi tion input Both doors are equipped with input Input reader 1 obligatorily and output read er 2 obligatorily drives or you need to have a SAS time 2 controllers declared as SAS This SAS will have an internal access point and another outside The SAS time is the time during which access to the SAS is prohibited follow ing the entry of a user into the SAS Declare the SAS in the SAS...

Page 17: ...n input readers Degree of antipassback Hard Antipassback is enabled on input and output readers In case of access denied by antipassback an output function can be triggered An entry can be dedicated to Unblocking Antipassback of all users A user can be dedicated to unlocking the antipassback of all users if he triggers the function Output of a configurable input on a relay connected to the entry U...

Page 18: ... app from the PlayStore or AppStore first Once downloaded open the app Select Register This will register our device on Google and get a unique identifier linked with our mobile device Choose the language On the main page is indicated if the app is registered Select Configuration and enter the parameters IP Port communication code and security code Introduce also the position 1 to 8 which will tak...

Page 19: ...t a C o m p a t i b l e e l e m e n t s F u n c t i o n s d e s c r i p t i o n D e l e t e S u p e r v i s i o n Once these parameters have been entered the configu ration must be saved Now we need to transfer the ID of our mobile device to the ADIP controller If all goes well the following message will appear to confirm that the ID of our mobile device has been suc cessfully transferred to the A...

Page 20: ... which we have just transferred the ID of our mobile device Select the Installation Settings Access Point Configuration menu On page 3 of this menu We see the name and ID Reg of our mobile device Now only would select a function on the list and SAVE the configuration NOTE 1 In order to avoid the need to open the ADIP PUSH application every time we turn on our mobile device it is possible to use th...

Page 21: ...owser and VALIDATE It is also possible to address the device name or HOSTNAME but this method only works if the terminal and the ADIP controller are on the same network This factory HOSTNAME is ADIP01 Enter this HOSTNAME on the browser and validate 2 Procedure DHCP in LAN without the Internet If the terminal and the controller do not have the same network rank 1 Disconnet power 2 Place the N P pro...

Page 22: ... i o n D e l e t e IP Addressing Procedure for the ADIP Controller Then the main menu appears as shown in the following image Once the language is chosen You must choose installer then a USER and PASSWORD will be requested When it left the factory USER is adip and the installer PASSWORD is insta The following window will open once the ADIP controller is addressed If the menu stops change to the me...

Page 23: ... point 01 Master HOSTNAME ADIP01 Modify it if you will contact by HOSTNAME recommended Enable DHCP if you want to find an IP address automatically then and leave this menu To see the new address enter again in this menu Enable DHCP Adresse IP Port 19 Subnet mask Default gateway DNS1 DNS2 Do not forget to save the changes made with If you have a DYNDNS service click on the button DYNDNS to configur...

Page 24: ...ch but it is necessary to do this also on this table Access point select from 1 to 32 Designation Click on one of the two options Adresse IP DynDNS Host Indicate the port Port Do not forget to save the changes made with If you want to Delete press NO MASTER to indicate that this controller is not the MASTER Status indicates whether the devices are located on the network 01 02 03 04 05 06 07 08 09 ...

Page 25: ...t con sumed Access point Reader 2 Designation Indicate Designation Input Output Free Active the reader works Anti Timeback 00 mn Access verification Exit with schedule control Do not select to allow to exit off hours Do not forget to save the changes made with Press to advance to the next page Input configuration pag 2 4 Input IN6 select inputs IN1 to IN6 Function select input function Normally op...

Page 26: ...as occurred Select PUSH notifications from 1 to 8 1 Device Name ID reg Identification of the mobile device from the APP Function select out put function Message IOS sends a PUSH message to IOS devices Do not forget to save with or delete with Press to advance to the next page or press to return to the previous page E mails pag 4 4 Possibility of having up to 8 different e mails for each access poi...

Page 27: ... e l e m e n t s F u n c t i o n s d e s c r i p t i o n D e l e t e S u p e r v i s i o n SAS Definition Indicate on each access point the pair of points that integrate the SAS Since there is a maximum of 32 access points there will be a maximum of 16 SAS Outside Access point Access point 3 Inside Access point Access point 5 SAS time 240 SAS time in seconds Do not forget to save the changes made ...

Page 28: ...16 Hour PC 12 53 44 Access point hour 12 53 32 Select whether the date time will be automatically taken from an Internet NTP server or if it will be entered manually SYNC WITH SERVER NTP Server NTP If you chose NTP server select the server from the list Once the NTP server option is selected and saved the connection with the controller is lost and we have to press F5 to connect again MANUAL Day Mo...

Page 29: ... b l i n g T a b l e s D a t a C o m p a t i b l e e l e m e n t s F u n c t i o n s d e s c r i p t i o n D e l e t e S u p e r v i s i o n Propagate Date Hour This option is not useful in the case of time setting with NTP server A button on the screen allows you to propagate master date time to all slaves PROPAGATE DATE TIME THE MASTER TO ALL SLAVES NO MASTER to indicate that this controller is ...

Page 30: ...t e r s E v e n t s A c c e s s o r i e s S u p e r v i s i o n C o n f i g u r a t i o n a n d c a b l i n g T a b l e s D a t a C o m p a t i b l e e l e m e n t s F u n c t i o n s d e s c r i p t i o n D e l e t e Register unknown users Click to activate the option Register unknown users Do not forget to save the changes made with ...

Page 31: ...rator Password New Administrator Password Confirm New Administrator Password Do not forget to save the changes made with A message indicates if the password is changed Consultant password access pag 3 4 Old Consultant Password New Consultant Password Confirm New Consultant Password Do not forget to save the changes made with A message indicates if the password is changed User name pag 4 4 Old User...

Page 32: ...s D a t a C o m p a t i b l e e l e m e n t s F u n c t i o n s d e s c r i p t i o n D e l e t e Communication and security codes These codes are used to secure communications with all access points Security code 8 digits 00000000 Communication code 4 digits 0000 Encryption code 32 digits CODE USINE The Encryption Code is intended to be used with SDKs All connected ADIPs must have the same encryp...

Page 33: ...oduction All the users of the access control system and these rights constitute the data base These rights are gathered in the form of Access groups but each access group contains special rights concerning access points different schedules etc The diagram shows this structure Access groups to 32 Antipassback Time tables to 32 Security areas controlled to 8 Access points to 32 Readers 1 2 Holidays ...

Page 34: ...user in a click It is possible to enter a unique random code by pressing AUTOMATIQUE CODE This code is decimal and is never repeated Access group 1 select from 1 to 32 Possibility to delete a user identity and code with Do not forget to save the changes made with OK to indicate correct USER NOK to indicate user number error NOK CODE to indicate ID code error CODE USER XXXXX REPEAT to indicate code...

Page 35: ... This message corresponds to the text that will be sent in the email as well as to the following selected information Click to indicate the information to send User Id Code Visits dates Number of access availables Number of consumable days User Email e mail del usuario Confirmation email 1 ejemplo adip es ssend confirmation email selec tor These confirmation e mails correspond to those declared in...

Page 36: ...able 1 Select the time tables from 1 to 32 Designation introduce the Designation in the time tables Each time table can have up to 30 time areas simultaneously Click to indicate time areas 01 02 03 04 05 06 07 08 Press HOLIDAYS to go to the next page Each time table can have 4 Holiday periods From Day Month select Day Month To Day Month select Day Month Each time table can have 24 holiday days Hol...

Page 37: ... t i b l e e l e m e n t s F u n c t i o n s d e s c r i p t i o n D e l e t e S u p e r v i s i o n Time Area 1 to select the time areas Designation introduce the time areas designation Every time areas may have 2 time frame hour minute Period 1 From H 00h Min 00 to H 23h Min 59 Period 2 From H 00h Min 00 to H 23h Min 59 Click to indicate days of the week Mo Tu We Th Fr Sa Su Do not forget to sav...

Page 38: ... e t e Security area controlled Area 1 to select the area from 1 to 7 or out area Designation introduce the area designation Every security areas may have 32 access points with their respective readers There is the possibility to select all or deselect all Select Deselect all Then click to indicate access points Access Points 01 L1 L2 02 L1 L2 03 L1 L2 04 L1 L2 Each reader will be in the selected ...

Page 39: ...n D e l e t e S u p e r v i s i o n Access group 1 select the groupe 1 to 32 Designation introduce the designation of the group Possibility to select simultaneously up to 8 safety controlled areas with its correspond ing time tables one time table per security area controlled Also possibility to select out of the areas Security area controlled 1 Time tables 01 Antipassback Oui Indicate if the grou...

Page 40: ...urity area controlled nº1 There is a total counter and a counter per access group The value Present shows the number of users who are inside the security area con trolled nº1 Press F5 computer or Slide your finger down on the touch screen Tf or tablet to refresh the value Total capacity area 1 Present Access Group capacity 01 Present Access Group capacity 02 Present Maximum meter capacity to 65 00...

Page 41: ...o the hour Hour Minute From Day Month Year H 00h Mn 00 To Day Month Year H 00h Mn 00 The number of available accesses or days indicates what remains to the user but this value can be changed Only users 1 to 16 000 have this possibility The first 16 000 us ers have the following options available Number of available accesses User 16 000 max number 9 999 Number of consumable days User 16 000 max num...

Page 42: ...the first authorization R1 R2 R3 R4 3 Any From the first authorization R1 R2 R3 R4 4 Any From the first authorization R1 R2 R3 R4 Click on the relays that will be controlled by the free access within the hours and ac cess points indicated on the access group In groups dedicated to free access do not select the Non controlled safety zone in any of the 8 possible ways It is necessary to indicate a z...

Page 43: ...ate error and NO MASTER to indicate that this controller is not the MASTER Possibility of unlocking the antipassback of a user Nº User User name Select one of the three options to place the user in the security area out side the security area or waiting for synchronization at the next identification Waiting for sync Do not forget to save the changes made with NOK to indicate error and NO MASTER to...

Page 44: ...e with NOK to indicate error and NO MASTER to indicate that this controller is not the MASTER Possibility to reset antipassback weekly The antipassback will be reset to the selected hour of each day indicated H 00h Mn 00 Click to indicate days of the week Mo Tu We Th Fr Sa Su Do not forget to save the changes made with Possibility to reset antipassback monthly The antipassback will be reset to the...

Page 45: ...ttle while but it is indicated by a progress bar Click to indicate data to SYNCHRONIZE Users Time Tables Time Areas Security areas controlled Access groups Visits A button on the screen allows the sync of all access points SYNCHRONIZE DATA NO MASTER to indicate that this controller is not the MASTER Once synchronization is started a window shows the current access point Access point 01 04 Access p...

Page 46: ...T a b l e s D a t a C o m p a t i b l e e l e m e n t s F u n c t i o n s d e s c r i p t i o n D e l e t e Viewing users by number Nº User 00001 Enter the number and click OK to indicate correct and NO USER to indicate that the user can not find it User id Identifier code Access group 1 Possibility of going to the previous or next user To select the e mail Send all users to the e mail 1 indicate ...

Page 47: ... a n d c a b l i n g T a b l e s D a t a C o m p a t i b l e e l e m e n t s F u n c t i o n s d e s c r i p t i o n D e l e t e S u p e r v i s i o n Users by name Viewing users with the indicated text enter the text and click OK to indicate correct and NO USER to indicate that the user can not find it User id Nº User Identifier code Access group Possibility of going to the next user ...

Page 48: ... b l i n g T a b l e s D a t a C o m p a t i b l e e l e m e n t s F u n c t i o n s d e s c r i p t i o n D e l e t e Time Tables Time tables display Time Tables 1 is the designation of the time tables Time Areas 01 Schedule Parking 02 Schedule Shop 03 Schedule Office 04 Schedule Workshop 05 06 07 08 09 10 11 12 13 14 15 16 17 18 19 20 21 22 23 24 25 26 27 28 29 30 Possibility of going to the pre...

Page 49: ... n a n d c a b l i n g T a b l e s D a t a C o m p a t i b l e e l e m e n t s F u n c t i o n s d e s c r i p t i o n D e l e t e S u p e r v i s i o n Time Areas display Time Areas 1 is the designation of the time areas Period 1 From H 00h Mn 00 To H 23h Mn 59 Period 2 From H 00h Mn 00 To H 23h Mn 59 Mo Tu We Th Fr Sa Su Possibility of going to the previous or next area Time Areas ...

Page 50: ...e security areas controlled Area 1 is the designation of the security area controlled Access points 01 L1 L2 02 L1 L2 03 L1 L2 04 L1 L2 Input Parking Output Parking Input Pedestrian Output Pedestrian 05 L1 L2 06 L1 L2 07 L1 L2 08 L1 L2 Input Shop Output Shop Input Office Output Office 09 L1 L2 10 L1 L2 11 L1 L2 12 L1 L2 Input Workshop Output Workshop 13 L1 L2 14 L1 L2 15 L1 L2 16 L1 L2 17 L1 L2 18...

Page 51: ... s i o n Visualisation of the access groups Access group 1 is the designation of the ac cess group Security area controlled 01 Time tables 01 Security area controlled 02 Time tables 01 Security area controlled 03 Time tables 01 Security area controlled 04 Time tables 01 Security area controlled 05 Time tables 01 Security area controlled 06 Time tables 01 Security area controlled 07 Time tables 01 ...

Page 52: ...r DynDns Port 04 IP or DynDns Port 05 IP or DynDns Port 06 IP or DynDns Port 07 IP or DynDns Port 08 IP or DynDns Port 09 IP or DynDns Port 10 IP or DynDns Port 11 IP or DynDns Port 12 IP or DynDns Port 13 IP or DynDns Port 14 IP or DynDns Port 15 IP or DynDns Port 16 IP or DynDns Port 17 IP or DynDns Port 18 IP or DynDns Port 19 IP or DynDns Port 20 IP or DynDns Port 21 IP or DynDns Port 22 IP or...

Page 53: ... l i n g T a b l e s D a t a C o m p a t i b l e e l e m e n t s F u n c t i o n s d e s c r i p t i o n D e l e t e S u p e r v i s i o n Clearing old events until a date To Day Month Year indicate the date Press to delete and to delete permanently Automatic deletion of old events Maximum number of days saved max 99 days and 00 to cancel Do not forget to save the changes made with Delete events ...

Page 54: ... a part From user nº indicate the fisrt user number To user nº indicate the last user number Press to delete and to delete permanently Delete Visits Click to clear all the visitors or a part Delete all Delete a part From visitor nº indicate the first visitor number To visitor nº indicate the last visitor number Press to delete and to delete permanently Delete Time tables Select time tables Press t...

Page 55: ...lly launch the process We only have 12 seconds to start the update It is strongly recommended to prepare before starting what is described below Ensure that the antivirus and firewall are disabled Use the app tftpd32 exe as well as the update firmware XXXXX ipl Execute tftpd32 exe Select Tftp Client then put the address 192 168 1 AAA AAA is the device address if it doesn t respond use AAA 61 and t...

Page 56: ...Activation Activation maintained End of the activation Access Point Hostname OUTPUTS Red colour no activated Green colour activated REL 1 REL 2 REL 3 REL 4 Select End Activation Permanent Activation Activation and INPUTS Red colour no activated Green colour activated IN1 IN2 IN3 IN4 IN5 IN6 Access type for this point Normal Universal without restriction for all the users Forbidden Acces type for t...

Page 57: ...ate the group To select the reader Reader All indicate the reader Possibility of going to the previous next or last user To show the 10 last events the previous 10 or the following 10 00001MARTIN CAROL 01 01 02 01 00 48 L2 I STOCK FCN User Nº User Identity Date Hour L1 Reader 1 L2 Reader 2 L0 Function I Input O Output Access point denomination Type 00001 MARTIN CAROL 01 01 02 01 00 48 L2 I STOCK F...

Page 58: ...lumn indicates AUT Authorized access AUE Authorized access in a slave for consumable days only in the master RZT Denied access excluding time areas RAS Denied access door not allowed RAN Denied access violation of the antipassback RFE Denied access due to holiday RVI Denied access exceeding visiting period RCN Denied access full area RCA Denied access number of accesses exceeded RCD Rejected by nu...

Page 59: ... webserver or monitoring software 65203 Activation output nb3 from webserver or monitoring software 65204 Activation output nb4 from webserver or monitoring software 65209 Permanent activation output nb1 65210 Permanent activation output nb2 65211 Permanent activation output nb3 65212 Permanent activation output nb4 65217 End permanent activation output nb1 65218 End permanent activation output nb...

Page 60: ...ut nb4 from an input of the same device using the output function Output of a configurable input 65237 Reset Unlocking ANTIPASSBACK user 65238 Reset Unlocking ANTIPASSBACK group 65250 Activation degraded mode 65251 Desactivate degraded mode 65300 Activation output door lock 1 associated with input PB 1 65301 Activation output door lock 2 associated with input PB 2 65302 Activation output fraud gat...

Page 61: ...h installer password 65401 Login with administrator password 65402 Login with consultant password 65403 E mail sending of movements in progress 65404 Error sending e mail movements 65405 Properly sending e mail 65406 Sending users e mail in progress 65407 Error sending users e mail 65408 Sending users e mail correctly 65409 E mail sending of presents in progress 65410 Error of sending e mail of pr...

Page 62: ... the groupe SEND To send to the e mail 1 example adip fr To show the last 10 users the previous 10 or the following 10 NO MASTER to indicate that this controller is not the MASTER TOTAL 65000 PRESENTS 00000 User Possibility of going to the previous or next group List of users missing Visualisation of the users missing in the site Access group All indicate the group SEND To send to the e mail 1 exa...

Page 63: ...h 42x25x14mm and 0 05Kg Installation environment Indoor 0 to 50 c Bus UP STREAM Connector receiving the signal or RS485 or Wiegand or DATACLOCK original to be protected The electric ground must be connected to GND either on the bus upstream or on the bus downstream GND B W1 A W0 LINE Bus DOWN STREAM Connector turning over signal RS485 or WIEGAND or protected DATACLOCK The electric ground must be c...

Reviews: