3
– English
EN
LIMIT SWITCH ADJUSTMENT
5
5.1 • Limit positions on opening
and closing
During the up and down movements, the motor stops the
shutter automatically when it reaches the limit switch posi-
tions (
fig. 3
): position “
0
” (shutter totally retracted) and po-
sition “
1
” (shutter totally extended). The factory settings of
these positions are very approximate, and therefore follow
the procedure below to adapt them to the specific dimen-
sions of the roller shutter concerned.
5.2 • Adjusting first limit
position “0” and then limit
position “1”
01.
Move the shutter to position “1”.
Align the adjustment screws with the re-
spective limit positions:
02.
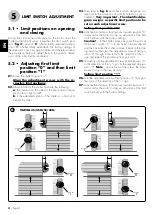
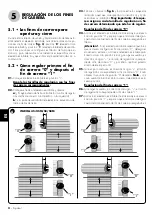
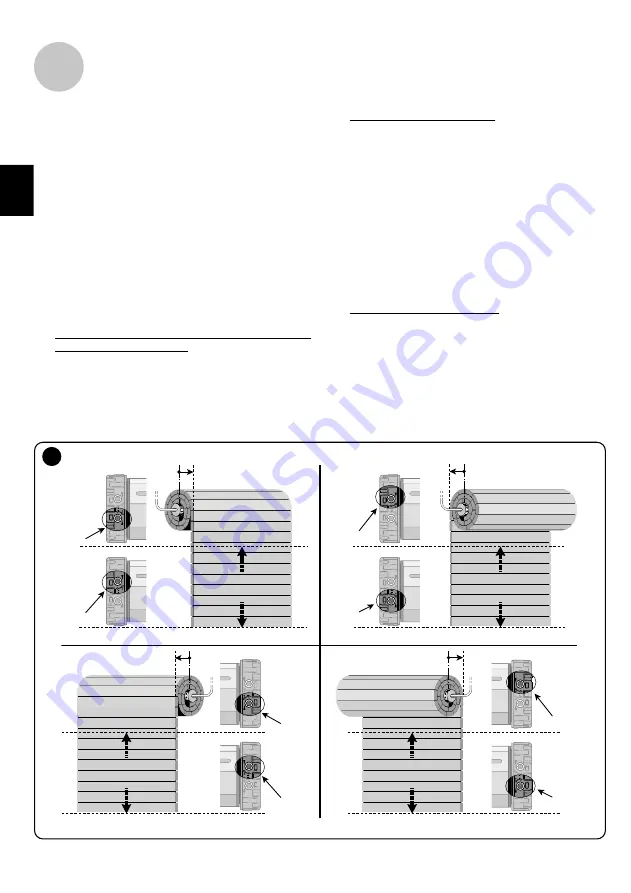
Stand in front of the shutter and note the following:
a
) the location on the roller of the limit position adjust-
ment screws: right or left?
b
) if the extended section of the shutter is in front of or
behind the roller.
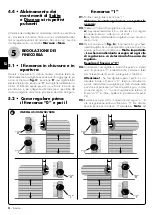
03.
Then refer to
fig. 6
and check which diagrams cor-
respond to the situations a) and b) noted on your in-
stallation.
Very important – The identified dia-
gram assigns a specific limit position to be
set on each adjustment screw.
Setting limit position “0”:
04.
Activate the shutter so that it moves towards position “0”
and wait for the motor to stop on activation of the limit
switch pre-set with the factory settings.
Caution!
– If the shutter moves beyond the point at
which limit switch “0” is to be fixed, stop movement
and then activate the shutter to move it back to the start-
ing position; then turn the adjustment screw of limit po-
sition “0” through a few turns in the direction of the “–”
sign and repeat the procedure from point 04.
05.
Gradually turn the adjustment screw of limit position “0”
in the direction of the “+” sign, to the required stop po-
sition “0”.
Note
– on each turn of the screw, the motor
moves to stop in the new position.
Setting limit position “1”:
06.
Turn the adjustment screw of limit position “1” through a
few turns in the direction of the “–” sign.
07.
Activate the shutter so that it moves towards position “1”
and wait for the motor to stop on activation of the limit
switch pre-set with the factory settings.
6
“
0
”
“
1
”
“
0
”
“
1
”
“
0
”
“
1
”
“
0
”
“
1
”
ITAROLL 45/45M/58/58M


