background image


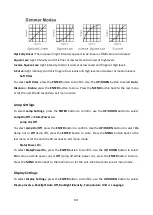
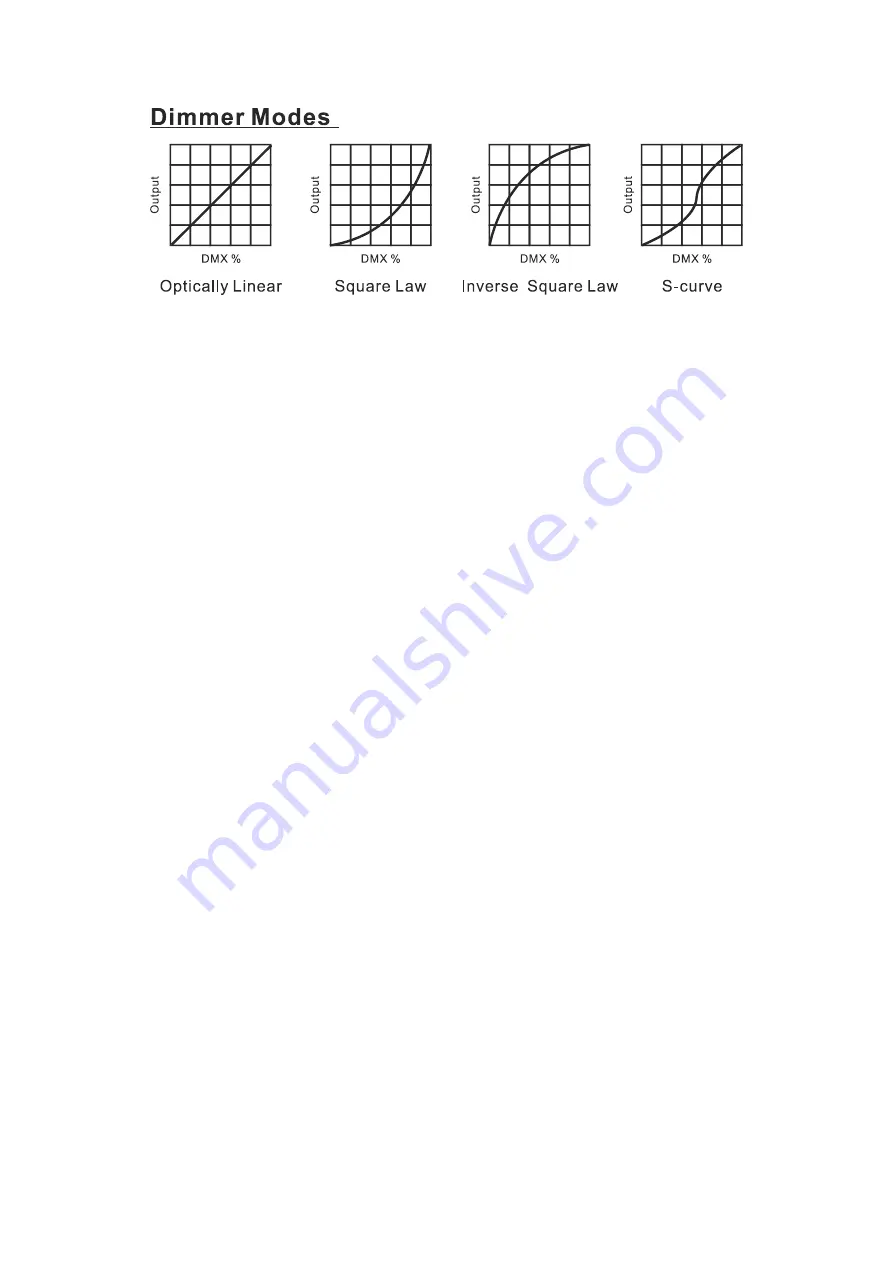
Optically Linear: 

The increase in light intensity appears to be linear as DMX value is increased.


Square Law:

 Light intensity control is finer at low levels and coarser at high levels. 

Inverse Square Law: 

Light intensity control is coarser at low levels and finger at high levels. 

S-Curve: 

Light intensity control is finger at low levels and high levels and coarser at medium levels. 

Soft Filter 

To select 

Soft Filter

, press the 

ENTER

 button to confirm. Use the 

UP

/

DOWN

 button to select

 Auto

Disable 

or 

Enable

, press the 

ENTER

 button to store. Press the 

MENU

 button back to the last menu 

or let the unit idle 30 seconds to exit menu mode. 


Lamp Settings 

To select 

Lamp Settings

, press the 

ENTER

 button to confirm, use the 

UP

/

DOWN

 button to select


Lamp On/Off 

or

 State/Power on.


Lamp On/Off 

To select 

Lamp


On/Off

, press the 

ENTER

 button to confirm. Use the 

UP

/

DOWN

 button to select 

On


(lamp on) or 

Off

 (lamp off), press the 

ENTER

 button to store. Press the 

MENU

 button back to the 

last menu or let the unit idle 30 seconds to exit menu mode. 

State/Power On 

To select 

State/Power On

, press the 

ENTER

 button to confirm. Use the 

UP

/

DOWN

 button to select 

On

 (Lamp on while power on) or 

Off

 (Lamp off while power on), press the 

ENTER

 button to store. 

Press the 

MENU

 button back to the last menu or let the unit idle 30 seconds to exit menu mode. 


Display Settings 

To select 

Display Settings

, press the 

ENTER

 button to confirm, use the 

UP

/

DOWN

 button to select


Display Inverse, Backlight Auto Off, Backlight Intensity, Temperature Unit 

or

 Language. 


13F 


Summary of Contents for Spartan Hybrid C

Page 1: ......

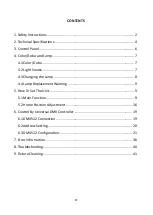
Page 2: ...ght Source 7 4 3 Changing the Lamp 8 4 4 Lamp Replacement Warning 9 5 How To Set The Unit 9 5 1 Main Function 9 5 2 Home Position Adjustment 16 6 Control By Universal DMX Controller 19 6 1 DMX512 Connection 19 6 2 Address Setting 20 6 3 DMX512 Configuration 21 7 Error Information 36 8 Troubleshooting 40 9 Fixture Cleaning 41 1F ...

Page 3: ...ise the unit will be overheated Before operating ensure that the voltage and frequency of power supply match the power requirements of the unit It s important to ground the yellow green conductor to earth in order to avoid electric shock Minimum ambient temperature TA 0 Maximum ambient temperature TA 40 DO NOT connect the device to any dimmer pack During initial start up some smoke or smell may ar...

Page 4: ...ssistance center if needed Disconnect the mains power if the fixture is has not been used for a long time DO use the original packing materials before transporting it again Hot lamp explosion hazard DO NOT open the unit within 15 minutes after switching off DO replace the bulb once it is damaged deformed or life expired DO NOT look directly at the light while the bulb is on Never touch bulb with b...

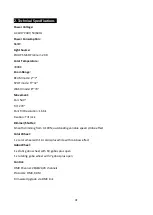
Page 5: ...an 540 Tilt 270 Pan Tilt Resolution 16 bit Fixation Tilt lock Dimmer Shutter Smooth dimming from 0 100 outstanding variable speed strobe effect Color Wheel 1 x color wheel with 14 colors plus white with rainbow effect Gobo Wheel 1 x static gobo wheel with 18 gobos plus open 1 x rotating gobo wheel with 7 gobos plus open Control DMX Channel 28 24 21 20 channels Protocols DMX RDM Firmware Upgrade vi...

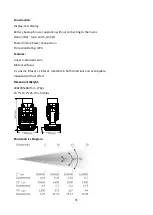
Page 6: ...t 3 pin and 5 pin XLR Power In Out Power Connector in Protection Rating IP20 Features Linear motorized zoom Motorized focus 2 x prisms 8 facet 16 facet rotatable in both directions and overlayable Independent frost effect Dimension Weight 400x335x667mm 27kgs 15 7 x13 2 x26 3 in 59 5lbs Photometrics Diagram 5F ...

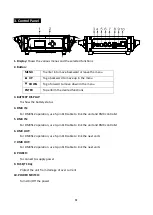
Page 7: ...To show the battery status 4 DMX IN For DMX512 operation use 5 pin XLR cable to link the unit and DMX controller 5 DMX IN For DMX512 operation use 3 pin XLR cable to link the unit and DMX controller 6 DMX OUT For DMX512 operation use 5 pin XLR cable to link the next units 7 DMX OUT For DMX512 operation use 3 pin XLR cable to link the next units 8 POWER To connect to supply power 9 FUSE T 10A Prote...

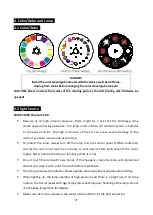
Page 8: ...close look at the lamp To protect the lamp always turn off the lamp first via control panel or DMX controller and let the unit run at least five minutes to cool down before switching off the mains supply Never handle the lamp or luminary when it is hot Do not touch the bulb with bare hands If this happens clean the lamp with denatured alcohol and wipe it with a lint free cloth before installation ...

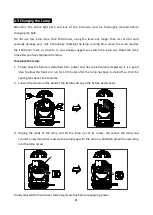
Page 9: ...have replaced the lamp To replace the lamp 1 Ensure that the fixture is detached from power and has cooled down completely It is a good idea to allow the fixture to run for 10 minutes after the lamp has been turned off so that the cooling fans have time to works 2 Loosen the screws on the head of the fixture and open the fixture head covers 3 Unplug the leads of the lamp and lift the lamp out of i...

Page 10: ...ll flash the message Lamp Timeout Use Replace Lamp Now for up to 10 minutes After 10 minutes the fixture will return to normal operation Attention Damages caused by the failure to replace the bulb in time are not subject to warranty 5 How To Set The Unit 5 1 Main Function Turn on the unit press the MENU button into menu mode and press the UP DOWN button until the required function is shown on the ...

Page 11: ...10F ...

Page 12: ... to confirm Use the UP DOWN button to view the DMX channel value Press the MENU button back to the last menu or let the unit idle 30 seconds to exit menu mode Fixture Settings To select Fixture Settings press the ENTER button to confirm use the UP DOWN button to select Pan Inverse Tilt Inverse P T Feedback P T Speed Focus Compensate Bl O P T Moving Bl O Color Change Bl O Gobo Change Dimmer Curve o...

Page 13: ...rm Use the UP DOWN button to select No normal while pan tilt moving or Yes blackout while pan tilt moving press the ENTER button to store Press the MENU button back to the last menu or let the unit idle 30 seconds to exit menu mode BL O Color Change To select BL O Color Change press the ENTER button to confirm Use the UP DOWN button to select No normal while color moving or Yes blackout while colo...

Page 14: ...amp Settings press the ENTER button to confirm use the UP DOWN button to select Lamp On Off or State Power on Lamp On Off To select Lamp On Off press the ENTER button to confirm Use the UP DOWN button to select On lamp on or Off lamp off press the ENTER button to store Press the MENU button back to the last menu or let the unit idle 30 seconds to exit menu mode State Power On To select State Power...

Page 15: ...utton to store Press the MENU button back to the last menu or let the unit idle 30 seconds to exit menu mode Temperature Unit Select Temperature Unit press the ENTER button to confirm present mode will blink on the display use the UP DOWN button to select or press the ENTER button to store Press the MENU button back to the last menu or let the unit idle 30 seconds to exit menu mode Language Select...

Page 16: ...s the ENTER button to confirm fixture use time will show on the display press the MENU button to exit Light Use Hour Select Light Use Hour press the ENTER button to confirm light use time will show on the display press the ENTER button to confirm use the UP DOWN button to select Exit or Reset Time press the ENTER button to confirm press the MENU button to exit Temperature Select Temperature press ...

Page 17: ...All Select All press the ENTER button to confirm use the UP DOWN button to select No normal or Yes the unit will run built in program to reset all motors to their home positions press ENTER button to store Press the MENU button to exit Special Functions Factory Settings Select Factory Settings press the ENTER button to confirm use the UP DOWN button to select No normal or Yes the fixture will rese...

Page 18: ...ffset the value from 128 to 127 press the ENTER button to store Press the MENU button to exit Shutter Enter offset mode Select Shutter press the ENTER button to confirm the present position will blink on the display use the UP DOWN button to offset the value from 128 to 127 press the ENTER button to store Press the MENU button to exit Color Enter offset mode Select Color press the ENTER button to ...

Page 19: ...N button to offset the value from 128 to 127 press the ENTER button to store Press the MENU button to exit Prism 1 Enter offset mode Select Prism 1 press the ENTER button to confirm the present position will blink on the display use the UP DOWN button to offset the value from 128 to 127 press the ENTER button to store Press the MENU button to exit R Prism 1 Enter offset mode Select R Prism 1 press...

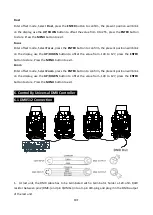
Page 20: ... the value from 128 to 127 press the ENTER button to store Press the MENU button to exit Zoom Enter offset mode Select Zoom press the ENTER button to confirm the present position will blink on the display use the UP DOWN button to offset the value from 128 to 127 press the ENTER button to store Press the MENU button to exit 6 Control By Universal DMX Controller 6 1 DMX512 Connection 1 At last unit...

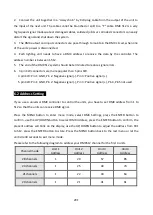
Page 21: ...ative signal Pin 3 Positive signal 5 pin XLR Pin 1 GND Pin 2 Negative signal Pin 3 Positive signal Pin4 Pin5 not used 6 2 Address Setting If you use a universal DMX controller to control the units you have to set DMX address from 1 to 512 so that the units can receive DMX signal Press the MENU button to enter menu mode select DMX Settings press the ENTER button to confirm use the UP DOWN button to...

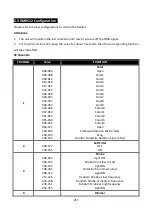
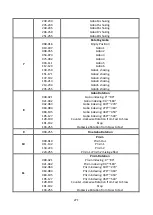
Page 22: ...034 037 038 042 043 046 047 050 051 054 055 058 059 063 064 127 128 189 190 193 194 255 Color Open Color1 Color2 Color3 Color4 Color5 Color6 Color7 Color8 Color9 Color10 Color11 Color12 Color13 Color14 Open Clockwise Rotation Fast to Slow Stop Counter Clockwise Rotation Slow to Fast 2 000 127 128 255 Soft Filter OFF ON 3 000 003 004 103 104 107 108 207 208 212 213 225 226 238 239 251 252 255 Strob...

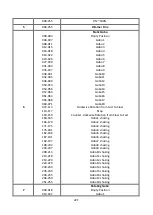
Page 23: ...1 255 Static Gobo Empty Position Gobo1 Gobo2 Gobo3 Gobo4 Gobo5 Gobo6 Gobo7 Gobo8 Gobo9 Gobo10 Gobo11 Gobo12 Gobo13 Gobo14 Gobo15 Gobo16 Gobo17 Gobo18 Clockwise Rotation from Fast to Slow Stop Counter clockwise Rotation from Slow to Fast Gobo1 shaking Gobo2 shaking Gobo3 shaking Gobo4 shaking Gobo5 shaking Gobo6 shaking Gobo7 shaking Gobo8 shaking Gobo9 shaking Gobo10 shaking Gobo11 shaking Gobo12 ...

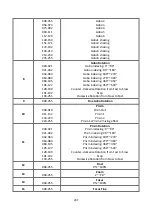
Page 24: ...0 Counter clockwise Rotation from Fast to Slow Stop Clockwise Rotation from Slow to Fast 9 000 255 Fine Gobo Rotation 10 000 010 011 132 133 223 224 255 Prism Prism Out Prism 1 Prism 2 Prism 1 Prism 2 mixing effect 11 000 021 021 042 042 063 063 084 084 105 105 127 128 190 191 192 193 255 Prism Rotation Prism indexing 0 90 Prism indexing 90 180 Prism indexing 180 270 Prism indexing 270 360 Prism i...

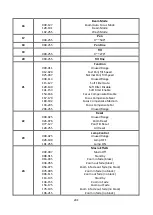
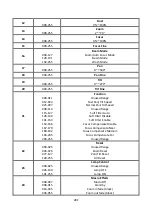
Page 25: ...us Compensate Disable Focus Compensate Near Focus Compensate Medium Focus Compensate Far Unused Range 22 000 025 026 076 077 127 128 255 Reset Unused Range Zoom Reset Pan Tilt Reset All Reset 23 000 025 026 100 101 255 Lamp Control Unused Range Lamp OFF Lamp ON 24 000 007 008 015 016 035 036 055 056 075 076 095 096 115 116 135 136 155 156 175 176 195 196 215 Macro Effects Macro Off Standby Zoom in...

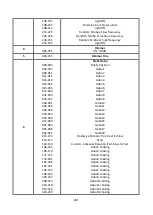
Page 26: ...TION 1 000 004 005 008 009 012 013 016 017 021 022 025 026 029 030 033 034 037 038 042 043 046 047 050 051 054 055 058 059 063 064 127 128 189 190 193 194 255 Color Open Color1 Color2 Color3 Color4 Color5 Color6 Color7 Color8 Color9 Color10 Color11 Color12 Color13 Color14 Open Clockwise Rotation Fast to Slow Stop Counter Clockwise Rotation Slow to Fast 2 000 127 128 255 Soft Filter OFF ON 3 000 00...

Page 27: ...7 060 061 064 065 068 069 071 072 113 114 117 118 159 160 165 166 170 171 175 176 181 182 186 187 191 192 197 198 202 203 207 208 213 214 218 219 223 224 229 Static Gobo Empty Position Gobo1 Gobo2 Gobo3 Gobo4 Gobo5 Gobo6 Gobo7 Gobo8 Gobo9 Gobo10 Gobo11 Gobo12 Gobo13 Gobo14 Gobo15 Gobo16 Gobo17 Gobo18 Clockwise Rotation from Fast to Slow Stop Counter clockwise Rotation from Slow to Fast Gobo1 shaki...

Page 28: ...n Gobo indexing 0 90 Gobo indexing 90 180 Gobo indexing 180 270 Gobo indexing 270 360 Gobo indexing 360 450 Gobo indexing 450 540 Counter clockwise Rotation from Fast to Slow Stop Clockwise Rotation from Slow to Fast 9 000 255 Fine Gobo Rotation 10 000 010 011 132 133 223 224 255 Prism Prism Out Prism 1 Prism 2 Prism 1 Prism 2 mixing effect 11 000 021 021 042 042 063 063 084 084 105 105 127 128 19...

Page 29: ...0 192 193 205 206 255 Function Unused Range Fast Pan Tilt Speed Normal Pan Tilt Speed Unused Range Soft Filter Auto Soft Filter Disable Soft Filter Enable Focus Compensate Disable Focus Compensate Near Focus Compensate Medium Focus Compensate Far Unused Range 22 000 025 026 076 077 127 128 255 Reset Unused Range Zoom Reset Pan Tilt Reset All Reset 23 000 025 026 100 101 255 Lamp Control Unused Ran...

Page 30: ...00 255 Tilt 0 270 4 000 255 Tilt Fine 5 000 254 255 P T Speed Fast to Slow Fast 6 000 009 010 014 015 029 030 034 035 039 040 044 045 049 050 059 060 064 065 069 070 074 075 079 080 084 085 089 090 104 105 109 110 114 115 119 120 124 Function No Function Reset All Reset Effect Reset XY No Function Lamp On Lamp Off No Function Dimmer Curve Square Law Dimmer Curve Inverse Square Law Dimmer Curve Lin...

Page 31: ...olor12 Color13 Color14 Open Clockwise Rotation Fast to Slow Stop Counter Clockwise Rotation Slow to Fast 8 000 127 128 255 Soft Filter OFF ON 9 000 007 008 015 016 023 024 031 032 039 040 047 048 055 056 063 064 094 095 098 099 129 130 147 148 165 166 183 184 201 202 219 220 237 238 255 Rotating Gobo Empty Position Gobo1 Gobo2 Gobo3 Gobo4 Gobo5 Gobo6 Gobo7 Counter Clockwise Rotation from Fast to S...

Page 32: ...34 035 037 038 041 042 045 046 049 050 053 054 056 057 060 061 064 065 068 069 071 072 113 114 117 118 159 160 165 166 170 171 175 176 181 182 186 187 191 192 197 198 202 203 207 208 213 214 218 219 223 Static Gobo Empty Position Gobo1 Gobo2 Gobo3 Gobo4 Gobo5 Gobo6 Gobo7 Gobo8 Gobo9 Gobo10 Gobo11 Gobo12 Gobo13 Gobo14 Gobo15 Gobo16 Gobo17 Gobo18 Clockwise Rotation from Fast to Slow Stop Counter clo...

Page 33: ...Counter clockwise Rotation from Fast to Slow Stop Clockwise Rotation from Slow to Fast 15 000 021 021 042 042 063 063 084 084 105 105 127 128 190 191 192 193 255 Prism 2 Rotation Prism indexing 0 90 Prism indexing 90 180 Prism indexing 180 270 Prism indexing 270 360 Prism indexing 360 450 Prism indexing 450 540 Counter clockwise Rotation from Fast to Slow Stop Clockwise Rotation from Slow to Fast ...

Page 34: ... 064 127 128 189 190 193 194 255 Color Open Color1 Color2 Color3 Color4 Color5 Color6 Color7 Color8 Color9 Color10 Color11 Color12 Color13 Color14 Open Clockwise Rotation Fast to Slow Stop Counter Clockwise Rotation Slow to Fast 2 000 127 128 255 Soft Filter OFF ON 3 000 003 004 103 104 107 108 207 208 212 213 225 226 238 239 251 252 255 Strobe Light OFF Strobe from Slow to Fast Light ON Pulsation...

Page 35: ... 246 250 251 255 Static Gobo Empty Position Gobo1 Gobo2 Gobo3 Gobo4 Gobo5 Gobo6 Gobo7 Gobo8 Gobo9 Gobo10 Gobo11 Gobo12 Gobo13 Gobo14 Gobo15 Gobo16 Gobo17 Gobo18 Clockwise Rotation from Fast to Slow Stop Counter clockwise Rotation from Slow to Fast Gobo1 shaking Gobo2 shaking Gobo3 shaking Gobo4 shaking Gobo5 shaking Gobo6 shaking Gobo7 shaking Gobo8 shaking Gobo9 shaking Gobo10 shaking Gobo11 shak...

Page 36: ...obo indexing 360 450 Gobo indexing 450 540 Counter clockwise Rotation from Fast to Slow Stop Clockwise Rotation from Slow to Fast 9 000 255 Fine Gobo Rotation 10 000 010 011 132 133 223 224 255 Prism Prism Out Prism 1 Prism 2 Prism 1 Prism 2 mixing effect 11 000 021 021 042 042 063 063 084 084 105 105 127 128 190 191 192 193 255 Prism Rotation Prism indexing 0 90 Prism indexing 90 180 Prism indexi...

Page 37: ...All Reset 20 000 025 026 100 101 255 Lamp Control Unused Range Lamp OFF Lamp ON 7 Error Information 1 CPU B C D E Error Check whether the 485 DATA leads on the PCB board are installed in place or disconnected Check whether the 485 DATA lead is disconnected Check whether the relevant signal circuit 485 DATA on the PCB board is damaged 2 Pan Reset Error Check if the position of the pan mounting magn...

Page 38: ...nected 6 Color Error Check if the position of the color wheel mounting magnetic steel falls off or is damaged Check if there are other interference items in the color wheel operating range Check if the color wheel Hall elements is damaged Check if the color wheel Hall elements is in poor contact with the lead of the PCB board or disconnected Check if the color wheel motor is damaged Check if there...

Page 39: ...ard or disconnected Check if the static gobo wheel motor is damaged Check if there is any damage to the circuit of the static gobo wheel motor drive board 10 Animation Error Check if the position of the animation mounting magnetic steel falls off or is damaged Check if there are other interference items in the animation operating range Check if the animation Hall elements is damaged Check if the a...

Page 40: ...connected Check if the focus motor is damaged Check if there is any damage to the circuit of the focus motor drive board 14 Zoom Error Check if the position of the zoom mounting magnetic steel falls off or is damaged Check if there are other interference items in the zoom operating range Check if the zoom Hall elements is damaged Check if the zoom Hall elements is in poor contact with the lead of ...

Page 41: ...Following are a few common problems that may occur during operation Here are some suggestions for easy troubleshooting A The unit does not work no light and the fan does not work 1 Check the connect power and main fuse 2 Measure the mains voltage on the main connector 3 Check the power on LED to see if it can be light up or not 40F ...

Page 42: ...r s drive IC on the PCB might be out of condition D The lamp is cutting out intermittently 1 The lamp is not working well Check the mains voltage either too high or too low 2 Internal temperature may be too high Check if replacement of fan is needed on the head 9 Fixture Cleaning The cleaning of internal and external optical lenses and or mirrors must be carried out periodically to optimize light ...

Page 43: ...42F ...

Page 44: ...Innovation Quality Performance ...

Reviews: