background image

 
XP-5R Beam 


-                 


23

-

return to the last menu. Press MENU button to exit.   


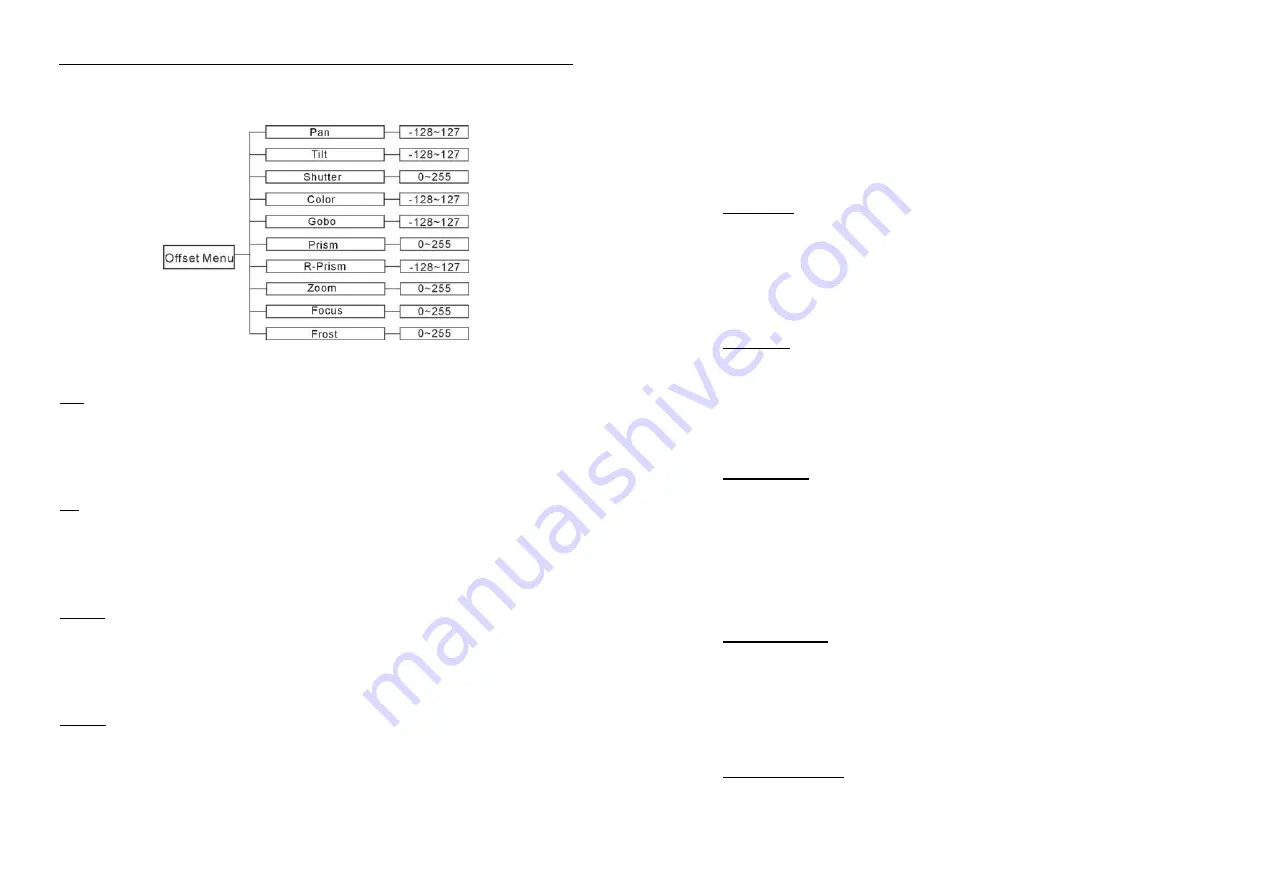
Pan

pan home position adjust


Enter offset mode, Select 

Pan

, press ENTER button to confirm, the present position will 

blink on the display, use UP and DOWN button to offset the value from -128 to 127, press 

ENTER button to store. Press MENU button to exit. 

Tilt

Tilt home position adjust   

Enter offset mode, Select 

Tilt

, press ENTER button to confirm, the present position will 

blink on the display, use UP and DOWN button to offset the value from -128 to 127, press 

ENTER button to store. Press MENU button to exit. 

Shutter

Shutter home position adjust   

Enter offset mode, Select 

Shutter

, press ENTER button to confirm, the present position will 

blink on the display, use UP and DOWN button to offset the value from 0 to 255, press 

ENTER button to store. Press MENU button to exit. 

Color

Color home position adjust   

Enter offset mode, Select 

Color

, press ENTER button to confirm, the present position will 

blink on the display, use UP and DOWN button to offset the value from -128 to 127, press 

ENTER button to store. Press MENU button to exit. 


16-

Fixture Setting 

Enter menu mode, select

 Fixture Setting,

 press ENTER button to confirm, use UP and 

DOWN button to select

 Pan Inverse, Tile Inverse, BL.O. P/T Moving, BL.O.    Color 

Change or BL.O. Gobo Change. 

Pan Inverse


Select 

Pan Inverse

, press ENTER button to confirm, present mode will blink on the 

display, use UP and DOWN button to select 

No

 (normal) or 

Yes

 (pan inverse), press 

ENTER button to store. Press MENU button back to the last menu or let the unit idle 

one minute to exit menu mode. 

Tilt Inverse 

Select 

Tilt Inverse

, press ENTER button to confirm, present mode will blink on the 

display, use UP and DOWN button to select 

No

 (normal) or 

Yes

 (tilt inverse), press 

ENTER button to store. Press MENU button back to the last menu or let the unit idle 

one minute to exit menu mode. 

P/T Feedback — pan/tilt Feedback 

Select 

P/T Feedback

, press ENTER button to confirm, present mode will blink on the 

display, press UP/DOWN button to select 

No

 (Pan or tilt’s position will not feedback 

while out of step.) or 

Yes

 (Feedback while pan/tilt out of step. ), press ENTER button to 

store. Press MENU button back to the last menu or let the unit idle one minute to exit 

menu mode. 

BL.O. P/T Moving

Blackout while pan/tilt moving 

Select 

BL.O. P/T Moving

, Press ENTER button to confirm, present mode will blink on 

the display, use UP and DOWN button to select 

No

 (normal while pan/tilt moving) or 

Yes

 (blackout while pan/tilt moving), press ENTER button to store. Press MENU button 

back to the last menu or let the unit idle one minute to exit menu mode. 

BL.O. Color Change

Blackout while change color 

Select 

BL.O. Color Change

, press ENTER button to confirm, present mode will blink 

www.bluelight.at

www.bluelight.at

Summary of Contents for Xperior 5R BEAM F

Page 1: ...EMC Directive 2004 108 EC EN55103 1 1996 EN55103 2 1996 EN61000 3 2 2006 EN61000 3 3 2008 Harmonized Standard EN 60598 2 17 1989 A2 1991 EN60598 1 2008 A11 2009 Part 1 General requirements and test Following the provisions of the low voltage directive 2006 95 EC Innovation Quality Performance XperiorTM 5R BEAM User Guide Please read these instructions carefully before use www bluelight at www blue...

Page 2: ...EMC Directive 2004 108 EC EN55103 1 1996 EN55103 2 1996 EN61000 3 2 2006 EN61000 3 3 2008 Harmonized Standard EN 60598 2 17 1989 A2 1991 EN60598 1 2008 A11 2009 Part 1 General requirements and test Following the provisions of the low voltage directive 2006 95 EC Innovation Quality Performance XperiorTM 5R BEAM User Guide Please read these instructions carefully before use www bluelight at www blue...

Page 3: ...ce and Cleaning 37 38 B Do maintain the fixtures every two months and make sure that all the screws and terminals have been locked firmly to make sure the normal performance of the fixtures Negligence of maintenance would cause malfunction of the fixture Cleaning The cleaning of internal and external optical lenses and or mirrors must be carried out periodically to optimize light output Cleaning f...

Page 4: ...ce and Cleaning 37 38 B Do maintain the fixtures every two months and make sure that all the screws and terminals have been locked firmly to make sure the normal performance of the fixtures Negligence of maintenance would cause malfunction of the fixture Cleaning The cleaning of internal and external optical lenses and or mirrors must be carried out periodically to optimize light output Cleaning f...

Page 5: ...nly Use only in a dry location y Do install and operate by qualified operator y Do not allow children to operate the fixture y Use safety chain when fixing the unit Handle the unit by carrying its base instead of head only y The unit must be installed in a location with adequate ventilation at least 50cm from adjacent surfaces y Be sure that no ventilation slots are blocked otherwise the unit will...

Page 6: ...nly Use only in a dry location y Do install and operate by qualified operator y Do not allow children to operate the fixture y Use safety chain when fixing the unit Handle the unit by carrying its base instead of head only y The unit must be installed in a location with adequate ventilation at least 50cm from adjacent surfaces y Be sure that no ventilation slots are blocked otherwise the unit will...

Page 7: ...minutes after switching off y Do replace the bulb once it is damaged deformed or life expired y Do not look directly at the light while the bulb is on y Never touch bulb with bare fingers as it is very hot after using y Do not start on the unit without bulb enclosure or when housing is damaged 36 9 Troubleshooting Following are a few common problems that may occur during operation Here are some su...

Page 8: ...minutes after switching off y Do replace the bulb once it is damaged deformed or life expired y Do not look directly at the light while the bulb is on y Never touch bulb with bare fingers as it is very hot after using y Do not start on the unit without bulb enclosure or when housing is damaged 36 9 Troubleshooting Following are a few common problems that may occur during operation Here are some su...

Page 9: ...8 Update Software Download update file from our web site follow the user manual of IU 01 to update the fixture via IU 01 not included 4 2 Installation Unpacking the fixture for flight case pack only 1 Stop the flight case via the brake sheet above the wheels 2 Unlock the lock modules 1 and open the cover board 3 Prop the cover board with lid bracket 4 Take out the fixture 5 Unlock the lock module ...

Page 10: ...8 Update Software Download update file from our web site follow the user manual of IU 01 to update the fixture via IU 01 not included 4 2 Installation Unpacking the fixture for flight case pack only 1 Stop the flight case via the brake sheet above the wheels 2 Unlock the lock modules 1 and open the cover board 3 Prop the cover board with lid bracket 4 Take out the fixture 5 Unlock the lock module ...

Page 11: ...ering extremely powerful output High quality lens Movement Pan 540 Tilt 270 Pan Tilt moving speed adjustable Automatic Pan Tilt correction Easy calibration and maintenance by magnetic home positioning 34 Function Reset Lamp Control 101 255 Lamp on Lamp swtich on passing through the unused range and staying 5 seconds in Lamp ON levels 26 100 Lamp off Lamp swtich off passing through the unused range...

Page 12: ...ering extremely powerful output High quality lens Movement Pan 540 Tilt 270 Pan Tilt moving speed adjustable Automatic Pan Tilt correction Easy calibration and maintenance by magnetic home positioning 34 Function Reset Lamp Control 101 255 Lamp on Lamp swtich on passing through the unused range and staying 5 seconds in Lamp ON levels 26 100 Lamp off Lamp swtich off passing through the unused range...

Page 13: ...8 223 Gobo11 Shaking 212 217 Gobo10 Shaking 205 211 Gobo9 Shaking 199 204 Gobo8 Shaking 192 198 Gobo7 Shaking 186 191 Gobo6 Shaking 180 185 Gobo5 Shaking 173 179 Gobo4 Shaking 167 172 Gobo3 Shaking 160 166 Gobo2 Shaking 159 Fast Rotation 118 Slow Rotation 114 117 Stop 113 Slow Rotation 72 Fast Rotation 68 71 Gobo17 64 67Gobo16 60 63 Gobo15 56 59 Gobo14 52 55 Gobo13 48 51 Gobo12 44 47 Gobo11 40 43 ...

Page 14: ...8 223 Gobo11 Shaking 212 217 Gobo10 Shaking 205 211 Gobo9 Shaking 199 204 Gobo8 Shaking 192 198 Gobo7 Shaking 186 191 Gobo6 Shaking 180 185 Gobo5 Shaking 173 179 Gobo4 Shaking 167 172 Gobo3 Shaking 160 166 Gobo2 Shaking 159 Fast Rotation 118 Slow Rotation 114 117 Stop 113 Slow Rotation 72 Fast Rotation 68 71 Gobo17 64 67Gobo16 60 63 Gobo15 56 59 Gobo14 52 55 Gobo13 48 51 Gobo12 44 47 Gobo11 40 43 ...

Page 15: ...2 Ch11 Ch13 Pan Tilt Pan Fine Tilt Fine Function Reset Lamp Control 101 255 Lamp on Lamp swtich on passing through the unused range and staying 5 seconds in Lamp ON levels 26 100 Lamp off Lamp swtich off passing through the unused range and staying 5 seconds in Lamp OFF levels 0 25 No Function 128 255 Complete reset complete reset is activated passing through the unused range and staying 5 seconds...

Page 16: ...2 Ch11 Ch13 Pan Tilt Pan Fine Tilt Fine Function Reset Lamp Control 101 255 Lamp on Lamp swtich on passing through the unused range and staying 5 seconds in Lamp ON levels 26 100 Lamp off Lamp swtich off passing through the unused range and staying 5 seconds in Lamp OFF levels 0 25 No Function 128 255 Complete reset complete reset is activated passing through the unused range and staying 5 seconds...

Page 17: ...0 Shaking 205 211 Gobo9 Shaking 199 204 Gobo8 Shaking 192 198 Gobo7 Shaking 186 191 Gobo6 Shaking 180 185 Gobo5 Shaking 173 179 Gobo4 Shaking 167 172 Gobo3 Shaking 160 166 Gobo2 Shaking 159 Fast Rotation 118 Slow Rotation 114 117 Stop 113 Slow Rotation 72 Fast Rotation 68 71 Gobo17 64 67Gobo16 60 63 Gobo15 56 59 Gobo14 52 55 Gobo13 48 51 Gobo12 44 47 Gobo11 40 43 Gobo10 36 39 Gobo9 32 35 Gobo8 28 ...

Page 18: ...0 Shaking 205 211 Gobo9 Shaking 199 204 Gobo8 Shaking 192 198 Gobo7 Shaking 186 191 Gobo6 Shaking 180 185 Gobo5 Shaking 173 179 Gobo4 Shaking 167 172 Gobo3 Shaking 160 166 Gobo2 Shaking 159 Fast Rotation 118 Slow Rotation 114 117 Stop 113 Slow Rotation 72 Fast Rotation 68 71 Gobo17 64 67Gobo16 60 63 Gobo15 56 59 Gobo14 52 55 Gobo13 48 51 Gobo12 44 47 Gobo11 40 43 Gobo10 36 39 Gobo9 32 35 Gobo8 28 ...

Page 19: ...255 Fast Rotation 190 193 Stop 189 Slow Rotation 128 Fast Rotation 52 55 Gobo17 49 51Gobo16 46 48 Gobo15 43 45 Gobo14 40 42 Gobo13 37 39 Gobo12 34 36 Gobo11 31 33 Gobo10 28 30 Gobo9 25 27 Gobo8 22 24 Gobo7 19 21 Gobo6 16 18 Gobo5 13 15 Gobo4 10 12 Gobo3 7 9 Gobo2 4 6 Gobo1 0 3 White 124 127 Gobo17 Shaking 120 123 Gobo16 Shaking 116 119 Gobo15 Shaking 251 255 Prism rotation effects 28 247 250 Prism...

Page 20: ...255 Fast Rotation 190 193 Stop 189 Slow Rotation 128 Fast Rotation 52 55 Gobo17 49 51Gobo16 46 48 Gobo15 43 45 Gobo14 40 42 Gobo13 37 39 Gobo12 34 36 Gobo11 31 33 Gobo10 28 30 Gobo9 25 27 Gobo8 22 24 Gobo7 19 21 Gobo6 16 18 Gobo5 13 15 Gobo4 10 12 Gobo3 7 9 Gobo2 4 6 Gobo1 0 3 White 124 127 Gobo17 Shaking 120 123 Gobo16 Shaking 116 119 Gobo15 Shaking 251 255 Prism rotation effects 28 247 250 Prism...

Page 21: ...Macro12 088 095 Macro11 080 087 Macro10 072 079 Macro9 064 071 Macro 8 056 063 Macro7 048 055 Macro6 040 047 Macro5 032 039 Macro4 024 031 Macro 3 016 023 Macro2 008 015 Macro1 000 007 Off 255 0 Slow Fast P T Macro 10 DANGER Install change the gobo wheel with the device switched off only 5 2 Lamp Philips MSD Platinum 5R 8000K y Because of its high internal pressure there might be a risk that the D...

Page 22: ...Macro12 088 095 Macro11 080 087 Macro10 072 079 Macro9 064 071 Macro 8 056 063 Macro7 048 055 Macro6 040 047 Macro5 032 039 Macro4 024 031 Macro 3 016 023 Macro2 008 015 Macro1 000 007 Off 255 0 Slow Fast P T Macro 10 DANGER Install change the gobo wheel with the device switched off only 5 2 Lamp Philips MSD Platinum 5R 8000K y Because of its high internal pressure there might be a risk that the D...

Page 23: ...ver the lamp and wear Anti static gloves to take on the lamp 4 Change a new lamp Fig1 Fig2 Fig3 Fig4 Fig5 Fig6 28 7 4 DMX 512 Configuration Please refer to below configurations to control the fixtures Attention 1 The unit will maintain the last condition until reset if you cut off the DMX signal 2 For the channel Function keep the value for about 5 seconds then the corresponding function will take...

Page 24: ...ver the lamp and wear Anti static gloves to take on the lamp 4 Change a new lamp Fig1 Fig2 Fig3 Fig4 Fig5 Fig6 28 7 4 DMX 512 Configuration Please refer to below configurations to control the fixtures Attention 1 The unit will maintain the last condition until reset if you cut off the DMX signal 2 For the channel Function keep the value for about 5 seconds then the corresponding function will take...

Page 25: ...iagram to address your DMX512 channel for the first 4 units Channel mode Unit 1 Address Unit 2 Address Unit 3 Address Unit 4 Address 19 channels 1 20 39 58 16 channels 1 17 33 49 20 channels 1 21 41 61 12 6 How To Set The Unit 6 1 Power On Display Every time you turn on the unit it will run built in program to reset all motors to their home position the display will show as fig 4 you may hear some...

Page 26: ...iagram to address your DMX512 channel for the first 4 units Channel mode Unit 1 Address Unit 2 Address Unit 3 Address Unit 4 Address 19 channels 1 20 39 58 16 channels 1 17 33 49 20 channels 1 21 41 61 12 6 How To Set The Unit 6 1 Power On Display Every time you turn on the unit it will run built in program to reset all motors to their home position the display will show as fig 4 you may hear some...

Page 27: ... unit to the input of the next unit The cable cannot be branched or split to a Y cable DMX 512 is a very high speed signal Inadequate or damaged cables soldered joints or corroded connectors can easily distort the signal and shut down the system 3 The DMX output and input connectors are pass through to maintain the DMX circuit when one of the units power is disconnected 4 Each lighting unit needs ...

Page 28: ... unit to the input of the next unit The cable cannot be branched or split to a Y cable DMX 512 is a very high speed signal Inadequate or damaged cables soldered joints or corroded connectors can easily distort the signal and shut down the system 3 The DMX output and input connectors are pass through to maintain the DMX circuit when one of the units power is disconnected 4 Each lighting unit needs ...

Page 29: ...ror CPU D Error They appear when board P C or some wires are damaged Pan Reset Error Pan Encode Error Tilt Reset Error Tilt Encode Error Shutter Reset Fail Dimmer Reset Fail Color Reset Fail Gobo Reset Fail and Frost Reset Fail They may appear when turning on or resetting the unit for some parts such as board P C are damaged Please contact the qualified maintenance 14 DMX Functions Enter menu mode...

Page 30: ...ror CPU D Error They appear when board P C or some wires are damaged Pan Reset Error Pan Encode Error Tilt Reset Error Tilt Encode Error Shutter Reset Fail Dimmer Reset Fail Color Reset Fail Gobo Reset Fail and Frost Reset Fail They may appear when turning on or resetting the unit for some parts such as board P C are damaged Please contact the qualified maintenance 14 DMX Functions Enter menu mode...

Page 31: ...es refuse wireless signal or No press ENTER button to store Press MENU button back to the last menu or let the unit idle one minute to exit menu mode 24 Gobo Gobo home position adjust Enter offset mode Select Gobo press ENTER button to confirm the present position will blink on the display use UP and DOWN button to offset the value from 128 to 127 press ENTER button to store Press MENU button to e...

Page 32: ...es refuse wireless signal or No press ENTER button to store Press MENU button back to the last menu or let the unit idle one minute to exit menu mode 24 Gobo Gobo home position adjust Enter offset mode Select Gobo press ENTER button to confirm the present position will blink on the display use UP and DOWN button to offset the value from 128 to 127 press ENTER button to store Press MENU button to e...

Page 33: ...obo Change Pan Inverse Select Pan Inverse press ENTER button to confirm present mode will blink on the display use UP and DOWN button to select No normal or Yes pan inverse press ENTER button to store Press MENU button back to the last menu or let the unit idle one minute to exit menu mode Tilt Inverse Select Tilt Inverse press ENTER button to confirm present mode will blink on the display use UP ...

Page 34: ...obo Change Pan Inverse Select Pan Inverse press ENTER button to confirm present mode will blink on the display use UP and DOWN button to select No normal or Yes pan inverse press ENTER button to store Press MENU button back to the last menu or let the unit idle one minute to exit menu mode Tilt Inverse Select Tilt Inverse press ENTER button to confirm present mode will blink on the display use UP ...

Page 35: ...off the unit via DMX controller Select Off Via DMX press ENTER button to confirm present mode will blink on the display use UP and DOWN button to select Yes turn off the unit via DMX controller available or No turn off the unit via DMX controller impracticable press ENTER 22 to select Yes the unit will run built in program to reset zoom frost and frost to their home positions or No press ENTER but...

Page 36: ...off the unit via DMX controller Select Off Via DMX press ENTER button to confirm present mode will blink on the display use UP and DOWN button to select Yes turn off the unit via DMX controller available or No turn off the unit via DMX controller impracticable press ENTER 22 to select Yes the unit will run built in program to reset zoom frost and frost to their home positions or No press ENTER but...

Page 37: ... When you operate the unit via DMX controller set the value of channel special function to lamp off waiting for 5 seconds then the lamp will be off if you choose yes mode On If DMX On Lamp turns on when DMX signal is detected Select On If DMX On press ENTER button to confirm present mode will blink on the display use UP and DOWN button to select Yes Lamp turns on when DMX signal is detected or No ...

Page 38: ... When you operate the unit via DMX controller set the value of channel special function to lamp off waiting for 5 seconds then the lamp will be off if you choose yes mode On If DMX On Lamp turns on when DMX signal is detected Select On If DMX On press ENTER button to confirm present mode will blink on the display use UP and DOWN button to select Yes Lamp turns on when DMX signal is detected or No ...

Page 39: ...u or let the unit idle one minute to exit menu mode Fixture Enter menu mode select Fixture Test press ENTER button to confirm use UP and 20 DOWN button to select Auto Test or Manual Test Auto Test Select Auto Test press ENTER button to confirm the unit will run built in programs to automatically test pan tilt color gobo gobo rotation shutter dimmer prism prism rotation frost focus and lamp on off ...

Page 40: ...u or let the unit idle one minute to exit menu mode Fixture Enter menu mode select Fixture Test press ENTER button to confirm use UP and 20 DOWN button to select Auto Test or Manual Test Auto Test Select Auto Test press ENTER button to confirm the unit will run built in programs to automatically test pan tilt color gobo gobo rotation shutter dimmer prism prism rotation frost focus and lamp on off ...

Reviews: