Chapter 1
Getting Started
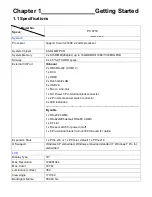
1.1 Specifications
Model No.
Specs
PC 8719
PLP-A717
PLP-A719
System
Processor
Support Core i3-2330E 2.2GHz processor
System Chipset
Intel QM67 PCH
System Memory
2 x SO-DIMM(204pins) up to 16GB DDRIII 1066/1333MHz FSB
Storage
2 x 2.5" SATA HDD space
External I/O Port
Onboard
2 x DB9 RS-232 (COM1.2)
1 x DVI-I
1 x HDMI
2 x RJ45 GbE LAN
4 x USB 2.0
1 x Mic-in, Line-Out
1 x DC Power 3 Pin terminal block connector
1 x 2 Pin remote power switch connector
2 x LED indication
--------------------------------------------------------------------------------------------------------
By cable
1 x RS-232 COM4
1 x RS-422/485 default RS-485 COM3
1 x CF slot
1 x Rocker switch for power on/off
1 x 8 Pin terminal block 3 in/out/VCC/Ground for option
Expansion Slots
1 x PCIe x16 or 1 x PCI slot, default 1 x PCIe x16
OS support
Windows XP embedded, Windows embedded standard 7, Windows 7 Pro for
embedded
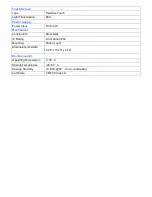
LCD
Display Type
19
”
Max. Resolution
1280X1024
Max. Color
16.7M
Luminance (cd/m2)
350
View Angle
170:160
Backlight Lifetime
50,000 hrs
Summary of Contents for PC8719
Page 8: ...1 2 Dimensions Figure 1 1 Dimensions of PC 8719...
Page 58: ...Step 5 Click Next Step 6 Click Continue Anyway...
Page 59: ...Step 7 Click Continue Anyway Step 8 Click Next...
Page 60: ...Step 9 Select Yes I want to restart this computer now Click Finish...
Page 64: ......
Page 68: ...Step 3 Click Exit to complete the installation...
Page 72: ...Step 6 Wait for installation Then click Next to continue Step 7 Click OK...
Page 73: ...Step 8 Click Finish to compete installation...
Page 78: ...Setting...
Page 79: ...About This panel displays information about the PenMount controller and driver version...
Page 81: ...Step 2 When the mapping screen message appears click OK...
Page 85: ...NOTE The Rotate function is disabled if you use Monitor Mapping...


