44
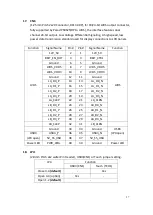
40. CN3
:
(1.27mm Pitch 2X30 Female Header), for expand output connector, it provides
four GPIO, two USB 2.0,one PS/2 mouse, one PS/2 keyboard, two uart, one
PCIex1, one SMbus. connected to the TB-528 riser Card.
Function
Signal Name
Pin#
Pin#
Signal Name
Function
5V_S5_USB
1
2
5V_S5_USB
5V_S5_USB
3
4
5V_S5_USB
USB23_OC
5
6
PSON_ATX-
Exp-USB2
USB2_DM
7
8
USB2_DP
Exp-USB2
Exp-USB3
USB3_DM
9
10
USB3_DP
Exp-USB3
Ground
11
12
Ground
PS/2 MS
PS2_MSCLK
13
14
PS2_MSDATA
PS/2 MS
PS/2 KB
PS2_KBCLK
15
16
PS2_KBDATA
PS/2 KB
COM4
(UART)
COM4_RI
17
18
COM4_DCD-
COM4
(UART)
COM4_TXD
19
20
COM4_RXD
COM4_DTR
21
22
RICOM4_RTS-
COM4_DSR
23
24
COM_CTS-
Ground
25
26
Ground
COM3
(UART)
COM3_RI
27
28
COM3_DCD-
COM3
(UART)
COM3_TXD
29
30
COM3_RXD
COM3_DTR
31
32
DSRCOM3_RTS-
COM3_DSR
33
34
DTRCOM3_CTS-
GPIO23
SOC_GPIO23
35
36
ICH_GPIO22
GPIO12
GPIO25
SOC_GPIO25
37
38
ICH_GPIO24
GPIO24
Ground
39
40
Ground
PCIE
PCIE_TX0_DN
41
42
PCIE_TX0_DP
PCIE
PCIE_RX0_DN
43
44
PCIE_RX0_DP
Ground
45
46
Ground
PCIE_REFCLK0_DN
47
48
PCIE_REFCLK0_DP
PCIE0_WAKE_N
49
50
PLTRST_3P3_N
SMBUS
SMB_CLK_S0
51
52
SMB_DATA_S0
SMBUS
PCIE
PCIE_CLKREQ0_N
53
54
Ground
3P3V_S5
55
56
PWRBTN_ON-
Power Auto on
3P3V_S5
57
58
3P3V_S5
12V
12V_S0
59
60
12V_S0
12V
Summary of Contents for PC9 A Series
Page 12: ...11 1 3 Dimensions Figure 1 1 Dimensions of PC9070 Figure 1 2 Dimensions of PC9080...
Page 13: ...12 Figure 1 3 Dimensions of PC9101 Figure 1 4 Dimensions of PC9120...
Page 14: ...13 Figure 1 5 Dimensions of PC9150A Figure 1 6 Dimensions of PC9156A Resistive Touch...
Page 16: ...15 Figure 1 9 Dimensions of PC9185A Figure 1 10 Dimensions of PC9215A Resistive Touch...
Page 17: ...16 Figure 1 11 Dimensions of PC8215A Projected Capacitive Touch...
Page 19: ...18 Figure 1 13 Rear View of PC9170 9180 Figure 1 14 Rear View of PC9101...
Page 20: ...19 Figure 1 15 Rear View of PC9120 Figure 1 16 Rear View of PC9150A...
Page 21: ...20 Figure 1 17 Rear View of PC9156A Figure 1 18 Rear View of PC9170A...
Page 22: ...21 Figure 1 19 Rear View of PC9185A Figure 1 20 Rear View of PC9215A...
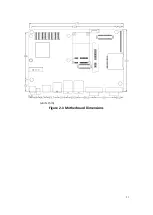
Page 32: ...31 units mm Figure 2 1 Motherboard Dimensions...
Page 83: ...82 Step 3 Read license agreement Click Yes Step 4 Click Next...
Page 84: ...83 Step 5 Click Install Step 6 Click Install...
Page 85: ...84 Step 7 Click Next Step 8 Click Yes I want to restart this computer now Then click Finish...
Page 88: ...87 Step 5 Click Install to begin the installation Step 6 Click Finish to exit the wizard...
Page 92: ...91 Step 3 Read the license agreement Then click Yes to continue Step 4 Click Next to continue...
Page 95: ...94 Step 2 Select Resistive Touch Step 3 Click Next to continue...
Page 97: ...96 Step 6 Wait for installation Then click Next to continue Step 7 Click Continue Anyway...
Page 99: ...98 Step 2 Select Projected Capacitive Step 3 Click Next to continue...
Page 102: ...101 Step 9 Go to C Program Files eGalaxTouch Click Next Step 10 Click Next...
Page 109: ...108 About This panel displays information about the PenMount controller and driver version...
Page 120: ...119 Hardware Saturn Hardware Configuration...
Page 121: ...120 About To display information about eGalaxTouch and its version...

