background image

661 Brea Canyon Rd., Suite 3

Walnut, CA 91789

tel: 909.598.7388, fax: 909.598.0218

© Copyright 2009 Acnodes, Inc.

All rights reserved. Product description and product specifications

are subject to change without notice. For latest product information,

please visit Acnodes’ web site at www.acnodes.com.

RMC 7132

1U Rackmount System

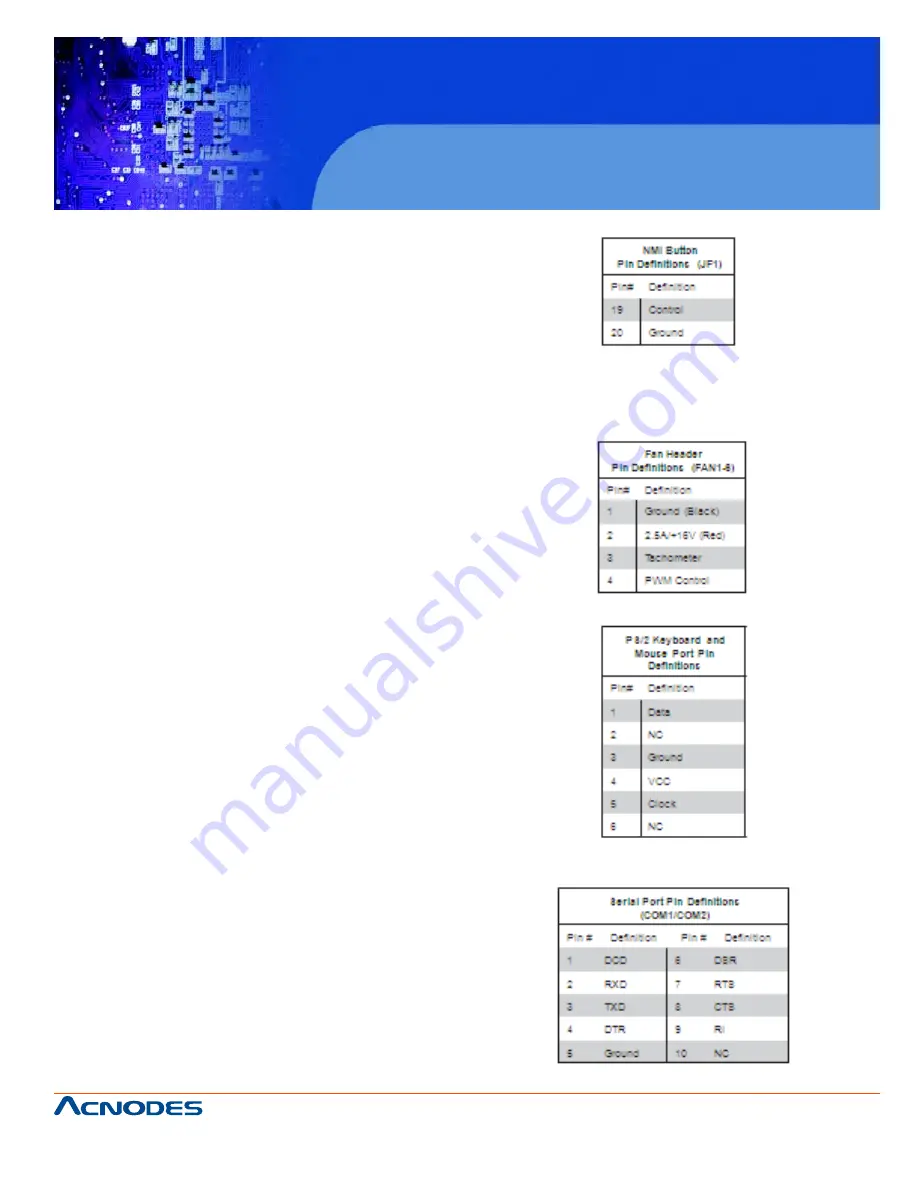
NMI Button

The non-maskable interrupt button header is located
on pins 19 and 20 of JF1. Refer to the table on the
right for pin definitions.

Fan Headers

There are six fan headers on the serverboard,  all of
which  are  4-pin fans (pins 1-3 are backward
compat- ible with traditional 3-pin fans). See the
table on the right for pin defini- tions. The onboard
fan speeds are controlled  by Thermal Management
(via Hardware Monitoring) under the Advanced
Section in the BIOS. The default  is  disabled.
Please  use  all
3-pin fans or all 4-pin fans.

ATX PS/2 Keyboard and PS/2
Mouse Ports

The ATX PS/2 keyboard and the PS/2 mouse are
located beside the USB0/1 ports. The mouse port is
above the keyboard port. See the table on the right
for pin definitions.

Serial Ports

Two serial ports are included on the serverboard.
COM1  is a backpanel port and COM2 is a header
located on the corner of the board near USB2. See
the table on the right for pin definitions.

Summary of Contents for RMC 7132

Page 1: ...ights reserved Product description and product specifications are subject to change without notice For latest product information please visit Acnodes web site at www acnodes com RMC 7132 1U Rackmount System User Manual RMC7132 1U Rackmount Computer comes with Intel Xeon 5600 5500 3600 3500 i7 series Processor ...

Page 2: ...y in the State of California USA The State of California County of Santa Clara shall be the exclusive venue for the resolu tion of any such disputes Acnodes s total liability for all claims will not exceed the price paid for the hardware product FCC Statement This equipment has been tested and found to comply with the limits for a Class A digital device pursuant to Part 15 of the FCC Rules These l...

Page 3: ...cluded with the server system and describes the main features of the embedded board and the RMC7132 chassis Chapter 2 Server Installation This chapter describes the steps necessary to install the Acnodes RMC7132 into a rack and check out the server configuration prior to powering up the system If your server was ordered without the processor and memory components this chapter will refer you to the...

Page 4: ...ectors headers and jumpers Refer to this chapter when adding or removing processors or main memory and when reconfiguring the motherboard Chapter 6 Advanced Chassis Setup Refer to Chapter 6 for detailed information on the RMC7132 1U rackmount server chassis You should follow the procedures given in this chapter when in stalling removing or reconfiguring drives and when replacing system power suppl...

Page 5: ... 1 1 Overview 1 1 2 Motherboard Features 2 Processor 2 Memory 2 Onboard SATA 2 PCI Expansion Slots 2 Onboard Controllers Ports 2 1 3 Server Chassis Features 4 System Power 4 SATASubsystem 4 Control Panel 4 Rear I O Panel 4 Cooling System 4 CHAPTER 2 INSTALLATION 2 1 Overview 5 2 2 Unpacking the System 5 2 3 Preparing for Setup 5 Choosing a Setup Location 5 Rack Mounting Considerations 7 Ambient Op...

Page 6: ... Bay Setup 14 CHAPTER 3 System Interface 3 1 Overview 16 3 2 Control Panel Buttons 16 Reset Button 16 Power 16 3 3 Control Panel LEDs 17 Overheat Fan FAil 17 NIC2 17 NIC1 17 HDD 17 Power 18 3 4 SerialATA Drive Carrier LEDs 19 CHAPTER 4 SYSTEM SAFETY 4 1 Electrical Safety Precautions 19 4 2 General Safety Precautions 20 4 3 ESD Precautions 21 4 4 Operating Precautions 22 CHAPTER 5 ADVANCED MOTHERBO...

Page 7: ...sink 27 Installing an LGA1366 Processor 27 Installing a Passive CPU Heatsink 28 Removing the Heatsink 29 5 6 Installing Memory Modules 30 Installing Removing DIMMs 30 Memory Support 31 5 7 Adding PCI Expansion Cards 32 5 8 Serverboard Details 33 X8STi Quick Reference 34 5 9 Connector Definitions 35 Main ATX Power Supply Connector 35 Processor Power Connector 35 External Power Connector 35 Power Bu...

Page 8: ...ake On LAN 38 External Speaker Internal Buzzer 38 Overheat Fan Fail LED 38 Onboard Power LED 38 Universal Serial Bus USB 39 SGPIO Headers 39 Power Supply SMBus Header 39 LAN 1 2 Ethernet Ports 39 Power Supply Fail LED Header 40 Alarm Reset 40 I Button 40 Unit Identifier Button 40 5 10 Jumper Setting 41 Explanation of Jumpers 41 CMOS Clear 41 VGA Enable Disable 41 LAN 1 2 Enable Disable 42 Watch Do...

Page 9: ...TAPorts 46 5 13 Installaing Software 47 Doctor III 48 CHAPTER 6 ADVANCED CHASSIS SETUP 6 1 Static Sensitive Devices 50 Precautions 50 Unpacking 50 6 2 Control Panel 51 6 3 System Fans 52 System Fan Failure 52 6 4 Drive Bay Installation Removal 53 Accessing the Drive Bays 53 SerialATA Drive Installation 55 SATA Power Cables 56 DVD ROM Drive Installation 56 Power Supply Failure 57 CHAPTER 7 BIOS 7 1...

Page 10: ...description and product specifications are subject to change without notice For latest product information please visit Acnodes web site at www acnodes com RMC 7132 1U Rackmount System 7 5 Boot Configuration 79 7 6 Exit Options 80 Appendix A POST Error Beep Codes Appendix B Installing the Windows OS Appendix C System Specifications ...

Page 11: ...mbedded board Please refer to our web site for informa tion on operating systems that have been certified for use with the RMC7132 In addition to the mainboard and chassis various hardware components may have been included with the RMC7132 as listed below o One CPU heatsink o Two 10 cm blower fans o One air shroud o One slim DVD ROM drive o One internal USB cable for DVD ROM drive o One SATA to US...

Page 12: ...b site for updates on supported processors Memory The embedded board has six 240 pin DIMM slots that can support up to 24 GB of unbuffered ECC non ECC DDR2 1333 1066 800 SDRAM Onboard SATA A SATA controller is built in to the ICH10R portion of the chipset to provide support for a six port 3 Gb sec Serial ATA subsystem The SATA drive is not hot swappable units PCI Expansion Slots The embedded board...

Page 13: ...88 fax 909 598 0218 Copyright 2009 Acnodes Inc All rights reserved Product description and product specifications are subject to change without notice For latest product information please visit Acnodes web site at www acnodes com RMC 7132 1U Rackmount System ...

Page 14: ...you use must have RAID support to enable the hot swap capability of the SATA drives Control Panel The control panel on the RMC7132 provides important system monitoring and control information LEDs indicate power on network activity hard disk drive activ ity and system overheat conditions The control panel also includes a main power button and a system reset button Rear I O Panel The rear I O panel...

Page 15: ...le location for the rack unit that will hold the Acnodes RMC7130 It should be situ ated in a clean dust free area that is well ventilated Avoid areas where heat electrical noise and electromagnetic fields are generated You will also need it placed near a grounded power outlet Read the Rack and Server Precautions in the next section 2 3 Preparing for Setup The Acnodes RMC7130 does not ship with a r...

Page 16: ...he rack is stable before extending a component from the rack o You should extend only one component at a time extending two or more si multaneously may cause the rack to become unstable Server Precautions o Review the electrical and general safety precautions in Chapter 4 o Determine the placement of each component in the rack before you install the rails o Install the heaviest server components o...

Page 17: ...empera ture Tmra Reduced Airflow Equipment should be mounted into a rack so that the amount of airflow required for safe operation is not compromised Mechanical Loading Equipment should be mounted into a rack so that a hazardous condition does not arise due to uneven mechanical loading Circuit Overloading Consideration should be given to the connection of the equipment to the power supply circuitr...

Page 18: ...k with the rack rails provided with the system You should also refer to the installation instructions that came with the rack unit you are using Identifying the Sections of the Rack Rails You should have received two rack rail assemblies with theAcnodes RMC7132 Each of these assem blies consist of two sections an inner fixed chassis rail that secures to the unit A and an outer fixed rack rail B th...

Page 19: ...talling into a telco rack Locking Tabs As you have seen both chassis rails have a locking tab which serves two functions The first is to lock the server into place when installed and pushed fully into the rack which is its normal posi tion Secondly these tabs also lock the server in place when fully extended from the rack This prevents the server from coming completely out of the rack when you pul...

Page 20: ...unt System Installing the Server into the Rack You should now have rails attached to both the chassis and the rack unit The next step is to install the server into the rack Do this by lining up the rear of the chassis rails with the front of the rack rails Slide the chassis rails into the rack rails keeping the pressure even on both sides you may have to depress the locking tabs when inserting See...

Page 21: ...ease visit Acnodes web site at www acnodes com RMC 7132 1U Rackmount System Installing the Server into a Telco Rack If you are installing the Acnodes RMC7132 into a Telco type rack follow the directions given on the previous pages for rack installation The only difference in the installation procedure will be the position ing of the rack brackets to the rack They should be spaced apart just enough...

Page 22: ... top cover to help you push the cover away from you until it stops 3 You can then lift the top cover from the chassis to gain full access to the inside of the server Checking the Components 1 You may have one or two processors already installed into the system board Each processor should have its own heatsink attached See Chapter 5 for instructions on processor and heatsink installation 2 Your RMC...

Page 23: ...88 fax 909 598 0218 Copyright 2009 Acnodes Inc All rights reserved Product description and product specifications are subject to change without notice For latest product information please visit Acnodes web site at www acnodes com RMC 7132 1U Rackmount System ...

Page 24: ... reinstall a DVD ROM and or floppy disk drive to the system 3 Depending upon your system s configuration your system may have one or two SerialATAdrives already installed If you need to install SerialATAdrives please refer to the appropriate section in Chapter 6 Checking the Airflow 1 Airflow is provided by two 10 cm input fans The system component layout was carefully designed to promote sufficie...

Page 25: ...ors and the appropriate response you may need to take 3 2 Control Panel Buttons There are two push buttons located on the front of the chassis a reset button and a power on off button Reset Button The reset button reboots the system Power This is the main power button which is used to apply or turn off the main system power Turning off system power with this button removes the main power but keeps...

Page 26: ...ed by cables obstructing the airflow in the system or the ambient room temperature being too warm Check the routing of the cables and make sure all fans are present and operating normally You should also check to make sure that the chassis covers are installed Finally verify that the heatsinks are installed properly see Chapter 5 This LED will remain on as long as the indicated condition exists NI...

Page 27: ...perating 3 4 Serial ATA Drive Carrier LEDs Each Serial ATA drive has both a green and a red LED o Green Each Serial ATA drive carrier has a green LED When illuminated this green LED on the front of the SATA drive carrier indicates drive activity A connection to the SATA backplane enables this LED to blink on and off when that particular drive is being accessed Please refer to Chapter 6 for instruc...

Page 28: ...m the system when removing or in stalling main system components such as the motherboard memory modules and floppy drive When disconnecting power you should first power down the system with the operat ing system first and then unplug the power cords of all the power supply units in the system o When working around exposed electrical circuits another person who is familiar with the power off contro...

Page 29: ... Tempera ture Coefficient fuses on the mainboard must be replaced by trained service technicians only The new fuse must be the same or equivalent as the one replaced Contact technical support for details and support 4 2 General Safety Precautions Follow these rules to ensure general safety o Keep the area around the RMC7132 clean and free of clutter o The RMC7132 weighs approximately 10 lbs 4 5 kg...

Page 30: ...ted circuit boards The following measures are generally sufficient to neutralize this difference before contact is made to protect your equipment from ESD o Use a grounded wrist strap designed to prevent static discharge o Keep all components and printed circuit boards PCBs in their antistatic bags until ready for use o Touch a grounded metal object before removing the board from the antistatic ba...

Page 31: ... subject to change without notice For latest product information please visit Acnodes web site at www acnodes com RMC 7132 1U Rackmount System 4 4 Operating Precautions Care must be taken to assure that the chassis cover is in place when the RMC7132 is operating to assure proper cooling Out of warranty damage to the system can occur if this practice is not strictly followed ...

Page 32: ... electronic components To prevent dam age to any printed circuit boards PCBs it is important to handle them very carefully see previous chapter To prevent the motherboard from bending keep one hand under the center of the board to support it when handling The following measures are generally sufficient to protect your equipment from electric static discharge Precautions o Use a grounded wrist stra...

Page 33: ...e Chassis 1 Access the inside of the system by removing the screws from the back lip of the top cover of the chas sis then pull the cover off 2 The embedded board requires a chassis big enough to support a 12 x 9 6 serverboard 3 Make sure that the I O ports on the serverboard align properly with their respective holes in the I O shield at the back of the chassis 4 Carefully mount the serverboard t...

Page 34: ...1 locations The following data cables with their locations noted should be connected See the motherboard layout for connector locations o Control Panel cable JF1 o COM Port cable COM2 o Front USB port cable USB2 3 o SATA drive data cables SATA0 SATA1 Important Make sure the the cables do not come into contact with the fans Connecting Power Cables The embedded board has a 24 pin primary power suppl...

Page 35: ...tion and product specifications are subject to change without notice For latest product information please visit Acnodes web site at www acnodes com RMC 7132 1U Rackmount System 5 4 I O Ports The I O ports are color coded in conformance with the PC 99 specification See Figure 5 2 below for the colors and locations of the various I O ports ...

Page 36: ...uy a CPU separately make sure that you use an Intel certified multi directional heatsink and fan only 3 Make sure to install the motherboard into the chassis before you install the CPU heatsink and heatsink fan 4 When purchasing an LGA1366 processor or when receiving a motherboard with an LGA1366 pro cessor pre installed make sure that the plastic CPU cap is in place and none of the CPU pins are b...

Page 37: ... on the side of the socket 3 Once the CPU and the socket are aligned carefully lower the CPU straight down into the socket Do not rub the CPU against the surface of the socket or its pins to avoid damaging the CPU or the socket 4 With the CPU in the socket in spect the four corners of the CPU to make sure that it sits level and is properly installed 5 Once the CPU is securely seated in the socket ...

Page 38: ...nk Notes The motherboard comes with a heatsink bracket pre in stalled on the reverse side of the board Do not apply any thermal grease to the heatsink or the CPU die the required amount has al ready been applied 1 Place the heatsink on top of the CPU so that the four mounting holes are aligned with those on the retention mechanism 2 Install two diagonal screws i e the 1 and the 2 screws and tighte...

Page 39: ... other components 1 Power down the system and unplug the power cord from the power supply 2 Disconnect the heatsink fan s wires from the fan header 3 Using a screwdriver loosen and remove the heatsink screws from the motherboard in the sequence as show in the previ ous section 1 and 2 followed by 3 and 4 4 Hold the heatsink as shown in the picture on the right and gently wiggle it to loosen it fro...

Page 40: ...mory modules of the same type and same speed in the same bank See the DIMM Installation Chart on the following page 2 Press down the release tabs on the ends of a memory slot Insert each DIMM module vertically into its slot Pay attention to the notch along the bottom of the module to prevent inserting the DIMM mod ule incorrectly 3 Gently press down on the DIMM module until it snaps into place in ...

Page 41: ...esult in interleaved memory which will improve memory performance Populating DIMMs For memory to work properly follow the table below for memory installation Maximum Memory Possible Single Rank UDIMMs 12GB 6x 2GB DIMMs Dual Rank UDIMMs 24GB 6x 4GB DIMMs o Both unbuffered ECC and non ECC DIMM modules are supported by the motherboard Using ECC or non ECC memory on your motherboard depends on the CPU...

Page 42: ...chassis uses a riser card to accommodate one add on card CSE RR1U E16 for a PCI E x16 card Installing a PCI Expansion Card 1 After powering down the system remove the PCI slot shield 2 Fully seat the riser card into the slot pushing down with your thumbs evenly on both sides of the ard 3 Install the expansion card into the riser card 4 Finish by using a screw to secure the top of the card shield t...

Page 43: ...s Inc All rights reserved Product description and product specifications are subject to change without notice For latest product information please visit Acnodes web site at www acnodes com RMC 7132 1U Rackmount System 5 8 Serverboard Details Notes Jumpers not indicated are for testing purposes only ...

Page 44: ...88 fax 909 598 0218 Copyright 2005 Acnodes Inc All rights reserved Product description and product specifications are subject to change without notice For latest product information please visit Acnodes web site at www acnodes com RMC 7132 1U Rackmount System ...

Page 45: ...PU PWR connector JPW2 is also required for the processor Refer to the table on the right for the pin definitions Processor Power Connector JPW2 must also be connected to the power supply to provide power for the processor See the table on the right for pin definitions Power Button The power button from the computer chassis con nects to pins 1 and 2 of JF1 See the table on the right for pin definit...

Page 46: ...ins 9 and 10 of JF1 Attach an LED cable to display network activ ity See the table on the right for pin defini tions NIC1 LAN1 LED The LED connections for LAN1 are on pins 11 and 12 of JF1 Attach an LED cable to display network activ ity See the table on the right for pin defini tions HDD LED UID Switch The HDD LED and UID switch con nections are located on pins 13 and 14 of JF1 Attach a cable her...

Page 47: ...hich are 4 pin fans pins 1 3 are backward compat ible with traditional 3 pin fans See the table on the right for pin defini tions The onboard fan speeds are controlled by Thermal Management via Hardware Monitoring under theAdvanced Section in the BIOS The default is disabled Please use all 3 pin fans or all 4 pin fans ATX PS 2 Keyboard and PS 2 Mouse Ports The ATX PS 2 keyboard and the PS 2 mouse ...

Page 48: ...ght for pin defini tions You must also have a LAN card with a Wake On LAN connector and cable to use this feature External Speaker Internal Buzzer On the JD1 header pins 1 4 are for an external speaker and pins 3 4 are for the internal speaker If you wish to use an external speaker connect it to pins 1 4 to If you wish to use the onboard speaker you should close pins 3 4 with a jumper Overheat Fan...

Page 49: ...SB 6 and USB 7 are Type A connectors See the table on the right for pin definitions SGPIO Headers The SGPIO Serial General Purpose Input Output headers are used to communicate with an enclo sure man agement chip on the backplane The T SGPIO headers are for SATAand the 3 SGPIO headers X8STi only are for SAS configurations See the table on the right for pin definitions Power Supply SMBus Header A Po...

Page 50: ...dules are installed the system can notify you when any of the three fails Connect JAR to a micro switch to enable you to turn off the alarm that is activated when a power module fails See the table on the right for pin definitions I Button The I Button located near the floppy connector is a computer chip en closed in a durable stainless contain er to enable RAID 5 under Software RAID mode See the ...

Page 51: ...ayout pages for jumper locations Note On a two pin jumper Closed means the jumper is on both pins and Open means the jumper is either on only one pin or completely removed CMOS Clear JBT1 is used to clear CMOS which will also clear any passwords Instead of pins this jumper consists of contact pads to prevent accidentally clearing the contents of CMOS To clear CMOS 1 First power down the system and...

Page 52: ...cation hangs Jumping pins 1 2 will cause WD to reset the system if an application hangs Jumping pins 2 3 will generate a non maskable inter rupt signal for the application that hangs See the table on the right for jumper settings Watch Dog must also be en abled in BIOS Note When enabled the user needs to write their own application software in order to disable the Watch Dog Timer USB Wake Up These...

Page 53: ...a See the table on the right for jumper settings BMC Enable Disable The JBMC1 jumper allows the user to enable or disable the BMC Base board Management Control chip and the onboard IPMI connections This jumper is to be used together with the IPMI settings in the BIOS If this jumper is set to enabled please also enable IPMI in the BIOS and vice versa The default position is on pins 1 and 2 to enabl...

Page 54: ...88 fax 909 598 0218 Copyright 2005 Acnodes Inc All rights reserved Product description and product specifications are subject to change without notice For latest product information please visit Acnodes web site at www acnodes com RMC 7132 1U Rackmount System ...

Page 55: ...88 fax 909 598 0218 Copyright 2009 Acnodes Inc All rights reserved Product description and product specifications are subject to change without notice For latest product information please visit Acnodes web site at www acnodes com RMC 7132 1U Rackmount System ...

Page 56: ...ou should first install the operating system and then the drivers The necessary drivers are all included on the CDs that came packaged with your motherboard Driver Tool Installation Display Screen Note Click the icons showing a hand writing on paper to view the readme files for each item Click the computer icons to the right of these items to install each item from top to the bottom one at a time ...

Page 57: ...The Doctor III program in cluded on the CD ROM that came with your motherboard allows you to monitor the environment and operations of your system Doctor III displays crucial system information such as CPU temperature system voltages and fan status See the Figure below for a display of the Supero Doctor III interface Note The default User Name and Password for Doctor III isADMIN AD MIN Note When D...

Page 58: ...88 fax 909 598 0218 Copyright 2005 Acnodes Inc All rights reserved Product description and product specifications are subject to change without notice For latest product information please visit Acnodes web site at www acnodes com RMC 7132 1U Rackmount System ...

Page 59: ...maintenance is a Philips screwdriver 6 1 Static Sensitive Devices Electrostatic Discharge ESD can damage electronic components To prevent damage to any printed circuit boards PCBs it is important to handle them very carefully The following measures are generally sufficient to protect your equipment from ESD discharge Precautions o Use a grounded wrist strap designed to prevent static discharge o T...

Page 60: ...ont of the chassis must be connected to the JF1 connector on the serverboard to provide you with system control buttons and status indicators These wires have been bundled together in a ribbon cable to simplify the connection Connect the cable from JF1 on the serverboard to the Control Panel PCB printed circuit board Make sure the red wire plugs into pin 1 on both connectors Pull all excess cablin...

Page 61: ...etting in BIOS see Chapter 7 System Fan Failure If a fan fails the ambient air temperature in the chassis will rise and activate the overheat LED on the control panel You will need to power down the system to replace this fan with one of the same type p n FAN 0038L4 Contact your vendor or Supermicro for information on replacement fans Replacing System Cooling Fans 1 Turn off the power to the syste...

Page 62: ...ceed to the next step for instructions DVD ROM Drive For installing removing a DVD ROM drive you ll need to gain ac cess to the inside of the R C7132 by removing the top cover of the chassis Proceed to the DVD ROM Drive Installa tion section later in this chapter for instructions Note Only a slim DVD ROM drive will fit into the RMC7132 SATA Drive Installation The SATA drives are mounted in drive c...

Page 63: ... a SATA Drive in a Drive Carrier 1 Install a drive into the carrier with the printed circuit board side toward the carrier so that the Mounting holes align with those in the carrier 2 Secure the drive to the carrier with four screws as shown in Figure 6 3 Installing Removing SATA Drives 1 To remove first push the release button located beside the drive LEDs 2 Swing the colored handle fully out and...

Page 64: ...M Drive 1 Turn off the power to the system and remove the AC power cord 2 Release the retention screws that secure the unit to the rack 3 Grasp the two handles on either side and pull the unit straight out until it locks you will hear a click 4 Depress the two buttons on the top of the chassis to release the top cover and at the same time push the cover away from you until it stops 5 Lift the top ...

Page 65: ...upply 1 Power down the system if on and unplug the power cord 2 Grasp the two handles on either side and pull the unit straight out until it locks you will hear a click 3 Depress the two buttons on the top of the chassis to release the top cover and push it away from you You can then lift the top cover from the chassis to gain full access to the inside of the server 4 To remove the failed power un...

Page 66: ...scribed in this manual The Main BIOS setup menu screen has two main frames The left frame displays all the options that can be configured Grayed out options cannot be configured Options in blue can be configured by the user The right frame displays the key legend Above the key legend is an area reserved for a text message When an option is selected in the left frame it is highlighted in white Ofte...

Page 67: ...up screens An AMI BIOS identification string is dis played at the left bottom corner of the screen below the copyright message Warning Do not upgrade the BIOS unless your system has a BIOS related issue Flashing the wrong BIOS can cause irreparable damage to the system In no event shall Supermicro be liable for direct indirect special incidental or consequential damages aris ing from a BIOS update...

Page 68: ... change the system time and date Highlight System Time or Sys tem Date using the arrow keys Enter new values through the keyboard Press the Tab key or the arrow keys to move between fields The date must be entered in Day MM DD YY format The time is entered in HH MM SS format Note The time is in the 24 hour format For ex ample 5 30 P M appears as 17 30 00 AMIBIOS Version Build Date Processor The AM...

Page 69: ...OS Features Quick Boot If Enabled this option will skip certain tests during POST to reduce the time needed for system boot The options are Enabled and Disabled Quiet Boot This option allows the bootup screen options to be modified between POST mes sages or the OEM logo Select Disabled to display the POST messages Select Enabled to display the OEM logo in stead of the normal POST messages The op t...

Page 70: ...n Function This setting allows you to decide if the power button will turn off the system in stantly or wait for 4 seconds when it is pressed The options are Instant Off and 4 Seconds Override Restore on AC Power Loss Use this feature to set the power state after a power outage Select Power Off for the system power to remain off after a power loss Select Power On for the system power to be turned ...

Page 71: ...ion allows the user to set the ratio between the CPU Core Clock and the FSB Frequency Note if an invalid ratio is entered the AMI BIOS will restore the setting to the previous state The default setting depends on the type of CPU is installed The default setting for the Intel Core i7 965 is 24 Clock Spread Spectrum Select Enable to use the feature of Clock Spectrum which will allow the BIOS to moni...

Page 72: ...esignate areas in the system memory where an application code can execute and where it cannot thus preventing a worm or a virus from flooding illegal codes to overwhelm the processor or damage the system during an attack The default is Enabled Refer to Intel and Microsoft Web Sites for more information Simultaneous Multi Threading Available when supported by the CPU Set to Enabled to use the Hyper...

Page 73: ...n your keyboard to change this value 2 3 Core Ratio Limit This increases the processor s core 2 3 clock speeds in relation to the bus speed The default setting is 25 Press or on your keyboard to change this value TDC Limit Override This option will override the system s default electrical current setting for the processor The options are Enabled and Disabled TDC Limit Value This option sets the pr...

Page 74: ...led DCA Technology This feature accelerates the performance of TOE devices Note A TOE device is a specialized dedicated processor that is installed on an add on card or a network card to handle some or all packet processing of this add on card For this moth erboard the TOE device is built inside the ESB 2 South Bridge chip This feature is supported only by some types of processors i e Intel Nehale...

Page 75: ...he spare memory is put online and used as active memory in place of the failed memory Demand Scrubbing Demand Scrubbing is a process that allows the North Bridge to correct correctable memory errors found on a memory module When the CPU or I O issues a demand read command and the read data from memory turns out to be a correctable error the error is corrected and sent to the requestor the original...

Page 76: ...ersburg EP platforms system memory thermal solution is derated up to 900m To comply with CPU specifications BIOS will attempt to adjust and correct DIMM velocity based on the altitude where the system is located in order to improve DIMM thermal performance Altitude is defined as the number of feet above the sea level where the computer is located The options are Sea Level or Below 1 300 above 301 ...

Page 77: ...on Technology significantly reduces CPU overhead by leveraging CPU architectural improvements freeing resources for more other tasks Available options are Disabled and Enabled Active State Power Management Select Enabled to start Active State Power Management for signal transactions between L0 and L1 Links on the PCI Express Bus This maximizes power saving and transaction speed The options are Ena...

Page 78: ...is feature allows the user to select the drive type for SATA 1 The options are IDE RAID and AHCI ICH RAID CodeBase Available if RAID is selected above Select Intel to enable the Intel SATA Host RAID Utility Select Adaptec to use the Adaptec Host RAID Utility The options are Intel and Adaptec Max Ports on SATA 1 Available if either RAID or AHCI is enabled under Configure SATA 1 as above This featur...

Page 79: ... amount of data transferred Only 512 bytes of data can be transferred per interrupt if Block Mode is not used Block Mode allows transfers of up to 64 KB per interrupt Select Disabled to allow data to be transferred from and to the device one sector at a time Select Auto to allow data transfer from and to the device occur multiple sectors at a time if the device supports it The options are Auto and...

Page 80: ...S to use Multi Word DMA mode 2 It has a data transfer rate of 16 6 MBs Select UDMA0 to allow the BIOS to use Ultra DMA mode 0 It has a data transfer rate of 16 6 MBs It has the same transfer rate as PIO mode 4 and Multi Word DMA mode 2 Select UDMA1 to allow the BIOS to use Ultra DMA mode 1 It has a data transfer rate of 25 MBs Select UDMA2 to allow the BIOS to use Ultra DMA mode 2 It has a data tr...

Page 81: ...gure all devices in the system PCI Latency Timer This feature sets the latency Timer of each PCI device installed on a PCI bus Select 64 to set the PCI latency to 64 PCI clock cycles The options are 32 64 96 128 160 192 224 and 248 PCI IDE Bus Master When enabled the BIOS uses PCI bus mastering for reading writing to IDE drives The options are Disabled and Enabled PCIE Width This feature selects t...

Page 82: ...e to configure Serial Port 2 mode The options are Normal IrDA and ASK IR IrDA Infra Red Data is an industry standard for remote control devices ASK IR Amplitude Shifted Keying Infra Red is a protocol compatible with Sharp branded PDAs and other infra red devices Floppy Controller Select Enabled to enable the onboard Floppy Controller The options are Enabled and Disabled XRemote Access Configuratio...

Page 83: ...n The options are No Delay Delay 1 Sec Delay 2 Sec and Delay 4 Sec XHardware Health Configuration This feature allows the user to monitor Hardware Health of the system and review the status of each item when displayed CPU Overheat Alarm This option allows the user to select the CPU Overheat Alarm setting which determines when the CPU OH alarm will be activated to provide warning of possible CPU ov...

Page 84: ...0 C o CPU Temperature Setting Medium When CPU PECI count is greater than TControl 100 C but below TControl TControl 100C PECI Count TControl o CPU Temperature Setting High When CPU PECI count is greater than TControl TControl PECI Count Notes 1 According to Intel s specifications PECI and TControl are defined as follows o PECI Platform Environmental Control Interface PECI is a bus interface that p...

Page 85: ... and 4 pin Workstation Fan1 Fan 5 Reading This feature displays the fan speed readings from fan interfaces Fan1 through Fan5 Vcore 3 3Vcc 12V V_DIMM 5V 12V 3 3VSB and VBAT XACPI Configuration Use this feature to configure Advanced Configuration and Power Interface ACPI power management settings for your system USB Device WakeUp This feature is used to awaken from Standby mode by a Universal Serial...

Page 86: ...Enabled and Dis abled TPM Enable Disable Status This item displays the status of TPM Enabled Disabled state TPM Owner Status This item displays the status of TPM Ownership XIPMI Configuration Intelligent Platform Management Interface IPMI is a set of common interfaces that IT administrators can use to monitor system health and to manage the system as a whole For more information on the IPMI specif...

Page 87: ...hould not exceed 255 MAC Address The BIOS will automatically enter the MAC address of this machine however it may be over ridden MAC addresses are 6 two digit hexa decimal numbers Base 16 0 9 A B C D E F separated by dots i e 00 30 48 D0 D4 60 Subnet Mask Subnet masks tell the network which subnet this machine be longs to The value of each three digit number separated by dots should not exceed 255...

Page 88: ...bles of disables Event Messages for PEF action Refer to Table 24 6 of the IPMI 1 5 Specification for more informa tion at www intel com The options are Disabled and Enabled BMC Watch Dog Timer Action Allows the BMC to reset or power down the system if the operating system hangs or crashes The options are Disabled Reset System Power Down Power Cycle BMC WatchDog TimeOut Min Sec This option appears ...

Page 89: ... password has not been used and Set means a supervisor password has been entered for the system User Password This item indicates if a user password has been entered for the system Clear means such a pass word has not been used and Set means a user password has been entered for the system Change Supervisor Password Select this feature and press Enter to access the submenu and then type in a new Su...

Page 90: ... 7132 1U Rackmount System Change User Password Select this feature and press Enter to access the submenu and then type in a new User Pass word Clear User Password Available only if User Password has been set Password Check Available options are Setup and Always Boot Sector Virus Protection When Enabled the AMI BOIS displays a warning when any program or virus is sues a Disk For mat command or atte...

Page 91: ...e to configure Boot Settings XBoot Device Priority This feature allows the user to specify the sequence of priority for the Boot Device The settings are 1st boot device 2nd boot device 3rd boot device 4th boot device 5th boot device and Disabled o 1st Boot Device 1st Floppy Drive o 2nd Boot Device USB XXXXXXXXX o 3rd Boot Device SATA XXXXXXXXX o 4th Boot Device Network XXXXXXXXX XHard Disk Drives ...

Page 92: ...ves The settings are 1st boot device 2nd boot device and Disabled o 1st Drive o 2nd Drive USB XXXXXXXXX XCD DVD Drives This feature allows the user to specify the boot sequence from available CD DVD Drives i e 1st Drive 2nd Drive etc 7 6 Exit Options Select the Exit tab from the AMI BIOS Setup Utility screen to enter the Exit BIOS Setup screen Save Changes and Exit When you have completed the syst...

Page 93: ...es and Exit from the Exit menu and press Enter Discard Changes Select this option and press Enter to discard all the changes and return to the AMI BIOS Utility Program Load Optimal Defaults To set this feature select Load Optimal Defaults from the Exit menu and press Enter Then select OK to allow the AMI BIOS to automatically load Optimal De faults to the BIOS Settings The Optimal settings are des...

Page 94: ...elf Test error beep codes for the AMI BIOS POST error beep codes are divided into two categories recoverable and terminal This section lists Beep Codes for recoverable POST errors Recoverable POST Error Beep Codes When a recoverable type of error occurs during POST BIOS will display a POST code that describes the problem BIOS may also issue one of the following beep codes 1 long and two short beep...

Page 95: ...sert Microsoft s Windows XP 2003 Setup CD in the CD drive and the sys tem will start booting up from CD 2 Press the F6 key when the message Press F6 if you need to install a third party SCSI or RAID driver displays 3 When the Windows XP 2003 Setup screen appears press S to specify ad ditional device s 4 Insert the driver diskette Intel AA RAID XP 2003 Driver for ICH10R into Drive A and press the E...

Page 96: ...press S to specify ad ditional device s 4 Insert the driver diskette you want to install into Drive A and press the En ter key 5 Press the Enter key to proceed with the installation process If you need to specify any addi tional devices to be installed do it at this time Once all devices are specified press the Enter key to continue with the installation 6 From the Windows XP 2003 Setup screen pre...

Page 97: ...oard specifications pages on our web site for updates on supported processors Chipset Intel X58 ICH10R chipset BIOS 4 Mb AMI SPI Flash ROM Memory Capacity Six 240 pin DIMM slots that can support up to 24 GB of unbuffered ECC non ECC DDR2 1333 1066 800 SDRAM Note See the memory section in Chapter 5 for details SATA Controller On chip ICH10R 3 Gb s Intel SATA controller Drive Bays One internal fixed...

Page 98: ...Operating Temperature 10º to 35º C 50º to 95º F Non operating Temperature 40º to 70º C 40º to 158º F Operating Relative Humidity 8 to 90 non condensing Non operating Relative Humidity 5 to 95 non condensing Regulatory Compliance Electromagnetic Emissions FCC Class A EN 55022 Class A EN 61000 3 2 3 3 CISPR 22 Class A Electromagnetic Immunity EN 55024 CISPR 24 EN 61000 4 2 EN 61000 4 3 EN 61000 4 4 ...

Reviews: