background image

12

Chapter 4 

Using your TV

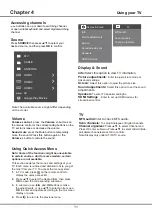
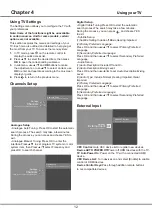
Using TV Settings

The Settings menu allows you to 

 the TV with

your preferences.

This section explores the menus and settings of your 

TV. Each menu is outlined and detailed to help you get 

the most from your TV. To access the menu system: 

1. 

In TV mode, press   on the remote control to 

display the quick access list.

2. 

Press 

▲/▼


to select the desired item, then press 

OK 


to open the corresponding submenu.

3. 

In submenu, use 

 and 

OK

 buttons 

to make 

the adjustments, or use 

▲/▼


to select an item, use  

OK


to enter and operate according to the on-screen

display or guide.  

4. 

Press   to return to the previous menu. 

Note: Some of the functions might be unavailable 

in certain sources. And for some models, certain 

options are not available.

▲/▼

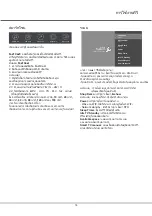
Settings

Channels

Setup your TV to receive broadcast signal.

Analogue Setup

Select to customise and receive programmes.

Channels Setup

Analogue Setup

Analogue Auto Tuning:


Press OK to start the automatic

search process. The search may take a few minutes.

During the process, you can press and chosse YES to 

exit.

Analogue Manual Tuning:


Press OK to enter the

interface.Press ▲/▼ to set program,TV system or color

system item, then Press ▲/▼ select Frequency and

press OK to search channel.

Digital Setup

Digital Cable Tuning:Press OK to start the automatic

search process.The search may take a few minutes.

During the process, you can press        and chosse YES

to exit .

Subtitle Setup:

(1)Subtitle Setting:

Include off

,

Basic,Hearing impaired.

(2)Primary Preferred Language:

Press OK and than use ▲/▼ to select Primary Preferred

Language.

(3)Secondary Preferred Language:

Press OK and than use ▲/▼ to select 

Secondary Preferred

Language.

Audio Setup

(1)Audio Description:

Include Off and On.

(2)Audio Description Mixing Level:

Press OK and than use ◄/► to set 

Audio Description Mixing

Level.

(3)Audio Type: 

Include Normal ,Hearing Impaired,Visual 

Impaired.

(4)Primary Preferred Language:

Press OK and than use ▲/▼ to select Primary Preferred

Language.

(5)Secondary Preferred Language:

Press OK and than use ▲/▼ to select 

Secondary Preferred

Language.

Settings

Channels

Setup your TV to receive broadcast signal.

Digital Setup

Select to customise and receive digital broadcast services

.

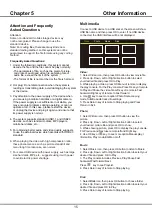
External Input

CEC Control:

Go to CEC device list to register new devices.

Device AUTO POWER Off:

Power off HDMI devices with the TV.

TV Auto Power On:

Power on the TV with a connected HDMI

device.

CEC Device List: 

Turn devives on and select [Enable] to enable

control of HDMI devices.

Device Control Keys:

Pass through addtion remote buttons

to cec compatible devices.

Settings

External Input

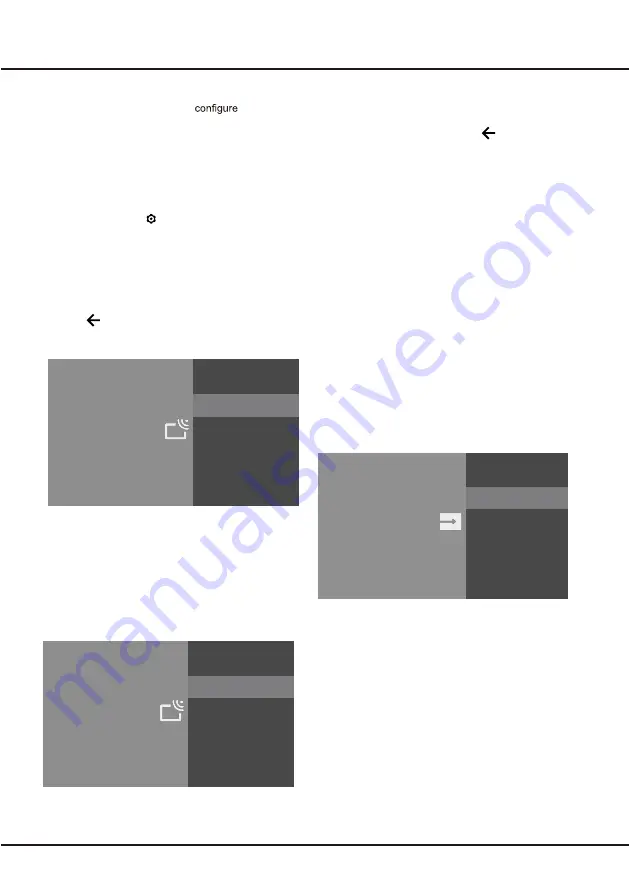
Select to configure external inputs.

HDMI CEC Settings

Select CEC compatible devices for stremlined control.

Summary of Contents for 32HS521AN

Page 1: ...32HS521AN ...

Page 2: ... ดสวิตช ป ดสวิตช การเชื อมต อเครือข าย บทที 4 การใช งานทีวี การเข าถึงช องทาง ดูอุปกรณ ที เชื อมต อ ระดับเสียง การใช เมนู Quick Access การตั งค าระบบ การติดตั งช อง รูปภาพและการแสดงผล บทที 5 ข อมูลอื น ๆ การติดตั งขาตั ง บทที 3 คุณสมบัติหน าแรก การใช งาน โฮมเพจ เสียง 11 11 11 11 12 13 11 13 10 สมาร ทโซน ระบบ 14 14 15 16 17 17 15 มัลติมีเดีย ป ญหา และแนวทางแก ไข การแก ไขป ญหา หมายเหตุ และคําถามที พ...

Page 3: ... ก และติดต อศูนย บริการ หากอุปกรณ กระแทก หรือ ตกหล นทําให ตัวเครื องเสียหาย ไฟฟ าและปลั ก โปรดอย าวางวัตถุทับสายไฟ หรือ ม วนรอบสายไฟ และสายสัญญาณ ป องกันสายไฟและสายสัญญาณจากการถูกเหยียบ โปรดอย าวางสายไฟ หรือ เต าเสียบไฟฟ าใกล กันมากเกินไป โปรดอย าให สายไฟ และ สายสัญญาณสัมผัสกับความชื น สายไฟและสายสัญญาณ โปรดอย าวางทีวีไว บนรถเข น ขาตั ง หรือ โต ะที ไม มั นคง โปรดวางเครื องไว ในที ที อากาศถ ายเทได ...

Page 4: ...ยบนรีโมทและปรับการควบคุมเมนู 1 ปุ ม ปุ ม สแกนขึ น ลงผ านช องรายการ ในระบบเมนู ปุ มจะทําหน าที เหมือนปุ มขึ น ลงบนรีโมทและปรับการควบคุมของเมนู ปุ ม ปุ มเป ดทีวีหรือสแตนด บาย เมื อทีวีเป ดอยู กดขึ น จะเป นการเป ดเมนูหลัก หรือ เป นปุ มกดไปที เมนูก อนหน า ก อนเข าสู เมนูกดค างไว เป นเวลาสามวินาที เพื อแสดงตัวเลือกแหล งสัญญาณ 3 หมายเหตุ ตําแหน งและชื อของปุ มฟ งก ชั นและปุ มเป ด ป ดบนทีวีอาจแตกต างกันไ...

Page 5: ...มีรหัสประจํา MHL เท านั น ที รองรับฟ งก ชั น MHL Mobile High definition Link ถึงสามารถเชื อมต ออุปกรณ พกพา ที สามารถใช งาน MHL เข ากับโทรทัศน ได USB sockets input ช องนี สามารถใช เชื อมต ออุปกรณ USB หมายเหตุ จํานวนช อง USB บนทีวีอาจแตกต างกันไปตามรุ นของทีวี ช องต างๆ หมายเหตุ ตําแหน ง และ ชื อของช องบนทีวี อาจแตกต างกันไปตามรุ นของทีวี และช องบางตัวอาจไม สามารถใช ได ในบางรุ น LAN RJ45 ช องเชื อมต...

Page 6: ... ป ร า ก ย า ร ง อ ช น ย ี ล ป เ ม ป งโหมดทีวี ด ส แ ม ป ง ล ก ต ก อ ื ล เ ม ป า ว ข ย า ซ ง า ล น บ ก อ ื ล เ ม ป ี น า น ห น อ ก ร า ก ย า ร ป ไ บ ั ล ก ม ป ณ า ญ ญ ั ส ง อ ช ก อ ื ล เ ม ป ร า ก ย า ร ก า จ ก อ อ ม ป ม ซ ม ป า ค ง ั ต ม ป ร า ก ย า ร ง ั ผ น ผ แ ด ย ี อ เ ะ ล ย า ร ง ด ส แ ม ป ง ย ี ส เ บ บ ะ ร ก อ ื ล เ ม ป ี น า น ห น อ ก ร า ก ย า ร ง อ ช ป ไ บ ั ล ก น อ ย ม ป ม า ว ค อ ข ง ด...

Page 7: ... ส า ข เ อ ื พ เ 4 ี ท น อ ต น ั ข กด ค บ ั จ ก ิ ล เ ก ย ม ป ด ก น ั น ก า จ OK ี ว ี ท บ ั ก ล ร ท โ น อ ค ท ม โ ี ร อ ต ม อ ื ช เ ี ธ ิ ว ธ ท ล บ น า ผ ล ร ท โ น อ ค ท ม โ ี ร อ ต ม อ ื ช เ ร า ก ี น ป ไ อ ต น อ ต น ั ข ม า ต า ํ ท ด ร ป โ ก ร แ ง ั ร ค ี ว ี ท บ ั ก อ ต ม อ ื ช เ ด ร ป โ ช ใ น อ ก HOME HOME ล ร ท โ น อ ค ท ม โ ี ร อ จ า น ห น บ ฏ ก า ร ป ี ท น ม เ น ใ ย อ ะ จ น ศ ั ท ร ท โ น ั...

Page 8: ...ทรทัศน นั นอยู ในโหมดเตรียมพร อม กดปุ ม บนรีโมทคอนโทรลหรือบนโทรทัศน เพื อเป ดทีวี 2 เชื อมต อสายไฟเข ากับโทรทัศน จากนั นต อเข ากับเต าเสียบไฟหลัก หมายเหตุ สายไฟที เชื อมต อกับโทรทัศน โปรดเชื อมต อสายไฟเข ากับเต าเสียบไฟฟ าเท านั น หากทีวีของคุณเชื อมต อกับแหล งจ ายไฟ AC ทีวีของคุณควรเชื อมต อกับแหล งจ ายไฟ AC เท านั น โปรดอย าเชื อมต อกับแหล งจ ายไฟกระแสตรง หากถอดปลั กออกจากทีวี โปรดอย าเชื อมต อเ...

Page 9: ...USB อแด ปเตอร ไร สายภายนอก บางตัวไม สามารถใช งานร วมกับทีวีได 3 ตั งค าเครือข ายเพื อ กําหนดค าอีเธอร เน ตบนทีวี หมายเหตุ ฟ งก ชั นนี ใช ไม ได กับในบางรุ น คําแนะนําด านล างเป นวิธีในการเชื อมต อทีวีของคุณ กับ เครือข ายแบบ ใช สาย หรือ ไร สาย วิธีการเชื อมต ออาจแตกต างกันไปขึ นอยู กับการกําหนดค าเครือข ายของคุณ การใช งานทั วไป การเข าถึงอินเทอร เน ต คุณต องสมัครใช บริการอินเทอร เน ตความเร วสูง จากผ...

Page 10: ...อโต ตอบกับ Google Assistant ของทีวี การแจ งเตือน แจ งเตือนถึงข อมูลที สําคัญของระบบเช นการลงชื อเข าใช google พื นที ดิสก เหลือน อย หรือ ข อผิดพลาดบัญชี ป ญหาการเชื อมต อเครือข าย ฯลฯ อินพุต เลือกแหล งสัญญาณอินพุต การตั งค า เข าถึงการตั งค าระบบ Apps แสดงรายการแอพพลิเคชั นโปรด หรือเข าไปที ศูนย แอพพลิเคชั น YouTube เรียกดูแอปพลิเคชันนี เพื อรับชมวิดีโอออนไลน ที หลากหลาย Featured แสดงรายการเนื อหา...

Page 11: ...บ ั ด ะ ร ด ล อ ื ร ห ม ิ พ เ อ ื พ เ ี ว ี ท น บ ม ป อ ื ร ห กดป ม VOL บนรีโมทคอนโทรล ว า ร ค ว ั ช ง ย ี ส เ ด ป อ ื พ เ ม ป ด ก ง ย ี ส เ ด ป ง ย ี ส เ ด ป เ อ ื พ เ l o v ม ป อ ื ร ห ง ั ร ค ก ี อ ี น ม ป ด ก Info ี ว ี ท ล ม อ ข ด อ ื พ เ ี น ร า ก ย า ร ก อ ื ล เ Picture Off น ั น า ท เ ง ย ี ส เ ด ม ห โ ส า ข เ อ ื พ เ ี น ร า ก ย า ร ก อ ื ล เ Picture adjustments พ า ภ ด ม ห โ บ ั ร ป อ ื พ ...

Page 12: ...งค าคําบรรยาย 1 การตั งค าคําบรรยายภาพ 2 ภาษาหลักที ต องการ กดปุ ม OK และกดปุ ม เพื อเลือกภาษาที ต องการ 3 ภาษาที ต องการอันดับสอง กดปุ ม OK และกดปุ ม เพื อเลือกภาษาที ต องการ การตั งค าเสียง 1 คําอธิบายเสียง ตั งค าคําอธิบายเสียง 2 คําอธิบายเสียงบรรยายภาพ กด OK และกด เพื อตั งค าคําอธิบายเสียงบรรยายภาพ 3 ประเภทเสียง ประเภทเสียงบรรยายภาพ 4 ภาษาเสียงหลักที ต องการต องการ กด OK และกด เพื อเลือกภาษาเ...

Page 13: ... ทีวี ควรติดตั งบนโต ะ และ ผนัง สัญญาณเสียงดิจิตอล Optical Out สําหรับสัญญาณเสียงจาก Digital Audio Out Dolby Digital Plus ระบบ Dolby Digital Plus เสียง Sound Ajustment Adjust sound and speaker related options Settings Sound Adjust sound and speaker related options TV Placement Deak Top Digital Audio Out PCM Dolby digital plus On รูปภาพ และการแสดงผล Picture Ajustment Adjust the picture settings such as ...

Page 14: ...มากมายไปยังทีวี น อ ต น ั ข Fast Cast 1 ดาวน โหลดแอปมือถือ Fast Cast 2 อ ต ม อ ื ช เ ี ว ี ท ะ ล แ อ ื ถ อ ื ม Wi Fi เดียวกัน 3 ี ว ี ท อ ต ม อ ื ช เ ะ ล แ ณ ร ก ป อ า ห น ค หมายเหตุ 1 น ร ง า บ อ ื ถ อ ื ม บ ั ก ด ไ ช ใ ถ ร า ม า ส ม ไ จ า อ ี น น ั ช ก ง ฟ ล ฟ ไ บ บ แ ป ร บ ั ร ง อ ร ร า ก บ ั ก ย อ น ึ ข ะ ล แ 2 คําแนะนําของสภาพแวดล อมในการใช งาน 2 1 คําแนะนําความเร วเครือข าย 1M S 2M S 2 2 ร า ก...

Page 15: ... USB บางชนิดที มีเพาเวอร ซัพพลาย เช น ฮาร ดดิสก ขนาดใหญ MP4 ฯลฯ แนะนําให ใช ในกําลังไฟที เหมาะสมเพื อหลีกเลี ยงไฟช อต บทที 5 มัลติมีเดีย เชื อมต อ USB เข ากับช อง USB หลังอุปกรณ ทีวี จอภาพจะแสดงชื อไฟล จากนั นกด OK เพื อเล นไฟล ที ต องการ หากไม มี USB เชื อมต อกับอุปกรณ ทีวีอยู หน าต าง USB จะไม ปรากฎ วีดิโอ 1 เลือกไอคอนวีดิโอ จากนั นกด OK เพื อเล นไฟล ที เลือก 2 กดปุ มลูกศรเพื อเลื อนไปยังไฟล ที ...

Page 16: ...ลาเดียวกัน อาจทําให ไม สามารถใช งานได ในบางครั ง ฮาร ดดิสก แบบพกพาใช พลังงานมากซึ งอาจทําให เกิดป ญหาเกี ยวกับแหล งจ ายไฟ แนะนําให เชื อต อฮาร ดดิสก เพียงหนึ งเครื อง หรือฮาร ดดิสก แบบพกพาที ใช พลังงานตํ า 4 วิดีโอจากฮาร ดดิสก แบบพกพา USB กําลังเล นแต ไม มีเสียง เครื องเล นทีวีไม รองรับรูปแบบเสียงของวิดีโอในฮาร ดดิสก 5 วิดีโอบางรายการไม สามารถเล นได รูปแบบของวิดีโออาจไม ได รับการรองรับจากทีวี โดยเ...

Page 17: ... ม ิ ร น ป เ ี ท ี ท น ื พ น ใ ว ไ ง า ว ก ถ ศ า ก า อ า ส เ า ถ ป ไ น ิ ก เ น อ อ บ ั ร ด ไ ี ท ณ า ญ ญ ั ส ห ใ า ํ ท จ า อ ง ั ร ค ง า บ น ใ ก า ม น อ อ ณ า ญ ญ ั ส ี ท ี ณ ร ก น ใ ว ั ม า ร พ อ จ ร า ก า อ ด ิ ก เ ห ใ อ ก ะ ล แ ข ี ด ห ใ ณ า ญ ญ ั ส บ ั ร ร า ก บ ั ร ป อ ื พ เ ม ิ ต เ ม ิ พ เ ศ า ก า อ า ส เ ง ั ต ด ิ ต ง อ ต ะ จ จ า อ น ึ ี ว ี ท ณ ร ก ป อ บ ั ก อ ต ม อ ื ช เ ี ท ศ า ก า อ า ส...

Page 18: ...tup Chapter 3 Homepage Operation Using Homepage TV Using Homepage Apps Problems Solutions 3 3 3 3 3 3 3 3 4 5 6 8 8 9 9 10 10 Chapter 4 Using your TV 15 17 17 15 Chapter 5 Other Information Multimedia Troubleshooting Base Installation Attention and Frequently Asked Questions Accessing channels Source Volume Using Quick Access Menu Using TV Settings Channels Setup Picture Display Sound Smart Zone S...

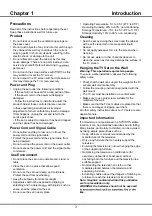
Page 19: ... with liquids such as vases shall be placed on the set Do not use the set in dusty place Operating Temperature 5 to 35 41 F to 95 F Operating Humidity 20 to 80 non condensing Storage Temperature 15 to 45 5 F to 113 F Storage Humidity 10 to 90 non condensing Cleaning Dust the set by wiping the screen and the cabinet with a soft clean cloth or some special liquid cleaner Do not apply excessive force...

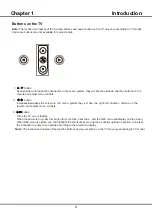
Page 20: ... down through the channel list In the menu system they act like the up down direction buttons on the remote and adjust menu controls button 3 Note The location and names of the function buttons and power button on the TV may vary according to TV model Turns the TV on or standby When the power is on press this button for more than 3 seconds and the NAV menu will display on the screen When NAV menu ...

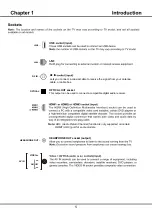
Page 21: ...s you connect a coaxial cable to receive the signal from your antenna cable or cable box Note ARC Audio Return Channel function is only supported on certain HDMI1 ARC port for some models This output can be used to connect a compatible digital audio receiver OPTICAL OPTICAL OUT socket ...

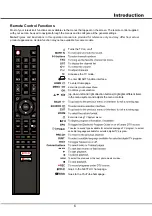
Page 22: ...able for some models SMART To enter SMART function interface To enter Homepage Turns the TV on or off Enter into Quick Access Menu Enter into Using TV System menu AD To select the previous or the next photo music or video Confirms your selection To select a sound type available for selected analogue TV program to select an audio language available for selected digital TV program up down left and r...

Page 23: ...een will display Pairing Pair finished the screen will display Success NOTE If you wait more than 2 minutes and it can t pair please repeat the above steps for pairing again If you want to unpair the Bluetooth remote As follow Step 1 Press button to enter the home page Step 2 Press to choose and then press OK to enter Step 3 Press to select Remotes Accessories and then to chooe the Bluetooth remot...

Page 24: ...up the TV set is in standby mode Press the button on the remote control or on the TV set to turn on the TV 2 Connect the power cable FIRST to the television THEN to a mains socket Note If the power cable is connected to the television please only connect the power cable to the mains socket If your TV is connected to an AC supply Your TV set should only be connected to an AC supply It must not be c...

Page 25: ...guage connecting to the network scanning channels and more During each step either make a choice or skip the step If you skip a step you can perform the setup later from the settings menu Note If the channel search retrieved only the analogue channels it could be caused by poor broadcasting and therefore is not covered by manufacturer warranty Manufacturers cannot be held responsible for lack of o...

Page 26: ...ing an application please contact the content provider According to circumstances of the contents provider an application s updates or the application itself may be discontinued Depending on your country s regulations some applications may have limited service or not be supported Using Homepage TV Source Select the input source from devices connected to TV through different ports Settings Allows y...

Page 27: ...nd operate according to the on screen display or guide 4 Press to return to the previous menu Info Select this option to view TV infomation Picture adjustments Enter to ajust picture mode or Advanced settings Screen Select this option to ajust the picture size Sound adjustments Select this option to set the sound adjustments Speakers To enter TV speaker settinghs HDMI Settings Enter to set up HDMI...

Page 28: ...up Digital Cable Tuning Press OK to start the automatic search process The search may take a few minutes During the process you can press and chosse YES to exit Subtitle Setup 1 Subtitle Setting Include off Basic Hearing impaired 2 Primary Preferred Language Press OK and than use to select Primary Preferred Language 3 Secondary Preferred Language Press OK and than use to select Secondary Preferred...

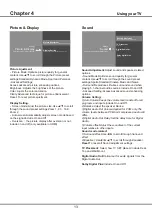
Page 29: ...al Include On and Off Overscan the picture display after overscan or not include on and off only available in HDMI Sound Adjustment Adjust sound and speaker related options Sound Mode Optimize sound quality for general content Use to scroll through the sound preset settings Sports Standard Cinema Music and News Surround Reproduces life like surround sound when playing 5 1 channel audio sources Inc...

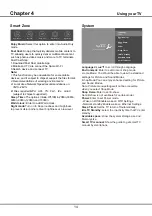
Page 30: ...stem Setup your TV options Shop Demo E show Power Sleep Timer Smart Zone Enjoy Music Select this option to enter into Audio Only mode Fast Cast An app that quickly delivers mobile content to TV allowing users to quickly deliver multimedia content such as photos videos music and more to TV terminals Fast Cast Step 1 Download Fast Cast mobile App 2 Mobile and TV are connect the Same Wi Fi 3 Search d...

Page 31: ...power supply such as large size hard disk MP4 etc suggests using it with power to avoid electric power shortage Multimedia Connect a USB device to a USB socket the screen will show USB file name and then press OK to enter If no USB device connected the USB interface will be not displayed Photo 1 Select Picture icon then press OK button to view the picture 2 Press Up Down Left or Right direction bu...

Page 32: ...be recognized some times All mobile hard disks consume a lot of power which may result in power supply problems We recommend inserting only one hard disk or a low power consumption mobile hard disk 4 The video from a mobile hard disk USB is playing with no sound The audio format of the video in your mobile hard disk is not supported by the TV player 5 Some videos fail to play The formats of the vi...

Page 33: ... television signal where the signal is weak the picture may be marred by dots When the signal is extremely weak it may be necessary to install a special antenna to improve the reception 1 Adjust the position and orientation of the indoor outdoor antenna 2 Check the connection of antenna 3 Fine tune the channel 4 Try another channel Broadcasting failure may happen Ignition Black spots or horizontal...

Page 34: ......
Reviews: