WARNING!
MODELS WITH TILING FLANGE OPTIONS:
A. Do not let rough wall material overlap
flange.
B. Do not attach flange to building wall.
C. Let finished wall (tile, etc.) overlap and
rest on shoulder.
LATH,
PLASTER
BOARD, ETC.
DO NOT ATTACH
FLANGE TO WALL
CAULKING
A
B
C
I N S T A L L A T I O N I N S T R U C T I O N S
3030-738-000 Rev. 08/02/18
RECOMMENDED PROCEDURE.
INSTALLATION INSTRUCTIONS:
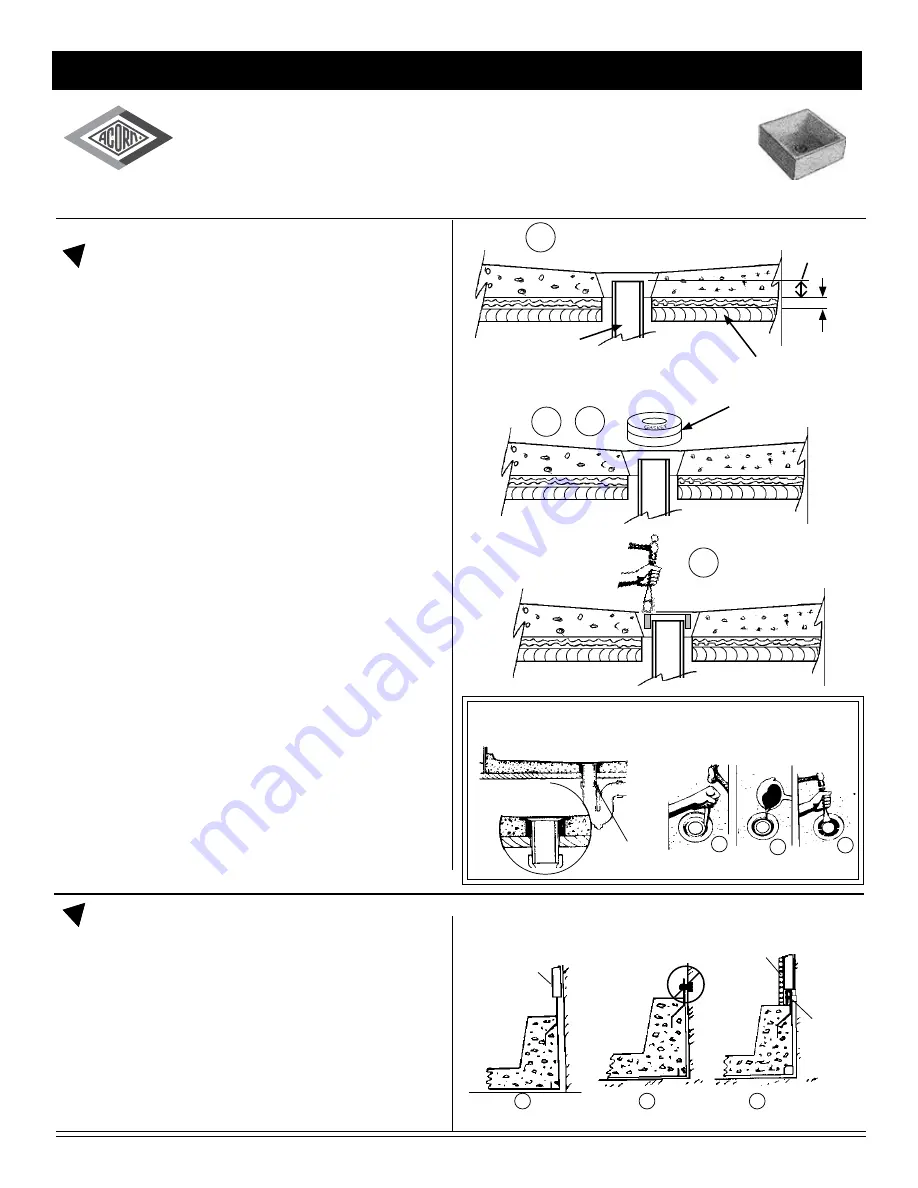
1.
Cut drain pipe to extend 1-3/8" into
drain body. Drain pipe should be even
with top of gasket when installation is
completed. Position
Mop Sink
over
3" waste pipe making sure that pipe is
centered in drain body.
2. Lubricate gasket with soap solution and
stretch over 3" pipe with letters facing up.
3.
Push gasket as far as possible into joint.
4. Using a hammer and caulking tool or
1/4" X 3/4" X 6" piece of wood instead
of a caulking tool, work around the
gasket with a series of blows and
gradually drive gasket into drain body
until it bottoms. Drain pipe should be
even with the top of gasket.
5. Test connection before covering or
concealing. To test: plug 3" drain and fill
receptor with water. Check for leaks.
Verify proper drainage.
This must be
done before finishing walls.
ACORN ENGINEERING
COMPANY
TERRAZZO-WARE
Mop Sink
800-488-8999 or 626-336-4561
FAX 626-961-2200
P.O. BOX 3527 • CITY OF INDUSTRY, CA 91744-0527 (U.S.A.)
2
5
4
Mop Sinks
#4
#1
TILE, ETC.
#2 & #3
NOTE: 3" WASTE
PIPE AND “P” TRAP
BY OTHERS.
A
B
C
FINISHED
FLOOR
3" WASTE PIPE
(BY OTHERS)
BASE
1-3/8"
ALTERNATE PROCEDURE
A. TAMP OAKUM TO 5/8" DEPTH
B. POUR MOLTEN LEAD.
C. TAMP LEAD CAREFULLY.
OPTIONAL -KDG or
GASKET BY OTHERS


