Limited Warranty
All products manufactured are warranted by Air Conditioning Products Company (ACP) to be free from original defects in workmanship for a period of one year from date of shipment, under conditions of
normal use and service. ACP will replace or repair any defective parts upon return to our plant, freight prepaid. This limited warranty will, in no way, include the payment of labor charges for field replacement
of defective parts, installation, repairs of adjustments, or any other work done. Back charges will not be accepted for any reason unless ACP has given prior written permission, nor will ACP be responsible for
consequential damages of any character, no limited warranty expressed or implied will supersede the foregoing.
manufactured for air Conditioning Products Co.
30350 Ecorse Road • Romulus, MI 48174
acpshutters.com
Fiberglass Wall Shutter Modification 36 - 48" Double Panel
Use These Instructions for
Modification of
Motor Model MTR-556 DP
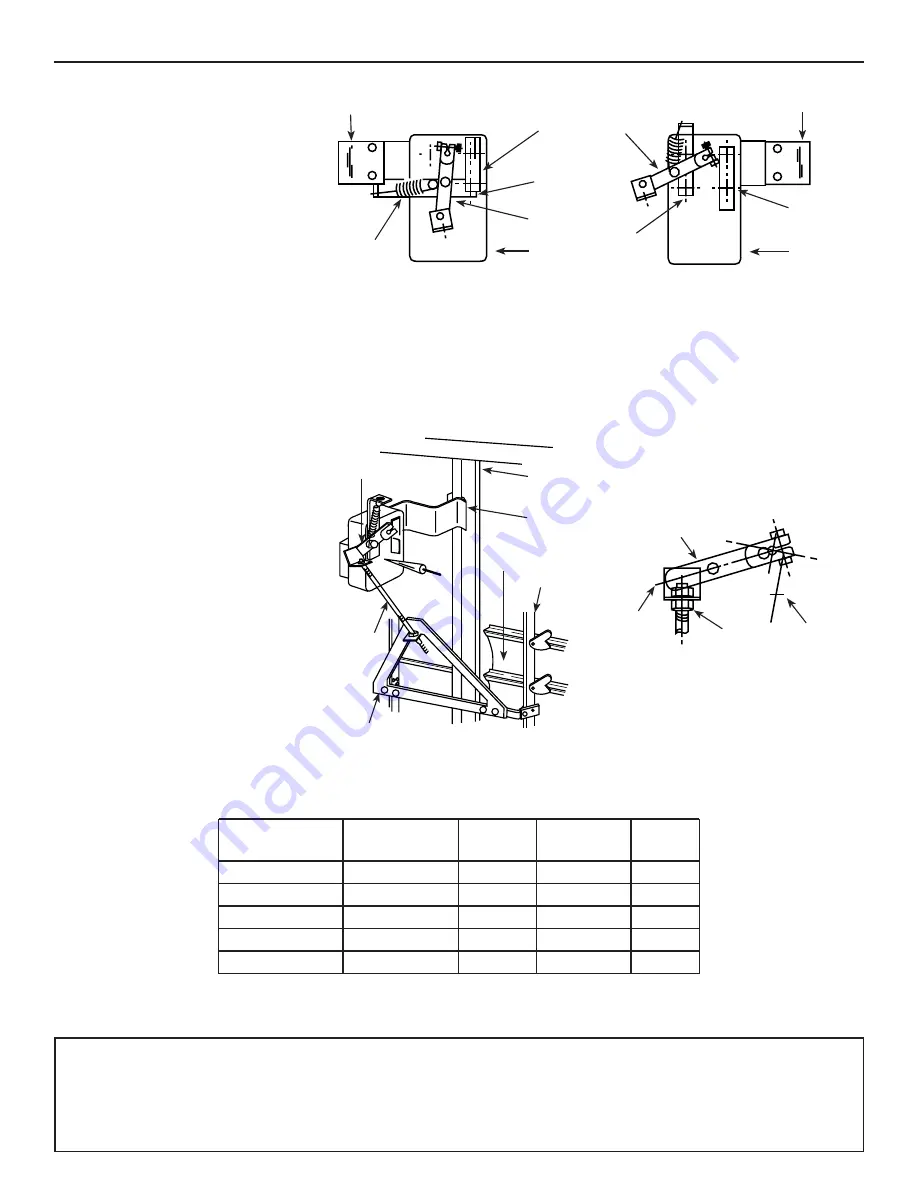
1. remove motor bracket and reinstall
in position shown in Figure 4.
note:
The offset must be in the
same direction as in Figure 3.
2. remove linkage arm stop, rubber
stop, spring and spring arm.
3. Install spring arm in position shown
in Figure 4.
4. reinstall linkage arm stop and
position as shown in Figure 4 using
screws from parts bag.
note:
Spring will be reinstalled at
time of yoke installation (see below).
Installation of Motor
1. Install yoke as shown in Figure 5,
keeping adjustable threaded rod in
center of shutter.
2. Install assembled motor and
bracket to shutter as shown in
Figure 5, making sure bracket is
aligned on center support.
3. Adjust threaded rod making sure
motor arm is in the eight o’clock
position (see Figure 6).
4. Tighten adjusting nuts securely and
reinstall spring.
5. Determine power supply voltage
and wire shutter motor per
appropriate wiring diagram. be sure
to insulate the unused lead.
MOTOr
brACKET
SPrINg
lINKAgE
ArM STOP
SPrINg
ArM
MOTOr
ArM
MOTOr
bEFOrE
AFTEr
MOTOr
ArM
SPrINg
ArM
MOTOr
brACKET
lINKAgE
ArM STOP
MOTOr
MOTOr ArM
MOTOr
brACKET
SHUTTEr
ClOSED
yOKE
figure 5
figure 6
TIE rOD
ADJ.
THrEADED
rOD
CENTEr
SUPPOrT
MOTOr
ArM
(2) THrEAD
EXTENSION
ADJ.
NUTS
EIgHT
O’ClOCK
POSITION
figure 3
figure 4
specifications
Motor Pack
Power Supply
running
Stall
lead
Part Number
required
AMPS
Torque
length
MTr-556 DP
115/230V, 60 Hz
.20/.14
41/47 in.lbs
6”
MTr-556 DP 24V
24V, 60HZ
1.02
42 in.lbs
6”
MTr-556 DP 208V
208V, 60Hz
0.10
42 in.lbs
6”
MTr-556 DP 277V
277V, 60Hz
0.12
50 in.lbs.
6”
MTr-556 DP 460V
460V, 60 Hz
0.11
48 in.lbs
6”
Note: 50 Hz versions of above motor packs available but not Ul rated).
(*) Motor is single-phase, continuous duty with a 40°C, (104°F) maximum ambient
temperature.


