background image

COPYRIGHT 2010 - 2020, ACCELERATED CARE PLUS CORP., ALL RIGHTS RESERVED


OMNICYCLE

® 

ELITE USER MANUAL 

19


Thermal Strip Printer


The  Omnicycle

® 

Elite  has  an  external  Bluetooth

® 

controller  for  wireless  communications 

with the thermal strip printer. From the display screen, the user has the option of sending the 
Exercise Summary Report to the printer to produce a hardcopy of the data for patient notes 
and/or documentation. The printer features one touch controls utilizing one button for power 
and  paper  feed.  Press  and  hold  the  button  to  power  down,  or  simply  allow  the  printer  to 
power off when idle.


Cycle Set-Up for Operation


The following items should be checked prior to operation of the Omnicycle

® 

Elite:


The Omnicycle

® 

Elite is intended for supervised use only


When positioning the cycle, always place on a level/non-slip surface


Route the power cord appropriately to prevent a trip hazard, entanglement with cranks, or damaged to other 
adjacent equipment


Never use the cycle in wet, damp, or overly hot conditions


Always  use  the  Omnicycle

®  

“anti-tip  straps”  when  using  the  system  with  wheelchair  bound  patients  to 

avoid the possibility of a tip-over or injury.


Never  attempt  to  adjust,  grasp,  or  stop  moving  parts  while  the  system  is  in  operation  (i.e.:  cranks,  crank 
length adjusters, footrest, calf length adjusters or armrests).


Setting up the Exercise Program


Determine whether upper or lower extremity exercise is indicated: 

Each has a separate motor.


They cannot be used simultaneously.


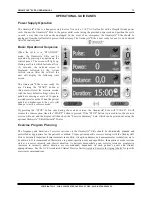
Operation is selected on the main operational screen of the system (the display shows a foot, a pedal, or a 
hand).


The system defaults to the “NEURO” mode of operation unless “ORTHO” or “CARDIO” is selected from 
the available menu choices.


For added stability, the stand on your Omnicycle

® 

Elite should 

be extended.  See extended stand in picture to the right.


Your  Omnicycle

® 

Elite  is  equipped  with  the  anti-tip  restraint 

straps, ensure the hooks are correctly fixed to the wheelchair to 
help  prevent  it  from tipping.  See  strap placement  in  picture  to 
the right.


Setting up the Exercise Program – Lower Extremity


Use the Assisted Entry feature if needed to help position the patient 
(press the foot icon on the display to rotate the pedals to load the patient)


The  Omnicycle

®   

will  automatically  move  each  pedal  into  a 

position where it is easy to put the patient’s feet in place.


Push  the  Assisted  Entry  button  and  wait  until  the  footrest  has 
rotated to its  lowest position, then place  the foot  in position  and 
apply Velcro

® 

straps to fit


Repeat for the other foot.


Secure  the  calf  support  belts  as  needed  when  the  foot  is  in  the 
upper position.


Summary of Contents for OMNICYCLE ELITE

Page 1: ...corporated by reference in its entirety This manual may not be used for any other purpose Any additional copies of the manual shall be ordered from ACP No changes or modifications shall be made to the manual without prior review and written authorization from ACP No authorization is given to market sell disclose or exploit this manual except as for purposes of using the equipment as contemplated b...

Page 2: ...COPYRIGHT 2010 2020 ACCELERATED CARE PLUS CORP ALL RIGHTS RESERVED OMNICYCLE ELITE USER MANUAL ...

Page 3: ...xercise Systems Our OMNISWD MEGAPULSE OMNIVERSA NEUROPROBE OMNISTIM OMNISOUND OMNICYCLE OMNISTAND OMNIVR and SYNCHRONY DYSPHAGIA SOLUTIONS by ACP represent the most recent worldwide advances available for therapeutic application of electro medical devices and other rehabilitation technology ACP is internationally recognized for its contribution to research in the development of medical application...

Page 4: ...NFECTION CONTROL EQUIPMENT AND PRINCIPLES OF USE 30 Definitions 30 Universal Precautions Body Substance Isolation 30 Cleaning Disinfecting of the Omnicycle Elite 30 Cleaning and Low Level Disinfection 30 Intermediate Level Disinfection and Barriers 30 Use of Barriers Intermediate Level Disinfection 31 TROUBLESHOOTING 32 Preventive Maintenance and Good Operating Practices 33 Servicing Your Omnicycl...

Page 5: ...tions Consult instructions for use 0297 CE mark of confidence Maximum extension of device base or supporting arm of upper body exerciser IP2X Classification against water intrusion Proper disposal required Do not dispose of with regular household waste Follow state and or local regulations Alternating current device Observe the user manual No symbol Protection Class I Protect the product from humi...

Page 6: ...nfidence and cooperation can be gained during the treatment The Omnicycle Elite is designed to be used in a sitting position only Patients should never stand on the foot rests with the full weight of their body The greater the distance between the Omnicycle Elite and the patient s seat wheelchair the more the knee hip and UE joints are extended Start at a closer distance to avoid overextending the...

Page 7: ...te is then started from the control panel The Omnicycle Elite is specifically recommended for persons with the following conditions Post stroke Multiple sclerosis Nerve injury Parkinson s Disease especially upper extremity Post operative joint replacement Total Knee Arthroplasty TKA Total Hip Arthroplasty THA Shoulder upper extremity UE Chronic Heart Failure CHF Chronic Obstructive Pulmonary Disea...

Page 8: ...by means of professional medical training professional experience or by means of instruction training by the manufacturer are deemed able to assess safety relevant regulations and recognize potential risks Do not operate this device until the User Manual has been carefully read and is understood Before you start the Omnicycle Elite exercise programs consult the User Manual and understand the speci...

Page 9: ...ercise as the user gains power mobility The Omnicycle Elite offers lower extremity exercise as well as upper extremity exercise The Omnicycle Elite biofeedback function programs provide visual feedback to the patient reflecting lower extremity resistance or cadence It is also used to indicate lower extremity right to left synergy and motor control The system s biofeedback capabilities also assist ...

Page 10: ... reach of upper extremity exerciser E Locking screw with knurled knob for adjusting height of handlebar upper extremity exerciser F Calf support and Velcro Strap G Footrest H Crank with variable length settings I Omnicycle Elite stand with anti tip straps and transport wheels J Transport strap K Control panel inclination adjuster L USB interface for control panel and Bluetooth Printer option Only ...

Page 11: ...s are moving at a rate of 10 rpm in assisted exercise mode When the patient pedals at a higher speed the cycle will change to active exercise mode By pressing the STOP button once during the exercise session the Omnicycle Elite will PAUSE It will resume the same session when the START button is pressed If the STOP button is pressed twice the exercise session will end and the display will then show...

Page 12: ... constant power until the heart rate limit is reached If the patient s heart rate rises above the set limit the resistance is automatically lowered Muscle Hypertonia Spasms Muscle hypertonia can be effectively reduced by gentle and even movement on the Omnicycle Elite The distance between the Omnicycle Elite and the patient s chair wheelchair should be minimized to reduce spasticity If this is com...

Page 13: ...vailable as accessories Y Try different sensor positions to find the best for you If the signal is weak when the sensor is placed right under the pectorals recommended position move the sensor left or right lower or higher to find the best signal There are known cases where heart rate is detected better when the sensor is turned upside down with the Polar logo facing out or even when attached on t...

Page 14: ...ssing the plus button To increase the resistance one increment at a time press and release the button The resistance can be reduced by pressing the minus button and has a minimum setting of zero If you press and hold the or button the setting increases decreases continuously up down to the maximum minimum The set resistance remains constant at all speeds A higher cadence means a higher power outpu...

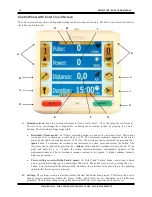
Page 15: ...ch pedal a position forward to makes it easier to properly secure the patient s feet in the footrests calf support Activate deactivate assisted entry mode by pressing the icon If assisted entry mode is active the symbol is red J Reset to default The user can select this button to return default settings for the current exercise The default settings are stored under the system parameters section un...

Page 16: ...footrest Undo the locking screw Slide the footrest along the crank to the desired position and firmly tighten the locking screw Adjust the opposite crank in the same way Make sure that both cranks are set to the same length the cranks are marked with a scale In certain cases it may be beneficial to have different crank lengths on each side e g if the patient s legs are different lengths or have di...

Page 17: ...ite on its rear bottom edge Undo the two fixing screws using the tool supplied Extend the exerciser stand taking care not to exceed the maximum extension marked on the stand 5 inches Retighten the fixing screws Tip the Omnicycle Elite forwards again into its normal position To level the Omnicycle Elite on an uneven floor the rubber feet on the exerciser stand can be adjusted Undo the lock nut with...

Page 18: ...paralysis hypertonia muscle spasms or lack of hand arm mobility to obtain a secure hold Armrests can and should be individually adjusted Combinations of armrests or the use of only one armrest is possible Adjustment by a clinician is essential Elastic Velcro straps allow the forearms to be secured in the armrests You can either place the arm in the armrest after the armrest has been attached to th...

Page 19: ...parts while the system is in operation i e cranks crank length adjusters footrest calf length adjusters or armrests Setting up the Exercise Program Determine whether upper or lower extremity exercise is indicated Each has a separate motor They cannot be used simultaneously Operation is selected on the main operational screen of the system the display shows a foot a pedal or a hand The system defau...

Page 20: ... pedal rotation To adjust the height undo locking screw knob on support tube by turning counterclockwise then pull to release the pin from the channel adjust height release knob and turn clockwise to re tighten knob Make sure it is fully tightened The pedals and handlebars should not be used as a support for standing The cycle could tip over Ensure that patient can comfortably grip the handle The ...

Page 21: ...o it does not come in contact with the display terminal while exercising in Upper extremity mode Rotate the handles by hand without the motor through one full revolution with the patient s arms in position and the legs comfortably placed in the pedals using the Velcro assisted straps and calf support as needed or wheelchair footrests Ensure that the cranks can move freely and that movement of the ...

Page 22: ...se of menu items which require entry of an amount e g motor power this button increases the setting B X Cancel Discard changes This button takes you back up to the next higher menu level Any changes previously saved by pressing Save Changes button are retained those not saved by pressing Save Changes are lost C 1 Save Changes Continue This button saves your settings If the menu item selected has f...

Page 23: ... 100 bpm CARDIO Duration 1 to 60 minutes 15 minutes Biofeedback Symmetry bar road Active Assist Off Symmetry bar Motor power 2 to 22 Nm 15 Nm Heart rate limit 60 to 160 bpm 100 bpm SOCCER Duration 1 to 60 minutes 15 minutes Level Minimal Moderate Maximum Minimal Motor power 2 to 22 Nm 15 Nm Spastic detector Fine Medium Rough Rough Heart rate limit 60 to 160 bpm 100 bpm PORCUPINE Duration 1 to 60 m...

Page 24: ...d to create an interactive exercise experience that encourages greater patient motivation exercise effort duration and performance by varying right left pedal force output This exercise activity requires the patient to control the position of the Porcupine left right center etc by peddling with more force on the side left or right required to position the Porcupine beneath or next to the falling t...

Page 25: ...acilitatecardiovascular range thegoaliedropsbelowthegoalarea WhentheRPMsexceedthesetupperparameterrange 0 muscle ROM and orcognrtiveexercise related thegoaliemovesabovethegoalarea Inthe assisted exercisemode thepedalRPMsarelimitedto l goals 1 15inminimum 1 25 inmoderate and 1 35inmaximum Theset resistance levelremainsconstant regardlessofthepedalingspeed 8 Interactive Biofeedback activity encourag...

Page 26: ... left thecenterlane orrandomly Byselectingthe cognitive exercise relatedgoals minimumlevelofdifficulty noothercarsappearinadjacentlanesandthepatientissimply requiredto keepthecarposrtionedinthecenterlane Thesetresistancelevelremainsconstantregardlessofthe pedaling speed I IIti ...

Page 27: ... road moves At irregular intervals obstacles appear on the road that the patient must avoid by applying more power to one leg or the other If an obstacle is avoided by appropriate one sided exercising obstacle on the left more activity on the right the obstacle changes to green Biofeedback Programs These programs are available on the main screen on the program selection bar Soccer Porcupine and Tr...

Page 28: ...er extremity exerciser is approx 30 of the power of the lower extremity exerciser Spastic detector A Neuro function This setting is used to specify the threshold at which the Omnicycle Elite sensors detect a spastic reaction on the part of the patient and stops the motor to minimize the risk of overstressing the patient For patients who may be subject to spasms there are three different settings t...

Page 29: ...ion allows the operator to choose a difficulty setting of minimal moderate or maximum Maximum Symmetry Available for lower extremity Porcupine program Allows the operator to adjust how close the Porcupine will be positioned from the edge of the border by percentage 70 80 90 100 At 100 the Porcupine will be at edge position of the border Muscle Support An Ortho function This function assists patien...

Page 30: ...etermined default settings using the Set Params setting in the Selection Menu If any settings are changed on the Selection Menu without setting them to default those changes are retained until the power is switched off power has been disconnected or the settings are changed manually This means that the same settings can be used for the next exercise session until changed or power has been interrup...

Page 31: ...ng guidelines Cleaning and Low Level Disinfection This is a recommended daily housekeeping practice to keep the equipment clean and free of contaminants which could contribute to transmission of infection The following practices are recommended for use when treating intact skin without the presence of physiologic fluids such as blood and urine Clean equipment daily with ACP germicidal wipes At the...

Page 32: ...ier film is for single use only The film is discarded after each patient therapy The procedure for use is as follows 1 Wash hands 2 Apply Intermediate Level Disinfection prior to barrier application 3 Select tear or cut with clean scissors a length of barrier film to fit over the operator surfaces of the Omnicycle Elite unit 4 Prepare any items which may become in contact with the therapist during...

Page 33: ... sitting position is central relative to spindle The Omnicycle Elite does not start Have you pressed START twice if Omnicycle Elite is in stand by mode Screen may reset if in standby mode Check power cord Unplug the power cord then reconnect Check power supply fuse Select the correct exerciser upper or lower body Unlock the upper extremity exerciser Exercise session analysis is not displayed Exerc...

Page 34: ...at the power cord cardiac pickup and display control cables are properly routed and are not in danger of being snagged pulled by the lower or upper cycle operation Always keep the system clean and keep any debris such as paper string cloth or clothing away from the cycle moving parts Servicing Your Omnicycle Elite For repair or service of ACP Products and accessories please call 800 350 1100 and f...

Page 35: ...60 Ambient conditions for storage or transportation ºC Rh hPa 25 to 70 15 to 93 700 to 1060 ACP reserves the right to change technical specifications and product availability without notice Electromagnetic Compatibility The Omnicycle Elite is delivered with a cardio pulse set manufactured by Polar This is the only pulse sensor that is authorized for use with the Omnicycle Elite The Omnicycle Elite...

Page 36: ...rehabilitation and exercise options Biofeedback training and Spasticity detection with color display screen Shipping Weight 100 lbs 45 kg ACCESSORY ITEM NO DESCRIPTION 51123 Glove attachment 39222 Cardio Pulse Set with transmitter receiver coiled cord and straps T34 60239 Molded arm rest attachment Left 54565 Molded arm rest attachment Right AP1300 BT Thermal Printer Bluetooth 65168 Omnicycle Elit...

Page 37: ...arrier Film for Surfaces Infection Control 6 x 9 perforated Sheets 1200 sheets roll 50593 Barrier Film for Surfaces Infection Control 12 x 14 perforated Sheets 800 sheets roll 63574 Barrier Film 3 Tubing 1200 roll 55536 Super Sani Cloth Single Use Packets 50 pk bx 44425 Super Sani Cloth Tub 160 Tub 96849 Sani Cloth w Bleach Tub 75 wipes tub 600 110 OTE Omnicycle Therapeutic Exercise Patient Brochu...

Page 38: ...ct Warranty Period The following coverage is provided at no additional cost to the Buyer New Equipment Product Products purchased as new from ACP are warranted against manufacturer s defects in material and workmanship for a period of one 1 year from the date of purchase Refurbished Equipment Product Products purchased specifically as Refurbished Equipment are warranted against manufacturer s defe...

Page 39: ...o a minimum service and handling fee IMPORTANT DO NOT SHIP THE EQUIPMENT TO ACP SERVICE CENTER WITHOUT FIRST SECURING AUTHORIZATION TO DO SO PLEASE CALL CUSTOMER SERVICE AT 800 350 1100 FOR AUTHORIZATION EQUIPMENT SENT IN WITHOUT AUTHORIZATION FROM ACP CUSTOMER SUPPORT WILL NOT BE ACCEPTED Returned Materials Shipping Address Accelerated Care Plus Attn ACP Service Center 4999 Aircenter Circle Suite...

Page 40: ...lay the following start screen The Omnicycle Elite is now ready for use Pressing the START button at this point will start the exercise session with the basic default settings with the pedals going at 10 rpm in assisted exercise mode By actively turning the pedals at speeds greater than this the cycle will change to active exercise mode at any time By pressing the STOP button once during the exerc...

Page 41: ...patient group For each patient group the exercising parameters can be selected and set on the submenu To enter the submenu from the main start up screen press the wrench icon The following screen will be displayed Pressing the UP or DOWN arrows will scroll the screen thru the available main programs Neuro Ortho Cardio Soccer Porcupine Traffic Jam and System To select the desired program press the ...

Page 42: ...r Power and Pulse Demand Press the CHECK MARK 1 button to select the option In this example the DURATION was selected The following screen will be displayed Scroll thru the selections available by pressing the UP or DOWN arrows Press the CHECK MARK 1 button to select the value for that parameter At this point that value will be saved and the screen will display the previous available menu for the ...

Page 43: ...his change as the new default setting for the Omnicycle Elite Scroll down under the selection screen until you see SYSTEM displayed in black The following screen will be displayed Scroll thru the selections available by pressing the UP or DOWN arrows Press the CHECK MARK 1 button to select the SYSTEM parameter The following screen will be displayed Press the CHECK MARK 1 button to select the SET P...

Page 44: ...rams that are based on the needs of a typical patient group For each patient group the exercising parameters can be selected and set on the submenu The user may also set their default parameters To return to the factory default parameters press the STOP button followed by the RESET DEFAULT button and hold both buttons for three 3 seconds The system will indicate SETTINGS RESTORED ...

Page 45: ...wing screen will be displayed Duration 15 00 min Activity 27 Activity Left 70 Activity Right 30 Distance 1 5 km Spasms 0 Calories 0 15 KCal Motor Power Begin 4 8 Nm Motor Power End 4 4 Nm The report may be printed by tapping the screen and following the printer screen options or by touching the printer icon on the screen If display time for this screen ends and the screen reverts to the start up s...

Page 46: ...ectromagnetic Disturbance UT is the supply AC voltage before the test level is applied Directives and Manufacturing Declaration Immunity to Electromagnetic Disturbance The Omnicycle Elite is designed for operation in an electromagnetic environment as described below The customer or the user should make sure that the unit is used in such an environment Immunity Test IEC 60601 Test Level Level of Co...

Page 47: ...is designed for operation in an electromagnetic environment as described below The customer or the user should make sure that the unit is used in such an environment Immunity Test IEC 60601 Test Level Level of Conformity Directive for electromagnetic environment Conducted HF 3Veff 3Veff Portable and mobile radio equipment should Emissions 150kHz to 80 MHz not be used closer to this device than the...

Page 48: ...z 800MHz to 2 5GHz d 1 17 1P d 1 17 1P d 2 33 1P 0 01 0 12 0 12 0 23 0 1 0 37 0 37 0 74 1 1 17 1 17 2 33 10 3 7 3 7 7 37 100 11 7 11 7 23 30 The distance for any transmitters the nominal power of which is not indicated in the table above can be determined by means of the equation given P is the nominal power of the transmitter in Watts W as indicated by the transmitter manufacturer Note 1 An addit...

Reviews: