background image

Page 8 

AB-8kW-I03-191213 

5.


Check the appliance for soundness of seals between castings and main components 
and that all supplied parts and fittings are correctly fitted. 

 
On completing the installation, check that all the internal components of the stove are 
positioned correctly. 
Check - Ashpan, iron grate, baffle, side and back bricks. 


Leave the appliance operational and explain the operation of the stove 
to the customer.  Leave all instructions and operating tools with the 
customer. 

 
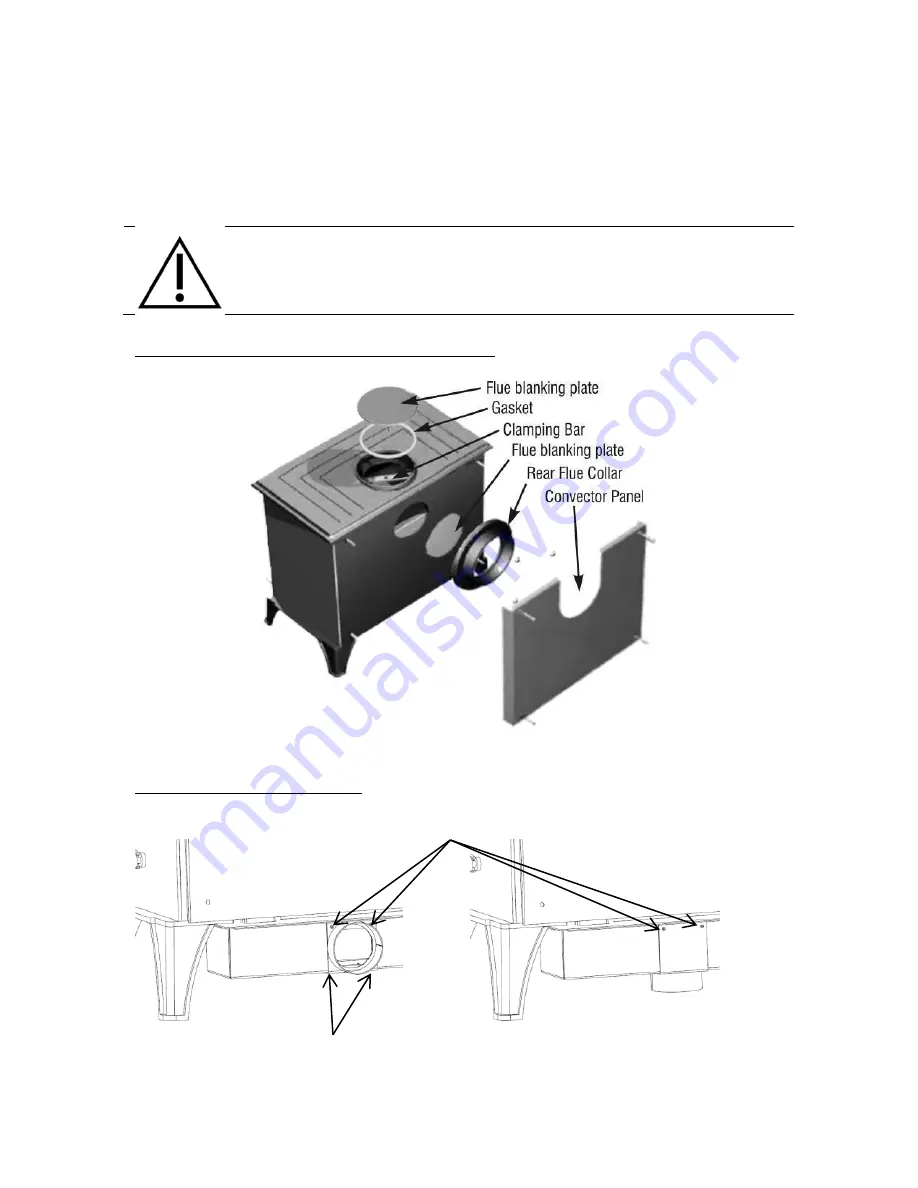
Fig. 4 – Arranging the Flue for Top or Rear Outlet. 


Fig. 5 – Positioning the Air Inlet 
 

Screws holding air inlet bracket. 


Screws holding air inlet bracket 

Summary of Contents for BLOOMSBURY SE 8kW

Page 1: ...BLOOMSBURY SE 8kW Smoke Exempt Multi Fuel Stove INSTALLATION USER INSTRUCTIONS TO BE LEFT WITH THE CUSTOMER UK IRELAND GB IE ...

Page 2: ...nd clean if required Do not attempt to relight the fire until the cause of the fume emission has been identified and corrected Seek expert advice if necessary Do not fit an extractor fan in the same room as the appliance It is important that flue ways are cleaned frequently and the chimney swept regularly Also the stove must be maintained in good mechanical order Regular sweeping means at least on...

Page 3: ...pliances All local regulations including those referring to National and European standards need to be complied with when installing the appliance CHIMNEY FLUE The successful operation of this appliance relies on the adequate performance of the chimney to which it is connected This Appliance is not suitable for installations in a shared flue system The chimney must Have an internal cross section o...

Page 4: ...e base that allows for soot to be removed See Fig 1 A flue chimney access point may also be required so that the state of the chimney can be checked and any fallen soot removed External flues must be insulated to prevent heat loss Fig 1 Ideal Flue Connections Flue box available from ACQUISITIONS Fig 2 Chimney and Flue Performance FLUE DRAUGHT ...

Page 5: ... taken with the primary air intake closed and the airwash control fully open MAXIMUM The primary air intake can now be opened to allow the stove to burn at maximum rate Give the stove some time for the burning rate to become steady and then close the primary air intake make sure the airwash control is fully open and take a flue draught reading immediately Ideally the flue draught reading should ra...

Page 6: ...t through the stove if the flue draught is too high The flue stabiliser should be Fitted in the same room as the stove The same size as the flue pipe Fitted no closer than 700mm to the flue outlet of the appliance DIMENSIONS CLEARANCES Fig 3 Stove Dimensions INSTALLING THE STOVE ...

Page 7: ...orm to Building Regulations must be firm non combustible and capable of supporting the stove Refer to Building Regulations Document J The stove has been independently certified as suitable to stand on a 12mm thick non combustible hearth FLUE CONNECTION The flue pipe used to connect the stove to the chimney is 125mm 5 in diameter The stove is supplied ready for top flue connection To change to rear...

Page 8: ... all the internal components of the stove are positioned correctly Check Ashpan iron grate baffle side and back bricks Leave the appliance operational and explain the operation of the stove to the customer Leave all instructions and operating tools with the customer Fig 4 Arranging the Flue for Top or Rear Outlet Fig 5 Positioning the Air Inlet Screws holding air inlet bracket Screws holding air i...

Page 9: ... touch when in operation and due care will need to be taken Additional loose parts supplied inside your stove include A Stove Mitt For removing the ash pan adjusting the primary air controls adjusting the air wash control and operating the door handle A Riddling Tool For operating the riddling grate and lifting the ash pan in and out A Flue Blanking Plug To blank the top flue outlet if the rear ou...

Page 10: ...ite Bricks One of the top baffle bricks can be removed and the remainder spaced evenly to help deal with a poor flue draught This is designed to be a temporary measure as it will affect the efficiency of your stove WOOD BURNING Front of the stove Rear of the stove Top Baffle Bricks ...

Page 11: ... will revive it When reviving a low fire it is important to also use kindling before adding larger logs to help prevent smoke Wood burns most efficiently when the air for combustion is supplied from above the fire bed rather than below The air supplied above the fire bed provides the oxygen necessary for the volatile gases smoke given off by the wood as it heats to combust This ensures that the ga...

Page 12: ...teady When loading wood make sure that the end grain of the wood in the stove is pointing away from the glass otherwise the moisture and gases coming from the end grain of the wood will dirty the glass TYPES OF WOOD FOR FUEL For best results use well seasoned hardwood such as Oak Ash or Beech Allow wood to dry out under cover in well ventilated conditions for at least twelve months As a rough guid...

Page 13: ...roduced EXTENDED BURNING Before adding a large amount of fuel the grate should be de ashed and the ash pan emptied Add the fuel sloping it from the front coal bar up to the back of the stove to the level of the top of the back brick Open the primary air inlet and let the fire burn for a period on high rate in order to hit the stove back up to temperature and drive off the moisture and gases in the...

Page 14: ...g your stove is the only way to learn its best operation The stove as with any other metal products will expand and contract A ticking noise may occur This is normal for this type of appliance TECHNICAL INFORMATION Normal heat output wood 7 6kW Nominal heat output solid mineral fuel 7 1kW Weight of stove 99kg Minimum chimney draught 12Pa Mean flue gas temperature Wood 229 C Mean flue gas temperatu...

Page 15: ...ed out by a professional The chimney should only be accessed for cleaning when the stove and flue are cold For a top exiting flue the chimney can be accessed through the stove by opening the door and removing baffle bricks and then the top baffle plate as shown in Fig 9 For a rear exit stove the base of the optional rear flue attachment has a removable base can be removed to allow access to the ch...

Page 16: ...t your ACQUISITIONS dealer who will bring your concerns to our attention We will assess the nature of the complaint and either send replacement parts for your dealer to fit or nominate a regional engineer to inspect the appliance and carry out any remedial work that may be necessary If the fault is not actually due to faulty manufacture but some other cause i e misuse failure to install correctly ...

Reviews: