background image

Updated: 2017-05-17

IMPORTANT

Inspecter le produit avant de procéderà l'installation.
La garantie sera invalide si le produita été installé avec des défauts apparents.

ATTENTION

Lors de l’installation. l'applicationde silicone doit être à l'extérieurde la douche
Veuiller lire attentivement ce manueld’instruction avant de commencer l’installation.
Conserver ce manuel pour référence ultérieure.

IMPORTANT

Thoroughly inspect your product before proceeding with the installation.
The warranty will be void if the product is installed with a conspicuous defect.

CAUTION

To prevent leaks, silicone must be applied on the outside of the shower.
Read all instructions carefully before starting the installation.
Save this manual for future reference.

Installation Manual / Manuel d’installation
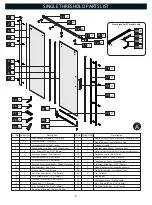
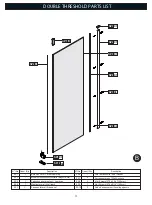
ABBOTT SERIES

Summary of Contents for ABBOTT Series

Page 1: ...eld instruction avant de commencer l installation Conserver ce manuel pour référence ultérieure IMPORTANT Thoroughly inspect your product before proceeding with the installation The warranty will be void if the product is installed with a conspicuous defect CAUTION To prevent leaks silicone must be applied on the outside of the shower Read all instructions carefully before starting the installatio...

Page 2: ...9 10 11 12 13 15 14 Description Vis Screws ST4 x 9 16 40mm Roulettes inférieures Bottom Rollers Moulure magnétique d étanchéité Magnetic Seal Moulure magnétique Magnetic Seal Poignée Handle Montant magnétique Magnetic Seal Moulure d étanchéité inférieure Bottom Moulding Seal Guide pour porte Door Guide Seuil de la porte Door Threshold Capuchon de seuil Threshold Cap Clé Allen Allen Key 3 32 2 5mm ...

Page 3: ...on pour montant Jamb cap Montant mural Wall jamb Panneau latéral Side panel SP 2 SP 3 SP 4 SP 5 Description Ancrages muraux Wall Anchors Vis Screws ST4 x 9 16 40mm 1 1 1 1 1 SP 9 SP 10 SP 6 SP 8 SP 7 1 4 4 1 2 N No Quant Qty Moulure magnétique d étanchéité Magnetic Seal Joint d étanchéité Seal Gasket Vis Screws ST4 x 9 16 40mm Cales d espacement Leveling spacers 3 B ...

Page 4: ...MEASURING TAPE MALLET PENCIL SET SQUARE DRILL BITS 1 8 3 16 1 4 MASONRY DRILL BIT DRILL SILICONE PRECISION KNIFE LEVEL SCREWDRIVER SCREWS TOOLS AND MATERIALS REQUIRED 0 90 FINISHED WALL 4 ...

Page 5: ...5 3 4 46 3 4 1159mm 1185mm 48 57 1 2 58 1 2 1463mm 1489mm 60 23 63 1 2 64 3 4 1616mm 1642mm 66 69 1 2 70 3 4 1768mm 1794mm 72 1 4 6mm 5 6 2 Installation du montant mural Wall jamb installation 1 2 3 4 15mm 16mm 16mm ...

Page 6: ...A 03 A 04 6 3 4 27 28 Commencez par le bas Start at the bottom À l intérieur de la porte 5T ZNK TYOJK UL ZNK JUUX 4 10 11 16 1 4 15 13 1 2 3 4 5 6 7 8 9 10 11 ø6mm ...

Page 7: ...A 05 A 06 7 8mm 10mm RH LH RH LH 1 2 3 4 5 6 4 1 8 3mm 2 3 1 ENLEVER REMOVE 1 8 3mm 6 7 5 16 24 22 25 25 5 8mm 23 ...

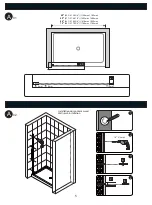
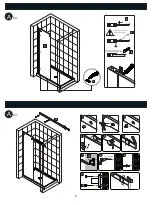
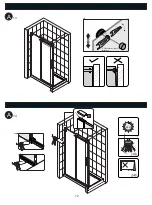
Page 8: ...A 07 A 08 8 12 18 44mm 8 8 29 Intérieur Inside 9 17 1 4 5 6 1 2 3 4 5 20 2 3 ...

Page 9: ...A 09 A 10 7 1 4 Ø6mm 18 21 19 4X 21 21 9 1 2 7 1 2 3 4 5 6 ...

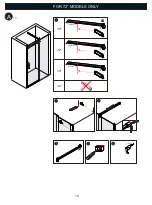
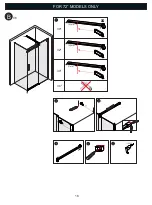
Page 10: ...30 A 11 FOR 72 MODELS ONLY 10 152mm 30 36 102mm 32 51mm 34 ...

Page 11: ...31 32 A 12 11 FOR 72 MODELS ONLY ...

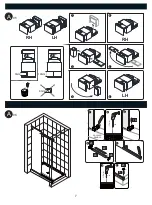
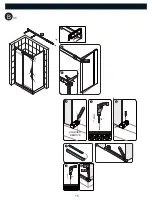
Page 12: ...A 13 A 14 À l intérieur de la porte Inside door 1 12 ...

Page 13: ...155mm 1171mm 48 57 1 2 58 1459mm 1475mm 60 63 1 2 64 1612mm 1628mm 66 69 1 2 70 1764mm 1780mm 72 27 3 4 2 1 8 2 7 0 7 m m 3 2 7 m m 30 29 3 4 2 1 0 3 8 5 7 m m 4 7 7 m m 32 31 3 4 2 1 2 3 9 0 8 m m 5 2 8 m m 34 33 3 4 2 1 4 3 0 6 8 m m 8 7 8 m m 36 1 2 3 4 13 15mm 16mm 16mm ...

Page 14: ...B 03 B 04 14 SP5 5 1 0 00mm 3 1 2 15 0 3 m 0 0 m S610 S66 S66 To temporarily hold the glass To temporarily hold the glass ...

Page 15: ...B 05 10 15m m SP 1 15 1 8 3mm 1 8 3mm 4 5 6 7 8 9 10 ENLEVER REMOVE 1 2 3 S69 S65 ...

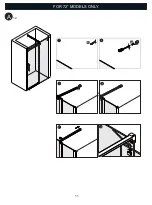
Page 16: ...30 B 06 FOR 72 MODELS ONLY 16 152mm 30 36 102mm 32 51mm 34 ...

Page 17: ...31 32 B 07 17 FOR 72 MODELS ONLY ...

Page 18: ...B 08 B 09 À l intérieur de la porte On the inside of the shower SP 2 28 1 2 3 SP 3 1 18 ...

Reviews: