background image

5

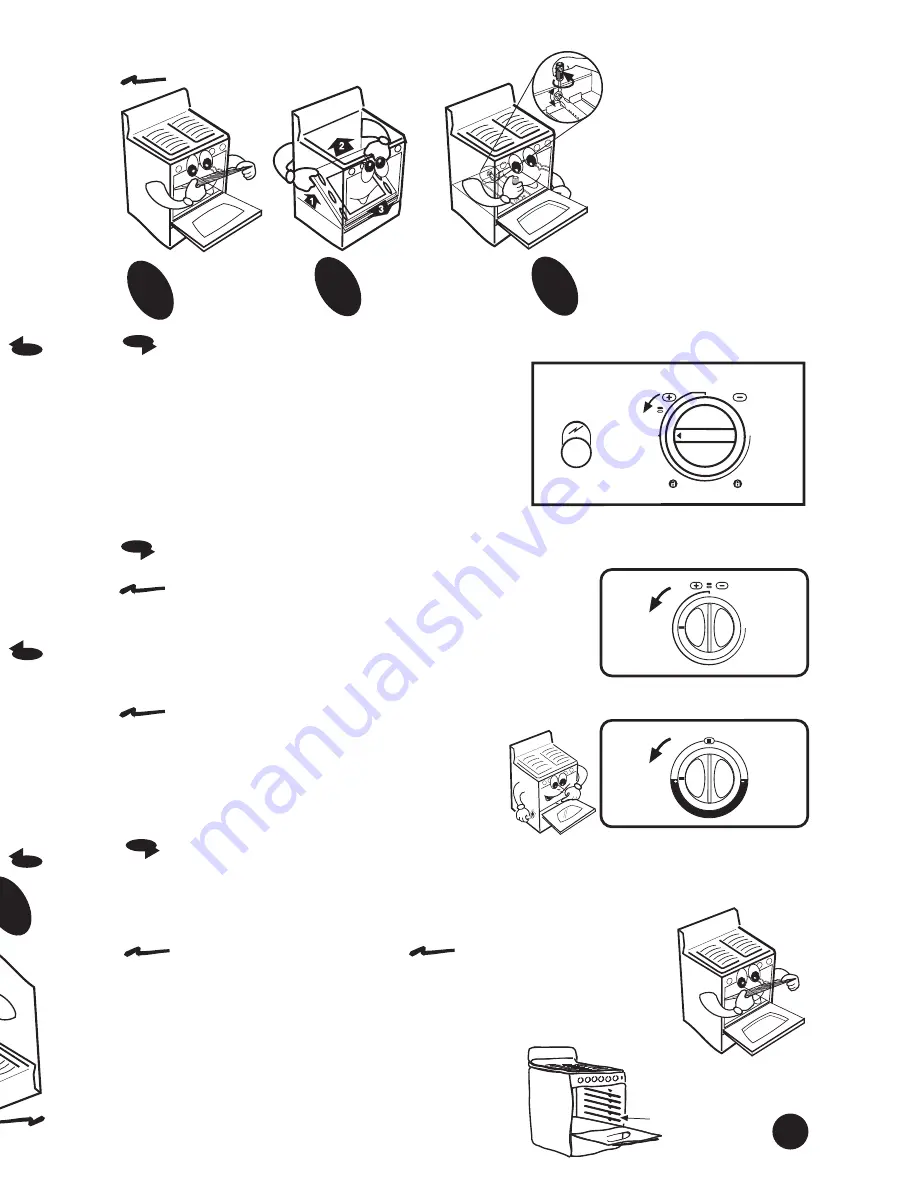
• Ajuste del aire del quemador del horno:

Retire la

parrilla del

horno.

Retire la charola

del horno. (Ver

Pag. 6)

A

 - Afloje el tornillo del

regulador.

B

 - Gire el regulador un

poco.

C

 - Encienda el horno.

D

 - Verifique que las flamas

sean azules.

E

 - Si las flamas no son

azules repita desde el

paso 

B

, al finalizar

apriete nuevamente el

tornillo.

F

 - Coloque la charola del

horno y la parrilla

nuevamente en su lugar.

1

2

3

• 

Para encender los quemadores superiores:

1.- Acerque un cerillo encendido al quemador y al mismo

tiempo presione y gire 1/4 de vuelta la perilla del quemador

correspondiente.

• 

Para encender el horno con termocontrol de encendido

manual:

1.- Encienda un cerillo y colóquelo cerca del agujero

de  la charola del horno, al mismo tiempo presione

y gire 1/4 de vuelta la perilla del horno.

2.- Verifique que el quemador del horno se haya

encendido.

ENCENDIDO MANUAL DE QUEMADORES

APAGADO

FLAMA

MÍNIMA

FLAMA

MÁXIMA

• How to adjust the oven burner air shutter:

Remove the

oven rack.

Remove the oven

tray. (See p

age 6)

5

HOW TO TURN ON THE BURNERS MANUALL

Y

• 

To turn on the surface burners manually:

1.- Light a match and place it close the burner while you

push and turn the knob 1/4 of the way to the maximum

flame position .

• 

How to light the oven burner with thermocontrol,

manually:

1.- 

Open the oven door, light a match and place the flame

at the igniter hole in the front of the oven tray

while you push in and turn the oven knob 1/4

of the way, the burner will light immediately

.

2.- Verify 

that the 

oven burner 

has been 

ignited.

A

 - Locate 

the screw 

on the

air shutter and loosen

it.

B

 - Turn around the air

shutter.

C

 - Turn on the oven.

D

 - Verify that the flames

are blue.

E

 - If 

the flames 

are not 

blue,

repeat since step 

B

,

when the flames are

adjusted, tighten the

screw again.

F

 - Replace the oven tray

and the oven rack

•

 Para retirarla de la estufa:

1.- Jale la parrilla hasta el tope.

2.- Levante la parrilla de la parte frontal.

3.- Jale nuevamente para liberarla.

• 

Para instalarla en la estufa:

1.- Empuje la parrilla hasta el tope.

2.- Levante la parrilla de la parte

     frontal.

3.- Empújela nuevamente para que

     llegue hasta el fondo del horno.

PARRILLA DEL HORNO

       OVEN RACK

The oven has 4 different support

s for the oven rack, this rack has a stop to

avoid droping from the oven, to change the rack position follow the steps:

• To remove the oven rack:

1.- Pull the oven rack until it stop

s.

2.- Lift the front p

art.

3.- Pull it again until it is released.

• To inst

all the oven rack:

1.- Push the oven rack until it stop

s.

2.- Lift the front p

art.

3.- Push it again until it stops.

An extra 

rack position 

is provided 

for special 

cooking operations

other than baking, such as roasting, where a large roasting

container will require more heat and therefore need to be

closer to the heat source or oven bottom.

Para hornear alimentos muy grandes puede usarse

el soporte extra de la parte inferior.

Soporte Extra

Extra Rack

Position

El horno tiene 4 diferentes soportes para la parrilla, la parrilla tiene un tope que evita

que  se salga completamente del horno, para cambiar la posición de la parrilla siga los

pasos:

APAGADO

FLAMA

MÍNIMA

FLAMA

MÁXIMA

OFF

MINIM

UM

FLAME

MAXIM

UM

FLAME

OFF

MINIM

UM

FLAME

MAXIM

UM

FLAME

• Para encender los quemadores superiores

con encendido electrónico

independiente:

Para operarlo oprima el botón que se localiza

en el lado izquierdo del frente de perillas y al

mismo tiempo presione y gire 1/4 de vuelta la

perilla del quemador que desea encender.

ENCENDIDO ELECTRÓNICO DE QUEMADORES SUPERIORES

Perilla en posición de encendido.

APAGADO

FLAMA

MÍNIMA

F L A M A

MÁXIMA

BOTÓN DE ENC.

ELECTRÓNICO

1

2

3

• 

To turn on the surface burners with

independent electronic ignition:

To 

operate it 

push the 

button located 

on the 

left

side of the manifold panel while you push and

turn the desired knob. Release the ignition

button when the burner lights.

SURFACE BURNERS WITH ELECTRONIC IGNITION

Knob in 

ignition position.

OFF

MINIM

UM

FLAME

MAXIM

UM

FLAME

ELECTRONIC IG

NITION

BUTTO

N

Summary of Contents for ACE2300

Page 1: ... ACE2300 ACE2330 INSTALLATION USE AND CARE M A N U A L Part No 98015630 Rev F Covers the following models THIS MANUAL CONTAINS IMPORTANT INFORMATION READ IT BEFORE FIRST USE OF YOUR RANGE Printed in Mexico 2004 STM00408 Rev A ...

Page 2: ...Partes Instala Conexi Funcio Limpie Póliza Format Centro Par Par Vál Que 2 Instal super No p Prop Utilic Int En El S mo AC Cubier Carac Solo Frente Perilla ...

Page 3: ...s or multiple outlets To connect the range use the material shown in the bottom figure 1 The material shown is not provided with the range 3 8 shut off valve Gas inlet tube fitting 3 8 brass pipe fitting Hex adapter 3 8 copper pipe with 5 8 flared type nut Gas regulator 3 8 copper pipe with 5 8 flared type nut Necessary length to reach the gas 3 8 brass pipe fitting Hex adapter Fire or Explosion H...

Page 4: ...4 I 2Si la in para e Esta func móv Para tube Whir y ha núm últi deb no ti gas en l Si la e 1 Aj NOTA en el s primari aire g Fu ...

Page 5: ... 2 3 OVEN RACK The oven has 4 different supports for the oven rack this rack has a stop to avoid droping from the oven to change the rack position follow the steps To remove the oven rack 1 Pull the oven rack until it stops 2 Lift the front part 3 Pull it again until it is released To install the oven rack 1 Push the oven rack until it stops 2 Lift the front part 3 Push it again until it stops An ...

Page 6: ...6 Lim Es neces porque s Su estufa paredes Puede u ranuras Como 1 Tom 2 Emp 3 Jale l P Ab No elé Ap fla vál Lla a la a s N o ins oc fue No utili De no s DI ...

Page 7: ...__ DEALER SIGNATURE AND STAMP AUTHORIZED REPRESENTATIVE Indicate precise steet col state and zip code IMPORTANT NOTE WARRANTY WHIRLPOOL MEXICO S A DE C V Antigua Carretera a Roma km 9 Col Milagro Apodaca N L Mexico C P 66600 phone 81 83 29 21 00 in the terms of this policy we warranty to the buyer and the consumer of this range identified in this following policy COVERED CONCEPTS Manufacturing def...

Page 8: ...8 ...

Page 9: ... INSTRUCTIVO DE INSTALACIÓN USO Y MANEJO No parte 98015630 Rev F Ampara los siguientes Modelos LEA CUIDADOSAMENTE ESTE INSTRUCTIVO ANTES DE USAR POR PRIMERA VEZ SU ESTUFA Impreso en México 2004 STM00408 Rev A T Printed STM00 ...

Page 10: ...es por la compra de su nueva estufa Termocontrol de Horno Quemadores Superiores Respaldo Superior Parrillas Superiores Válvulas de Quemadores Parrilla de Horno Puerta de Horno 2 Instale su estufa en un lugar protegido de las inclemencias del tiempo y sobre una superficie plana y resistente para soportar su peso No permita que la usen niños o personas que no conozcan su funcionamiento Proporciónele...

Page 11: ...nectar su estufa utilice el material especificado en la figura de abajo 1 El material mostrado no viene con la estufa Llave de paso de 9 5 mm 3 8 Tubo de alimentación de la estufa Cople Niple de 9 5 mm 3 8 NPT Tubo de cobre con tuercas cónicas de 9 5 mm 3 8 Tubo de cobre con tuercas cónicas de 9 5 mm 3 8 de longitud necesaria para llegar al gas Cople Niple de 9 5 mm 3 8 NPT Regulador de gas 61 cm ...

Page 12: ... aparece en la última página El técnico calificado debe cerciorarse que la conexión no tiene fugas y que la presión de gas en la estufa es la que aparece en las tablas Si la estufa presenta puntas amarillas en las flamas Retire las perillas 1 Retire el frente de perillas quitando los tornillos del frente y de abajo que lo sujetan 2 3 AJUSTE DE FLAMAS Ajuste del aire de quemadores superiores Empuje...

Page 13: ...Para retirarla de la estufa 1 Jale la parrilla hasta el tope 2 Levante la parrilla de la parte frontal 3 Jale nuevamente para liberarla Para instalarla en la estufa 1 Empuje la parrilla hasta el tope 2 Levante la parrilla de la parte frontal 3 Empújela nuevamente para que llegue hasta el fondo del horno PARRILLA DEL HORNO The avoid To 1 P 2 Li 3 P An e other conta close Para hornear alimentos muy ...

Page 14: ...blesen lacercaníadesuaparato Asegúrese que los muebles cercanos a su estufa así como el muro y piso soporten una temperatura de 180o C para que no sufran deformaciones Noobstruyalasranuras de la charola del horno No seguir estas instrucciones puede ocasionarriesgodefuego o explosión o la muerte Para su seguridad Si huele a gas Abra las ventanas No toque interruptores eléctricos Apague todas las fl...

Page 15: ...l 81 83 29 21 00 en los términos de esta póliza garantiza al comprador de la estufa identificada en la presente póliza exclusivamente lo siguiente CONCEPTOS CUBIERTOS POR LA GARANTÍA Defectos de fabricación que impidan total o parcialmente el correcto funcionamiento de la estufa que se presenten dentro del término de vigencia de esta garantía Reparación cambio de piezas y componentes Mano de obra ...

Page 16: ...8 e Los teléfonos y direcciones pueden cambiar sin previo aviso ...

Reviews: