background image

 - Page       -

4

Installation

Installation

If necessary, consult the user manual that

came with other add-on cards before you
perform the following steps.

1. Adjust the input power supply (110V or 220V

A.C.)

2. Power OFF the AR-IPC14P before installing or

removing any add-on cards to the backplane.

3. Using a standard screwdriver, remove the

chassis cover mounting screws. Then carefully
remove the chassis cover.

4. Refer to the jumper and connector information to

set the jumpers.

5. Remove the Hold-Down Clamp unit.

6. Refer to step 7-9 to install the CPU card.

7. Remove the screw and expansion slot cover

from the slot you wish to use.

8. Hold the CPU card by its top corners and press

it down into the expansion slot. Make sure that
the adapter is fully seated in the expansion slot.

9. Secure the adapter with the screw you removed

in step 5.

 - Page       -

5

10. Repeat step 7 to 9 if there is another add-on

card to be installed.

11. Re-install the Hold-Down Clamp unit to protect

the add-on cards against the vibration.

12. Secure the chassis top cover which you

removed by step 3.

Component list

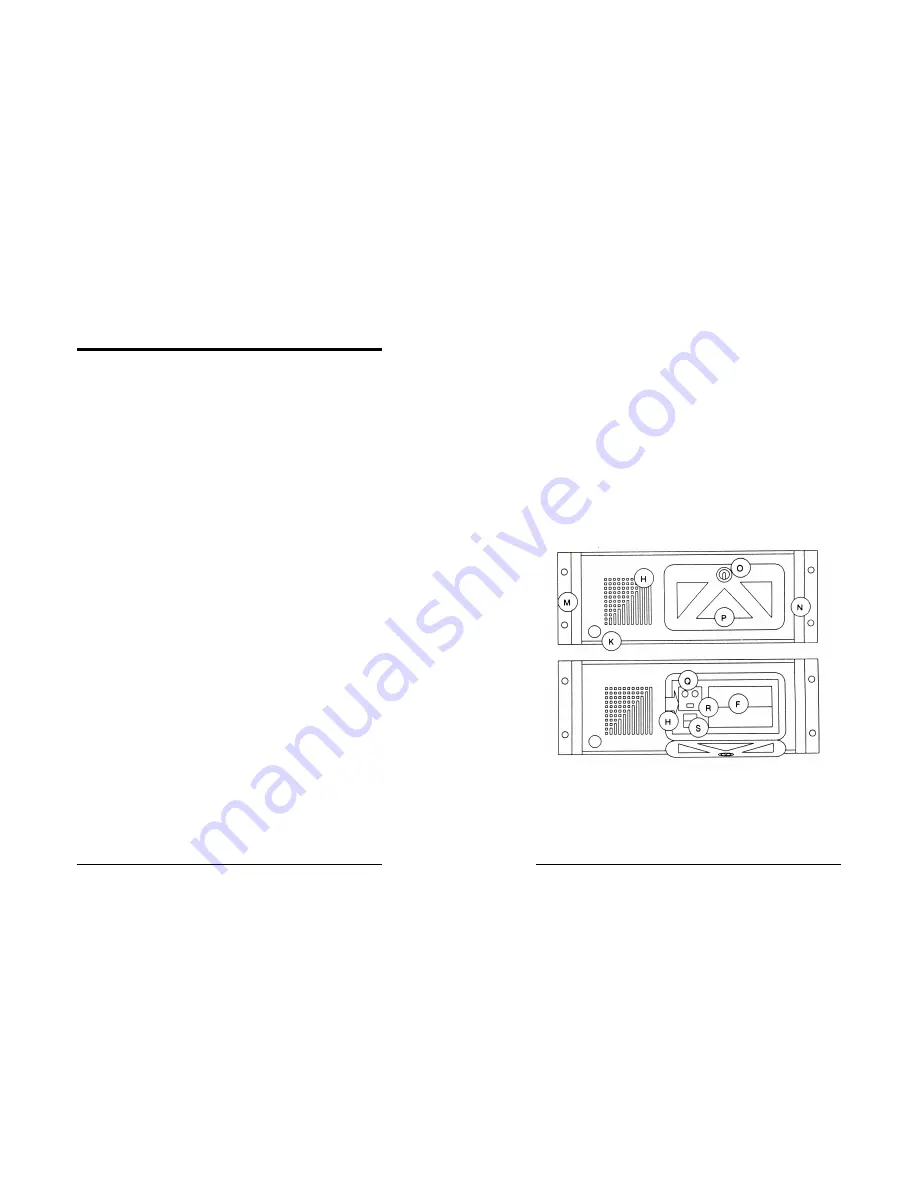
Figure 2 Front View

Summary of Contents for AR-IPC14P

Page 1: ...upply The power supplies are UL CSA and VDE approved The AR IPC14P includes a variety of options such as split backplanes mounted bearing slides The AR IPC14P chassis is intended for users that require rack mounted solutions Product highlight EIA RS 310C standard 19 rack mountable chassis Rugged all steel chassis suitable for industrial applications UL CSA VDE approved 250W or 300W power supply Fi...

Page 2: ...us backplane board Power and Hard disk LED indicators Check List Standard package The following is a list of the components included in each packaging unit Please check them before installing Quantity Products 1 AR IPC14P 1 AC power cord 1 Instruction manual System requirements PC compatible CPU card Page 3 AR IPC14P Rack mount chassis Figure 1 AR IPC14P Rack Mount Chassis ...

Page 3: ...tion to set the jumpers 5 Remove the Hold Down Clamp unit 6 Refer to step 7 9 to install the CPU card 7 Remove the screw and expansion slot cover from the slot you wish to use 8 Hold the CPU card by its top corners and press it down into the expansion slot Make sure that the adapter is fully seated in the expansion slot 9 Secure the adapter with the screw you removed in step 5 Page 5 10 Repeat ste...

Page 4: ...ay G Cooling Fan H Air filter I Add on card guider J Add on card hold down clamp K Keyboard connector L Power supply M 19 rack mounting holes N Hand holder O Front panel locker P Front panel cover Q Power and H D D indicator R Reset switch S Power switch T A C output U A C power input V Input voltage adjust switch W Power supply fan X External cable thru hole Y Add on card blanket ...

Page 5: ... board Page 9 Power supply The power supply that comes with the AR IPC14P chassis is a 300W or 250W power supply This power has been approved by UL CSA VDE The power supply is 110V 220V switch selectable The switch is located in the rear of the chassis The following is the output of the power supply Maximum O P Power supply output 300W 250W Color of cable 5V 23A 20A Red 5V 0 1A 0 1A White 12V 15A ...

Page 6: ...PC14P chassis is equipped 14 hold down clamps for each expansion slot The hold down clamp will secure the expansion cards in the expansion slot to guard against vibration Page 11 Fans and air filter There are two fans in the chassis one regular power supply fan and one filtered fan The first fan The first fan is located on the front panel This fan will blow air into the chassis A filter is supplie...

Page 7: ...M B CAGE 1 11 PLATE 1 35 DRIVE LEFT BKT 1 12 MYLAR 1 36 STAND OFF 6 13 LED HOUSING 2 37 REAR WINDOW 1 14 RESET SWITCH 2 38 BKT CROSS BAR 2 15 MUNT BKT 2 39 CROSS BAR 1 16 RUBBER STRIP 4 40 CLAMP A 10 17 HANDLE 2 41 CLAMP C 4 18 BEZEL 1 42 REAR BRACKET 1 19 SPEAKER 1 43 SCREWS 30 20 FAN BKT 1 44 SCREWS 55 21 RAIL F BEZEL 2 45 3 5 DRIVE BKT 2 22 FILTER 1 46 FRONT WINDOW 1 23 FRAME FILTER 1 47 I O WI...

Reviews: