background image

Ultrasonic flaw detector А1214 EXPERT

Operation Manual

17

ACOUSTIC 

CONTROL 

SYSTEMS

2

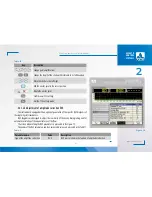
Figure 8

Key

Icon

Description

F1

Adjustment of PT’s parameters

F2

Adjustment of signal parameters

F3

Adjustment of parameters of the tested object

F4

Adjustment of the amplitude correction parameters

F5

Adjustment of imaging parameters

F6

Adjustment of the system settings

Key

Description

Line-by-line scrolling to select the parameter to be edited

Change the parameter value

Exit the editing mode of parameters

Exit the SETTING mode
Activate/deactivate some parameters. Start adjustment of the 
parameters marked with the “▶” sign

Table 4

Table 5

The functions of the keys applicable for parameter editing are presented in the Table 5.

Summary of Contents for A1214 Expert

Page 1: ...Ultrasonic flaw detector А1214 EXPERT Operation Manual 1 ACOUSTIC CONTROL SYSTEMS ULTRASONIC FLAW DETECTOR Acoustic Control Systems ACS Group Saarbrücken Germany 2019 А1214 EXPERT OPERATION MANUAL ...

Page 2: ...Ultrasonic flaw detector А1214 EXPERT Operation Manual 2 ACOUSTIC CONTROL SYSTEMS ...

Page 3: ...perating conditions 6 1 2 TECHNICAL SPECIFICATIONS 6 1 2 1 Main parameters 6 1 3 DESIGN AND OPERATION 8 1 3 1 Design 8 1 3 2 Transducers 9 1 3 3 Interface 9 1 3 4 Operation modes 9 1 3 5 Display of information on the screen 10 1 3 6 Keyboard 11 1 3 7 Working with icons 13 2 INTENDED USE 14 2 1 OPERATING LIMITATIONS 14 2 2 PREPARING THE DEVICE FOR USE 14 2 2 1 Turning the instrument On Off 14 ...

Page 4: ...NG mode 16 2 3 2 FLAW DETECTOR mode 46 2 3 3 The STOP mode 51 2 4 Surface preparation for measurements 56 3 TECHNICAL MAINTENANCE 57 3 1 ELECTRIC POWER SUPPLY AND POWER CONSUMPTION 57 3 1 1 Checking the power source 57 3 1 2 Checking of the power adapter 57 3 2 REGULAR MAINTENANCE 57 3 3 MALFUNCTIONS 57 4 STORAGE 58 5 TRANSPORTATION 59 APPENDIX A 60 ...

Page 5: ...ory of ultrasonic vibrations should be allowed to work with the device For proper ultrasonic testing the following preparatory works shall be performed the control tasks shall be defined the testing schemes and the transducer shall be selected and the inspec tion conditions of the given materials shall be evaluated and etc During the production of the instrument some modifications can be introduce...

Page 6: ...of locations of the flaws 1 1 2 Operating conditions The instrument is designed to operate under the following conditions temperature from 30 to 55 С relative air humidity up to 95 at 35 С upper temperature limit DESCRIPTION AND OPERATION 1 1 INTENDED USE 1 Name of the parameter Value Ultrasonic reconstruction range from 500 to 14 999 m s Operating frequencies of transducers from 0 5 to 15 0 MHz T...

Page 7: ...0D6CS from 2 to 1 300 mm from 2 to 500 mm Limits of permissible absolute measurement errors of the flaw locations steel with angle beam transducers Depth where H is the measured depth of the flaw location in mm Length over the surface where L is the measured length over the surface to the flaw in mm 0 03 H 1 00 0 03 L 1 00 Power supply specifications Power supply source battery Rated supply voltag...

Page 8: ...ed in the Figure 1 The instrument is controlled by means of a membrane keyboard The display and LEDs on the housing of the device indicate the signals measurement results and state of the instrument The PT is connected via coaxial cables included in the delivery kit by means of the LEMO connectors The instrument is powered from the battery unit or a power adaptor included in the de livery kit 1 3 ...

Page 9: ... and schematic indications of the keys allow quick understanding of instrument operation The display continuously indicates all information required for on line inspection The library of configurations facilitates work with the instrument The user can assign a unique name to each configuration Consequently the user can adjust the instrument to be operated under different conditions and for inspect...

Page 10: ...ll as view and delete saved snapshots In the SETTING mode the user can select and configure the parameters of the instrument settings Always start working with a new testing object in this mode 1 3 5 Display of information on the screen A color TFT display 640х480 indicates the measurement results and service information required to control the instrument The workspace of the screen is divided int...

Page 11: ...main functions English symbol names of the keys are used for unification of the design and operating docu mentation on the instrument provided that it could be used in various countries The user controls the main functions and parameters by means of the iconselection keys thefunctionalkeys F located just belowthescreen The corresponding information icon is provided above each key The user selects ...

Page 12: ...ovement Edit value of the active parameter Cancel the operation Change the length of the sweep horizontal arrows Select the parameter for configuring vertical arrows Change the amplifier gain value vertical arrows Enter the STOP mode Delete the configuration Switch On Off the reference level Start configuration of the parameters marked with the sign Start memory cleaning procedure in the process o...

Page 13: ... screen The icons represent symbols associated with a tested object or property Each mode has its own icon set The icons can be either in passive or active state Active state allows configuration of those instrument settings parame ters which correspond to the active icon Note Further as the text goes a conventional numbering of the icon windows and corresponding functional keys is used from left ...

Page 14: ...f the instrument will light green In a few seconds the screen will display a start up window with the name firmware ver sion and a corporate logo of the ACS Figure 7 In the next in 5 to 10 seconds the instrument will automatically enter the mode being active before it was switched off al the corresponding settings are saved 2 2 1 2 Turning off To turn OFF the instrument press the key ATTENTION THE...

Page 15: ...ue to ceramic protector These transducers are well suited for thickness measurement of the objects made of polymer mate rials due to their electroacoustic properties Straight beam double crystal PTs are used for inspection of objects of moderate thickness with greatest possible sensitivity Typically these transducers are used to inspect thicknesses from 0 8 to 50 0 mm Angle beam PTs are used for n...

Page 16: ...election of the ultrasonic transducers are described in specific methods documents and other guidance materials on the ultrasonic non destructive testing of the objects see Appendix A 2 3 1 SETTING mode The SETTING mode is used for correction and adjustment of the parameters The main screen of the SETTING mode is presented in the Figure 8 An active icon is always presented in the icons menu A list...

Page 17: ...litude correction parameters F5 Adjustment of imaging parameters F6 Adjustment of the system settings Key Description Line by line scrolling to select the parameter to be edited Change the parameter value Exit the editing mode of parameters Exit the SETTING mode Activate deactivate some parameters Start adjustment of the parameters marked with the sign Table 4 Table 5 The functions of the keys app...

Page 18: ...s of the material Angle of incident from 0 0 to 90 0 with step 0 5 Setting an angle of incident of the PT If zero value is set then the THICKNESS section 0 parameter value of the tested object will be automatically set into OFF state Press the key to start calibration with the V2 25 sample Delay μs from 0 00 to 100 00 with step 0 01 Setting the delay value in the PT s prism X value mm from 0 0 to ...

Page 19: ...d value of the angle of incident of the transducer Do the following to calibrate with the V2 25 sample select the Angle of incident parameter line and press the key to determine the delay in the transducer s prism scan the radial part R50 of the V2 25 sample on the side of the longer edge Figure 9 receive the time envelope of the signals Figure 10 and press the key scan the hole in the sample Figu...

Page 20: ...nning of the hole shall be performed by the large contact surface of the V2 25 sample If the angles exceed 620 the scanning shall be performed by the small contact surface of the V2 25 sample At that by means of the amplifier make the envelope to exceed the strobe though do not go off the top edge of the screen to accept the calibration results press or to cancel them press Figure 13 ...

Page 21: ...their permissible values are presented in the Table 7 Table 7 Parameter Value Description Gain dB from 0 to 100 Select the gain in the receive path Gain step dB 1 6 10 Select the gain step Impulse V 20 100 200 Select amplitude of the sounding impulse Excitation impulse period from 0 5 to 5 0 with step 0 5 Model the sounding signal Frequency of the snapshots Hz 25 50 250 500 1000 Select the regular...

Page 22: ... the tested object if the angle beam PTs are used allows automatic indication of the location depth of the reflector relative to the surface irrespective of which beam direct or reflected beam it was detected Switches when the key is pressed The parameter value will automatically switch into OFF state if the Angle of incident parameter value of the PT is set to zero Ultrasonic velocity m s from 1 ...

Page 23: ... distant for that purpose the notches are used The signal is detected using these notches by means of the direct or once reflected beam is required for adjust ment of TCG The names of the TCG parameters and their per missible values are presented in the Table 9 Table 9 Parameter name Value Description Type of the amplitude correction TCG TCG was selected in the function of amplitude correction DGS...

Page 24: ...on It is determined automatically as a sum of values of the reference level sensitivity standard and correction for roughness Multilevel strobe On Off Three levels of the strobe will be displayed on the screen search reference and acceptance Reference dB from 12 to 0 Setting the actual sensitivity level relative to the acceptance level Search AFAS dB from 12 to 0 Setting the searched sensitivity l...

Page 25: ...ion window of the reference level will be closed and the value of the maximum amplitude of the signal will be set in the function of the reference level and will correspond to red level of the strobe Note If values of the Correc tion by standard and Correction for roughness parameters are other than zero then their values will be con sidered during calculation of the red acceptance level and all t...

Page 26: ...make the cursor to measure this the signal automatically generated envelope of the signal will remember the level of the signal To reset the envelope change the amplification by pressing the or key measuring cursor will be automatically set to the maximum create an anchor point by means of the key Note an anchor point moves in vertical direction when the amplification gain is changed repeat the cr...

Page 27: ...ude correction DGS The instrument is equipped with an option of generation of the specific DGS diagrams of the single crystal transducers DGS diagrams are designed to adjust the sensitivity of the device during testing and for automatic calculation of the equivalent area of the flaw The screen when setting the DGS parameters is presented in the Figure 19 The names of the DGS parameters and their p...

Page 28: ...of the bottom signal when the PT is set on the side surface of the V2 25 sample shall be determined Figure 20 Attenuation dB m from 0 0 to 99 9 with step 0 1 Setting the attenuation coefficient in the material specified in the ultrasonic testing guidelines Correction for roughness dB from 0 0 to 12 0 with step 0 1 Correction for sensitivity level considering the difference between roughness and un...

Page 29: ... line and generate the time envelope of the signal from the hole Adjust am plification and move the strobe on the screen so that to make the envelope to cross the strobe and be within the limits of the top edge of the screen At that the measuring cursor will auto matically go to the maximum ampli tude and its value will be displayed in the result panel to save the settings press the key A confirma...

Page 30: ...s in the strobe interval AFAS will be actuated Thedisplayedvalueofthesignalamplitude consideringthesign willbeindicatedwithreferencetotheacceptancelevel namely plus sign means the signal exceeds the acceptance level by the given value minus sign means the signal is below the acceptance level by the given value If parameters for calculation are not correct then an information window will appear Fig...

Page 31: ...ification Move the strobe to the left right Changes the length of the strobe with reference to its left boundary Exits the DGS settings mode Opens a confirmation window of new DGS settings Table 12 Figure 25 Table 13 2 3 1 4 3 Adjustment of the amplitude correction DAC The DAC curve is used to adjust the sensitivity and estimate the size of the flaws by the amplitude The screen when setting the DA...

Page 32: ... 0 Setting the reporting sensitivity level relative to the acceptance level Search AFAS dB from 12 to 0 Setting the search sensitivity level relative to the acceptance level Table 13 Adjustment of DAC DAC adjustment procedure select the line with required type of the DAC amplitude correction and press A DAC configuration window will be opened find the maximum signal from the first reference reflec...

Page 33: ...ll be out of the strobe field Figure 27 press the key at that the second anchor point will appear on the peak value of the signal To delete the anchor point press the F6 key Note several anchor points will be deleted according to their creation sequence create the anchor points for all reference reflectors press the key confirm or cancel the DAC curve Figure 28 Press the key to exit the configurat...

Page 34: ... 29 Table 14 Key Description Adjustment of gain amplification Move the strobe to the left right Change the length of the strobe with reference to its left boundary Set the anchor point F6 Delete the anchor point Exits the DGS settings mode Opens a confirmation window of new DGS settings 2 3 1 5 Editing the imaging parameters The screen when setting the imaging parameters is presented in the Figure...

Page 35: ...or On Off Controls the display of the measuring cursor vertical line pointing at the place of measurement of the signal parameters on the screen key Cut off Off from 1 to 100 with step 1 Level of the cut off when the signal is displayed on the screen Cut off removes the noise signals from the screen Amplitude of these noise signals is below the selected threshold value Parameter name Value Descrip...

Page 36: ...ware version Time HH MM Current time in HOURS MINUTES 24 hour format Enters the editing mode Date DD MM YYYY Current date in DAY MONTH YEAR format Enters the editing mode Brightness from 5 to 100 with step 5 Setting image brightness of the instrument s screen Sound On Off Switch On Off the accompanying sound of AFAS actuation by the instrument and connected Bluetooth headset Auto shutdown timer mi...

Page 37: ...ching and connection of the Bluetooth devices Table 16 Table 17 The functions of the keys applicable for configuration of the system settings are presented in Table 17 Key Description Line by line scrolling to select the parameter to be edited Change the parameter value Exits the DGS settings mode Opens a confirmation window of new DGS settings Editing the Time or Date parameters Do the following ...

Page 38: ...rocedure Figure 34 Bluetooth function Only one headset can be connected to the instrument at a time First connection of the Bluetooth headset Do the following to connect the Bluetooth headset to the instrument turn On the Bluetooth headset at initial usage switch the Bluetooth headset into the interfacing mode according to its Operation Manual select the SEARCH FOR BLUETOOTH DEVICES parameter and ...

Page 39: ...h devices are detected then information message NO DEVICES FOUND will appear on the screen In such a case as well as if the required Bluetooth headset misses in the list of the found devices make sure that the headset is connect ed and is in the interfacing mode After that restart searching for devices select the line the headset being connected e g PLT_M20 and press a window for digital password ...

Page 40: ...ection of the headset select the Connect to line and press The instrument will automatically switch on the Bluetooth mode start searching for the headset and connect it when found Figure 38 2 3 1 7 View create and delete configurations A line is highlighted in the list of the configuration names when you enter the SETTING mode This is the line of the currently used configuration i e current config...

Page 41: ...TROL SYSTEMS 2 Figure 40 Figure 39 Note the following basic configurations are always present in the list of configurations by default Basic S5096 5 0 70 Basic S5182 2 5 65 Basic S3568 Basic D1771 WARNING YOU CANNOT DELETE A BASIC OR A CURRENTLY USED CURRENT CONFIGURATION ...

Page 42: ...ration based on the current one select the line with the configuration for editing by means of the keys e g Basic D1771 and make it a current one by pressing the key Figure 39 Press the key to change the values of the configuration parameters Parameter values will become editable Figure 42 A new line will be automatically added to the end of the names list of the configurations when you change the...

Page 43: ...figuration is being created based on the any basic configuration Figure 43 presents the display when you edit the configuration with the name Basic S5096 5 0 70 Press the key to exit the configuration of parameters when all required settings are adjusted A left column listing the configuration names will become active An automatically generated temporary name of new configuration Figure 44 is high...

Page 44: ...ses will be added to the name of the configuration taken as a basic one If the name of the configuration taken as a basic one terminates with the number in parentheses then the value within brackets will be increased by 1 by default If the next number in numerical order is already in the list then by default a number following the last existing one will be assigned Configuration can be assigned an...

Page 45: ...n the screen Move the cursor in the name field to the left right Enter a symbol confirms highlighted action in the name field of the screen keyboard field Exit the name editing window and enters the SETTINGS mode win dow the name will not be saved The functions of the icons when editing the name are presented in the Table 19 Key Icon Description F1 Save the new name F2 Move the cursor in the name ...

Page 46: ...on place and indication of the measured parameters will be performed Additionally event of the signal exceeding the strobe level is accompanied by the sound signal and red LED blinking onthefrontpaneloftheinstrument Ifthesignalisbelowthestrobe then neither registration nor measurement will be performed Manual mode is a measurement mode with the inactive strobes The signal measurement is performed ...

Page 47: ... of the acceptance level calculated automatically in the SETTINGS mode If DGS is On this filed displays the Equivalent area parameter is a value of acceptance equivalent area of the flat bottomed hole Velocity m s is the velocity value of the ultrasonic wave set in the SETTING mode Gain dB is the amplification value set in the SETTING mode Gain step dB is the switching step of the amplifier select...

Page 48: ...e reference level Enter the STOP mode F1 F6 edit a corresponding parameter Enter the SETTINGS mode 2 3 2 3 Functions of the control icons The functions of the keys applicable for the FLAW DETECTOR mode are presented in the Table 20 F1 First strobe F2 Second strobe Strobes are used to set the testing areas sensitivity levels and actuation of the AFAS system measurement of the flaw locations and sig...

Page 49: ...he cursor in this point will be indicated on the screen sound and light indication is produced AFAS actuates If the strobe is beyond the range displayed on the screen then a pointer will appear at the right boundary of the range The pointer allows determination of the strobe threshold level a single red arrow for the first strobe and a double blue arrow for the second strobe ATTENTION IF THE SIGNA...

Page 50: ...ker coincide F4 Form of the signal Switching between the signal forms in the A Scan area detected contoured detected shaded dimensional envelope except the LOOP mode radiofrequency signal except the DAC mode F5 Loop LOOP mode is Off LOOP mode is On If the LOOP mode is ON then two images of the signal are simultaneously displayed on the screen Prior to switching On the LOOP mode always switch On th...

Page 51: ...rrection the TCG curve is On Off the DGS curve is On Off the DAC curve is On Off The information on selecting the type and adjustment of the amplitude correction parameters is presented in the section 0 2 3 3 The STOP mode Upon pressing the key the instrument enters the mode of saving and viewing of previously saved A Scans Figure 52 2 ...

Page 52: ... 3 3 1 Saving current snapshot Upon pressing the key F1 the instrument enters the editing mode of the new snapshot name Figure 53 By default the snapshot name is generated on the basis of the Snapshot word with a hyphen of the appropriate serial number If the name of the last snapshot of the saved ones ends with any character or digit without a hyphen in front of it then a hyphen and a serial numb...

Page 53: ...previously saved snapshots Upon pressing the key F2 the instrument will enter the mode of viewing and deleting of the saved snapshots Figure 54 The functions of the icons in the STOP mode are presented in the Table 23 Figure 53 Figure 54 Key Icon Description F1 Go to the previous saved snapshot Table 23 2 ...

Page 54: ...Figure 55 Upon pressing the key F4 the instrument will start recording the voice comment to previously saved snapshot If the snapshot has a saved comment already then you will have to delete this comment in order to record a new one Upon pressing the key F5 the instrument will start playing the voice comment to the saved snapshot Upon pressing the key F6 the recorded voice comment to the saved sna...

Page 55: ...omment for the snapshot being saved Figure 56 The software allows recording a short voice comment up to 20 seconds ATTENTION REPEATED PRESSING OF THE F4 KEY RESULTS IN RERECORDING OF THE ALREADY RECORDED COMMENT Figure 56 Figure 57 2 3 3 4 Playing the voice comment for the snapshot being saved Upon pressing the key F5 the instrument will start playing the recorded voice comment for the snapshot be...

Page 56: ...face of the tested object influence the penetration of the ultrasonic sound into the material Hence prior to measurements clean such surfaces and remove the foreign matter wipe the surfaces and remove abrasive particles apply some coupling fluid onto the surface Cleaning rough corrosive surfaces provides service life extension of the ultrasonic transducers and the improvement of the measurement ac...

Page 57: ...1 2 Checking of the power adapter If a malfunctioning power adapter is connected to the instrument if the instrument is On then a blinking message Charging device is faulty Проблема с зарядным устройством will appear on the screen if the instrument is Off then the battery charge level icon will not light and a blinking message Charging device is faulty Проблема с зарядным устройством will appear o...

Page 58: ...arrangement of the instruments in warehouses shall enable their free movement and unrestricted access to them The distance between the instruments and the walls floor of the warehouse and other warehoused instruments shall be at least 100 mm Distance between the heating units in the warehouses and the instruments shall be at least 0 5 m The storage room shall be free from the current conducting du...

Page 59: ...hould be properly and steadily fixed to prevent their hitting against one another and against ve hicle walls during transportation When transported in open vehicles the instruments shall be protected from rain and water splashes The transportation conditions of the instruments shall correspond with the technical requirements and standards valid for the given type of the transport If shipped by air...

Page 60: ... industry 2005 656 p 3 Non destructive testing reference book in 8 v edited by V V Kluev V 3 I N Ermolov Yu V Lange Ultrasonic testing 2nd ed revised M Mechanical industry 2006 864 p picture 4 I N Ermolov M I Ermolov Ultrasonic testing Work book for professionals possessing 1st and 2nd skill levels 5th ed stereotype edition M Azimut 2006 208 p 77 picture 5 V G Scherbinskiy Technology of ultrasonic...

Page 61: ...Ultrasonic flaw detector А1214 EXPERT Operation Manual 61 ACOUSTIC CONTROL SYSTEMS NOTES ...

Page 62: ...Ultrasonic flaw detector А1214 EXPERT Operation Manual 62 ACOUSTIC CONTROL SYSTEMS NOTES ...

Page 63: ...Ultrasonic flaw detector А1214 EXPERT Operation Manual 63 ACOUSTIC CONTROL SYSTEMS ...

Page 64: ...Ultrasonic flaw detector А1214 EXPERT Operation Manual 64 ACOUSTIC CONTROL SYSTEMS OPERATION MANUAL Revision January 2019 ULTRASONIC FLAW DETECTOR А1214 EXPERT ...

Reviews: