18
Marvair MAA/MGA Wall Mount AC Installation & Operation Manual
05/2023 Rev.21
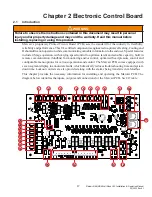
Item Description
1
Economizer Actuator Output 2-10 VDC
2
Outdoor Motor Control Output 0-10 VDC or PWM
3
Indoor Motor Control Output 0-10 VDC or PWM
4
Enthalpy Sensor Signal Input 4-20mA
5
Outdoor Sensor Signal 10K NTC (Heat Pumps) / Dry Bulb Sensor Signal Input 10K NTC
(Systems Equipped with Dry Bulb Economizer)
6
Supply Air Sensor Signal Input 10K NTC (Systems Equipped with Economizer)
7
Defrost Sensor Signal Input 10k NTC (Heat Pumps Only)
8
Head Pressure Control Sensor Signal 10k NTC (ECM Motors)
9
Control Board Menu/Fault Display
10
Menu/Up/Down Selection Buttons
11
Modbus RJ11 Communications Ports
12
Low Pressure / Freeze Sensor Signal Input 10k NTC
13
High Pressure Switch Input (Normally Closed)
14
Thermostat Inputs/Alarm And Status Terminals
15
24 VAC To Power Board (18 VAC To 30 VAC)
16
Indoor Blower Output 24 VAC (PSC Motors)
17
Reheat Output 24 VAC (Hot Gas Or Electric Reheat Dehumidification)
18
Reversing Valve Output 24 VAC (Heat Pumps Only)
19
Electric Heat Output 24 VAC
20
Outdoor Fan Output 24 VAC (PSC Motors)
21
Compressor 1/1st Stage Output 24 VAC (Single Stage Compressor)
22
Compressor 2/2nd Stage Output 24 VAC (Dual Compressor System 2nd Compressor)
(Single Compressor 2nd Stage)
23
Control Board Power Indicator LED
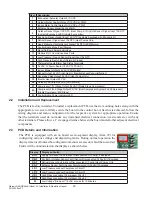
2.2 Installation and Replacement
The PCB is factory installed. To install a replacement PCB, use the six mounting holes along with the
appropriate screw size to firmly secure the board to the control box. After this is achieved, follow the
wiring diagram and menu configuration for the respective system for appropriate operation. Ensure
that the terminals used do not make any unwanted electrical connection (via strands etc.) with any
other terminals. Please allow a 1” creepage distance between the board and all other adjacent electrical
components.
2.3 PCB Details and Information
The PCB is equipped with an on board seven-segment display (Item #9) for
configuring various settings and displaying faults. During normal operation the
display remains off unless the configuration menu is accessed or a fault has occurred.
Faults will be annunciated on the display as shown below:
Display
Displayed Faults
AS-F
Supply Air Sensor Fault (Sensor Disconnected Or Faulty) If Equipped
DB-F
Dry Bulb / Outdoor Sensor Fault (Sensor Disconnected Or Faulty) If Equipped
DS-F
Defrost Sensor Fault (Sensor Disconnected Or Faulty) Heat Pumps Only
ES-F
Enthalpy Sensor Fault (Sensor Disconnected Or Faulty) If Equipped
LP-1
Low Pressure Lockout Compressor Circuit 1
LP-2
Low Pressure Lockout Compressor Circuit 2
HP-1
High Pressure Lockout Compressor Circuit 1
HP-2
High Pressure Lockout Compressor Circuit 2
03
Low Voltage "Brownout" 16VAC or Less for 10 Minutes


