background image

10

Add Card Batch

11

Delete Card Batch

12

Add PIN Code

13

Delete PIN

14

Add Card and PIN

15

Delete Card and PIN

16

Add Card Batch using keypad

17

Delete Card Batch using keypad

18

Add Random Card

20

Set Door Relay Time

5 seconds

21

Set Door Ajar Time

30 seconds

22

Set Guest Buzzer Time

2 seconds

23

Change Programming Code

9999

24

Change Number of PIN Digits

4

30

Door Chime

Off

31

Silent Operation

Off

32

Lock-saver (Anti Tailgating)

Off

33

Toggle

Off

34

Door Forced Alarm

On

35

Door Ajar Alarm 

On

36

Guest Button

On

37

Duress Codes

Off

38

Network Master

Off

39

Card and PIN

Off

40

Card or PIN

Off

41

Card and any PIN

Off

50

Set Programmable Input

Door Release Button

51

Set AUX I/O 1

Door Contact 

52

Set AUX I/O 2

Door Alarm

53

Quick I/O Setup

60

Assign Door Numbers

61

Find Door Number

62

Find Door Numbers

70

Add Card Batch for Second Door

71

Add PIN code for Second Door

72

Add Card and PIN for Second Door

73

Add Random card for Second Door

80

Default Unit

ACTSmart2 Operating and Installation Manual

Rev. 1.0

6

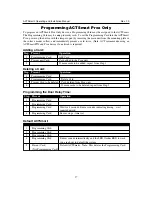
Programming Summary

Code

Function

Default

Summary of Contents for ACTSmart 2 1070

Page 1: ...access control TECHNOLOGY Operating Installation Instructions for ACTSmart 2 2 Product Range ...

Page 2: ......

Page 3: ...gramming ACTSmart Options 11 Setting Programmable Input Function 12 Setting AUX I O 1 Function 12 Setting AUX I O 2 Function 12 I O Function Code 12 Quick I O Setup 13 Adding a Card Batch for Second Door 13 Adding a PIN for Second Door 13 Adding a Card and PIN for Second Door 13 Add Random Card for Second Door 14 Programming a Network System 15 Assign Door Numbers 15 Find Door Number 16 Find All D...

Page 4: ...ed on a standalone ACTSmart The ACTSmart2 version is not compatible with the earlier version of ACTSmart Cards and fobs for one version will not work on the other The devices may NOT be networked together Important As with any Access Control system always ensure there is an alternate means of escape in the event of the unit failing to operate due to power loss or in the event of fire Product Speci...

Page 5: ...batch Press button to complete 3 Add a PIN Code Press 12 and then enter a 4 digit PIN code Press button to complete On ACT 1080 set Option 40 Card or PIN 4 Set Desired Door Relay Active Time Press 20 and then enter the desired number of seconds from 000 255 three digits with leading zeros Press button to complete 5 Change Programming code Press 23 then enter new 4 digit programming code 6 Exit Pro...

Page 6: ...ating Off 33 Toggle Off 34 Door Forced Alarm On 35 Door Ajar Alarm On 36 Guest Button On 37 Duress Codes Off 38 Network Master Off 39 Card and PIN Off 40 Card or PIN Off 41 Card and any PIN Off 50 Set Programmable Input Door Release Button 51 Set AUX I O 1 Door Contact 52 Set AUX I O 2 Door Alarm 53 Quick I O Setup 60 Assign Door Numbers 61 Find Door Number 62 Find Door Numbers 70 Add Card Batch f...

Page 7: ...mum security the unit may be programmed to require all users to enter a PIN code after presenting a card For lower security applications another programming option allows access to PIN only users A duress code feature is also available The built in inputs and outputs are programmable allowing the ACTSmart to be used in a wide variety of applications from simple door access to cash offices and fire...

Page 8: ...ption 40 is set on PIN and Prox units 2 0001 9999 4 6 digit PIN code 3 1 8 optional Select each door this PIN is valid for 4 Press End programming PINs Step Keypad Entry Operation 1 13 Delete PINs 2 0001 9999 4 6 digit PIN code 3 1 8 optional Select each door this PIN is deleted from 4 Press End deleting PINs Step Keypad Entry Operation 1 15 Delete Card and PIN 2 Present Card 3 1 8 optional Select...

Page 9: ...pad Entry Operation 1 20 Set Door Relay Time default 5 seconds 2 Enter 3 digit time 000 255 seconds leading zeros required 3 1 8 optional Select each door this timer is set for 4 Press End setting Door Relay Timer Set Door Relay Time Step Keypad Entry Operation 1 21 Set Door Ajar Time default 30 seconds 2 Enter 3 digit time 000 255 seconds leading zeros required 3 1 8 optional Select each door thi...

Page 10: ... Digits Step Keypad Entry Operation 1 24 Change Number of PIN digits 2 4 6 Select number of PIN digits in range 4 to 6 When set the codes require leading zeros Eg Code 9999 becomes 009999 for 6 digits Set SmartLock Code Step Keypad Entry Operation 1 25 Set SmartLock code 2 0001 9999 New 4 6 digit SmartLock code 3 1 8 optional Select each door this code is set for 4 Press End setting SmartLock code...

Page 11: ...he door ajar timer the buzzer output door alarm output is activated Closing the door and presenting a valid card or entering a valid PIN deactivates the output 36 Guest Button On When set default and when the key on the keypad is pressed the buzzer output is activated for the duration programmed in the guest buzzer timer 37 Duress Codes Off When set and when a duress PIN is entered the door is ope...

Page 12: ...ns diagram If this is wired into the Master Smart then all doors on the network will open 2 Lock Door When this input is low the door locks and the red LED flashes 3 Card and PIN When this input is low then only users who enter both Card and PIN will be admitted This option is only valid on an ACTSmart PIN and Prox 4 Card or PIN When this input is low a valid Card or a valid PIN will open the door...

Page 13: ...tLock 4 Door Release Button Fire Override Interlock 5 Door Contact Follow Door Alarm 6 Door Contact Follow Buzzer 7 Door Contact Door Alarm Buzzer 8 Fire Override Interlock Buzzer 9 Card And PIN Interlock Follow 3 1 8 optional Select each door this function is valid for 4 Press End Quick IO setup Adding a PIN for Second Door Step Keypad Entry Operation 1 71 Add PINs Make sure Option 40 is set on P...

Page 14: ...p Keypad Entry Operation 1 73 Add random card for Second Door I O function code 12 must be set for the Aux O P 2 Enter 1 8 optional Select each door these cards enabled for 3 Press 4 Present Card Add card 5 Present Card optional Repeat for all other cards to be added 6 Press End adding cards ...

Page 15: ...ocedure below Assign Door Numbers Assigning Users to Doors When each ACTSmart has been given a unique door number then users may be given access through specific doors In most programming menus there is an optional step to program specific doors For example when programming a Card Batch the user may select which doors the Card Batch applies to Step 4 in Adding Card Batch see above Skip this option...

Page 16: ...Default the new Slave and add it to the network Assign a door number to it from the Master Replacing the Master Unit If the Master Unit needs to be replaced then replace it with a Slave unit already on the system as it will have all the card PIN information and make it the Master Add a new defaulted Slave to the network in place of the swapped out Slave Then assign a Door number to the new Slave m...

Page 17: ...the ACTSmart The Programming Card may be any proximity card To set the Programming Card into the ACTSmart Prox power up the device with the tamper open by removing the main unit from the mounting plate or the surface mount collar and immediately present a card twice Note ACT recommends using an ACTSmart PIN and Prox device if a network is required Adding a Card Step Present Operation 1 Programming...

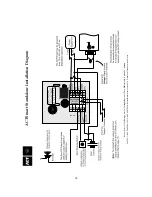
Page 18: ... Standalone Installation Diagram Access Control Technology Unit 8 Tallaght Business Park Whitestown Dublin 24 Ireland Tel 353 1 4622585 Fax 353 1 4622587 Web http www accesscontrol ie E mail sales accesscontrol ie ...

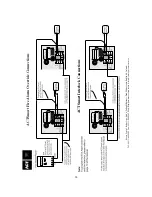
Page 19: ...e Connections Access Control Technology Unit 8 Tallaght Business Park Whitestown Dublin 24 Ireland Tel 353 1 4622585 Fax 353 1 4622587 Web http www accesscontrol ie E mail sales accesscontrol ie ACTSmart Interlock Connections 19 ...

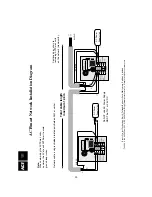
Page 20: ...r Total cable length maximum 1 4km Continue daisy chain to remaining ACTSmart units on the network maximum 8 SHIELD SHIELDS Access Control Technology Unit 8 Tallaght Business Park Whitestown Dublin 24 Ireland Tel 353 1 4622585 Fax 353 1 4622587 Web http www accesscontrol ie E mail sales accesscontrol ie DC Power Supply Unit DC Power Supply Unit SHIELD Do NOT use AC Power Supply MUST be 12V or 24V ...

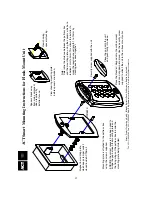
Page 21: ...are broken View showing spacers stacking Note Determine the distance between the pattress box and the mounting plate using the spacers which are labelled 1mm to 4mm This allows the installer to make the required spacer length 1 to 10mm by stacking each spacer together Security screw supplied with the unit Place the cap onto the unit and push firmly into place Access Control Technology Unit 8 Talla...

Page 22: ...all using the fixing kit supplied in the box ACTSmart Mounting Instructions for Surface Mount Unit Security screw supplied with the unit Place the Reader Keypad onto the surface mount collar and clip down into place Use the security screw supplied to attach the unit to the surface mount collar Place the cap onto the unit and push firmly into place Magnet in surface mount collar which keeps tamper ...

Page 23: ...23 ACTSmart2 Operating and Installation Manual Rev 1 0 NOTES ...

Page 24: ...User List 1 2 3 4 5 6 7 8 User Name Card Number PIN Access Control Technology Unit 8 IDA Business Park Whitestown Dublin 24 Ireland TEL 353 1 4622585 FAX 353 1 4622587 WEB http www accesscontrol ie E MAIL sales accesscontrol ie Smart ...

Reviews: