background image

14 


ACT Dust Collectors 

Bag-In Bag-Out Collars (OPTIONAL) 


Bag-in/bag-out collars are used when harmful dusts are present or simply to minimize exposure to any dust.  
They minimize the amount of dust the operator comes in contact with by allowing the operator to replace the 
filters by using a bag strapped onto the collar.  Although this procedure does greatly reduce exposure to the 
dusts, it is hard to completely avoid any exposure.  It is strongly recommended that the operator still use 
proper protective clothing, including respirators.    

1.  Remove the filter access cover and set it aside.  

If you would like, you can use a bag for this 
process to further minimize exposure.  Starting 
at the top row of the dust collector will prevent 
dusts from falling on to new filters already 
installed in the rows below.    

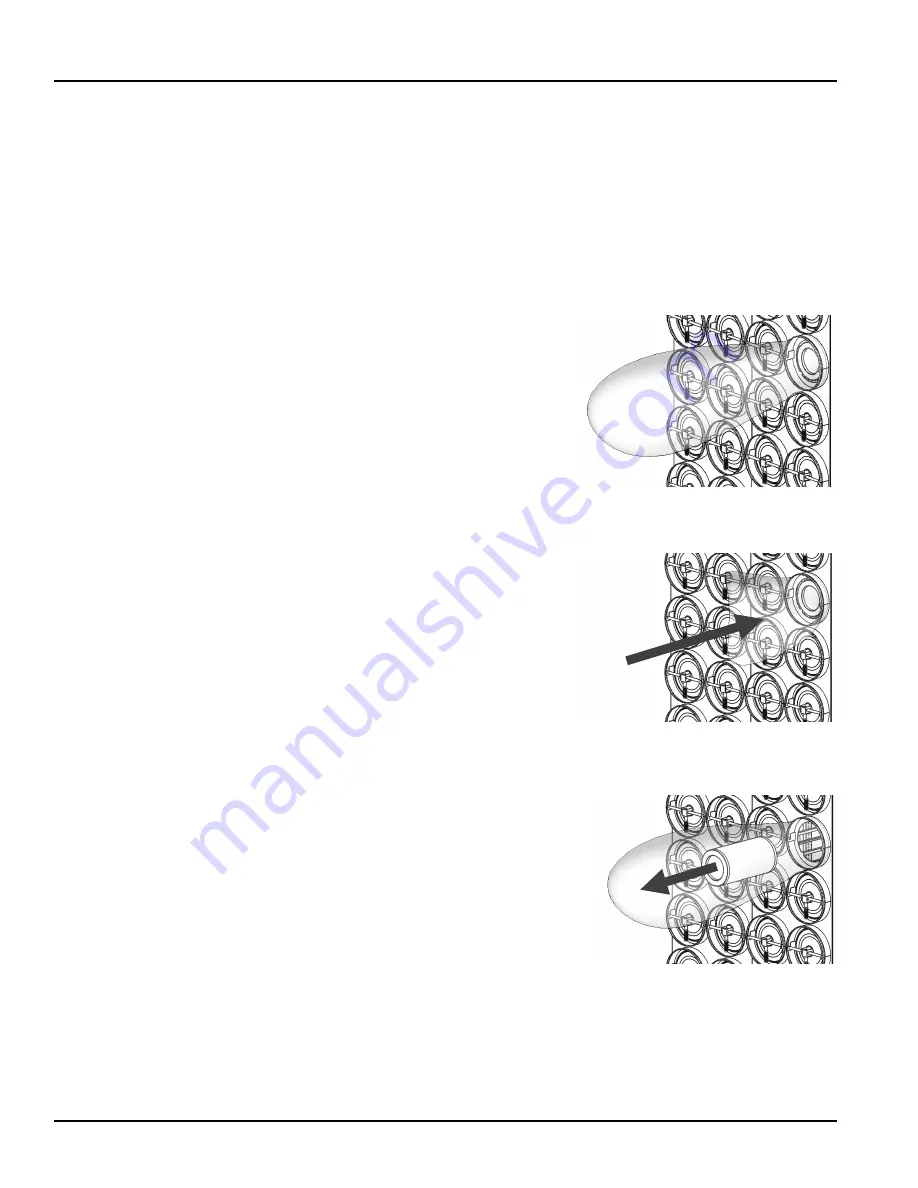
2.  Take a new bag and place it over the outside of 

the bag collar.  Secure the bag around the collar 
with the provided strap.  Securely tighten the 
strap.  

3.  Grab the bottom of the bag, reach in and twist 

the filter to drop off any dust that may be in the 
pleats of the filter, and then pull the filter out into 
the bag.    

4.  Before removing the bag from the collar, it is 

recommended that you twist the bag to prevent 
the dust from escaping and use a tie to seal off 
the bag.  

5.  Remove the bag from the collar.  

6.  If there are two filters in your filter access hole, 

repeat this process for the next filter.   

7.  Place the new filter into the filter access hole.  To 

further minimize exposure to dusts, this can be 
done by first loading the new filter into a bag.    

8.  Replace the filter access door and continue this 

process until all filters have been replaced. 

Secure bag on to the collar 

Reach in and grab the filter with the bag 

Remove the filter while still inside of the bag 

Summary of Contents for LASERPACK

Page 1: ...IOM 101 1 v2 LASERPACK Installation and Operation Manual...

Page 2: ...t was performed and we were provided with the results the size of the explosion vents may be inaccurate and you may not be in compliance It is the owner operators responsibility to verify the Kst and...

Page 3: ...Operation Principle 5 Shipping and Receiving 6 Handling 6 Assembly Dust Collector Anchoring 7 Compressed Air 7 Electrical 8 Timer Board Programming 9 Maintenance Filter Replacement 12 Spark Trap Clean...

Page 4: ...ity to ensure that the equipment is correctly installed and operated It is also the user s responsibility to ensure and provide qualified personnel for the installation operation and maintenance of th...

Page 5: ...surface allowing clean air to be exhausted back into the atmosphere To remove excess dust buildup on the filters a timer board is used to sequentially open the diaphragm valves and release a pulse of...

Page 6: ...ting by the manufacturer Handling Handling should be performed by trained able and qualified personnel and be consistent with safe handling practices outlined by OSHA and local codes Review this manua...

Page 7: ...may occur to the components Prior to installation purge the compressed air lines of any dirt or buildup 1 Install the compressed air pipe line to the air manifold to either the top or bottom 1 NPT cou...

Page 8: ...agram on page 10 for 5 HP fan wiring See diagram on page 11 for 10 HP fan wiring 1 Fan Verify fan rotation by observing from the motor end Another indication is poor fan performance or a lack of air m...

Page 9: ...tput The highest output terminal value that has a wire installed in it Terminal outputs have a range from 1 22 and are found near the bottom of the timer board Time Off 10 Time On 100 High Limit 1 00...

Page 10: ...10 ACT Dust Collectors WIRING DIAGRAM 5 HP...

Page 11: ...11 ACT Dust Collectors WIRING DIAGRAM 10 HP...

Page 12: ...ccess door by pulling and lifting the cam handle 4 Once door is loose lift it off the securing hooks and set it down 5 Reach into the collector and pull out all of the filters Or work your way top dow...

Page 13: ...2 Lock out tag out power to the collector and fan 3 Access the spark trap by unbolting the spark trap cover 4 Remove any debris or buildup inside of the spark trap 5 Reinstall the spark trap cover Am...

Page 14: ...led in the rows below 2 Take a new bag and place it over the outside of the bag collar Secure the bag around the collar with the provided strap Securely tighten the strap 3 Grab the bottom of the bag...

Page 15: ...nlet box with no turning vanes mitered elbow with no vanes etc Filters at end of life Replace filters Not enough compressed air Verify that the pressure is high enough for effective cleaning set to 80...

Page 16: ...re opening closing Replace if defective If located in frigid outdoors temperatures a solenoid heater may be required Diaphragm Valve Replace worn diaphragms 1 800 422 1316 Timer board Manually pulse b...

Page 17: ...arranty does not cover any damage due to normal wear and tear including but not limited to corrosion abrasion elements and modifications This warranty covers parts only This warranty covers only the p...

Page 18: ...820 North Front St New Ulm MN 56073 Toll Free 800 422 1316 Phone 763 557 7162 Fax 763 557 9731 www actdustcollectors com...

Reviews: