background image


1-6


1.4 Physical 

Description 


1.


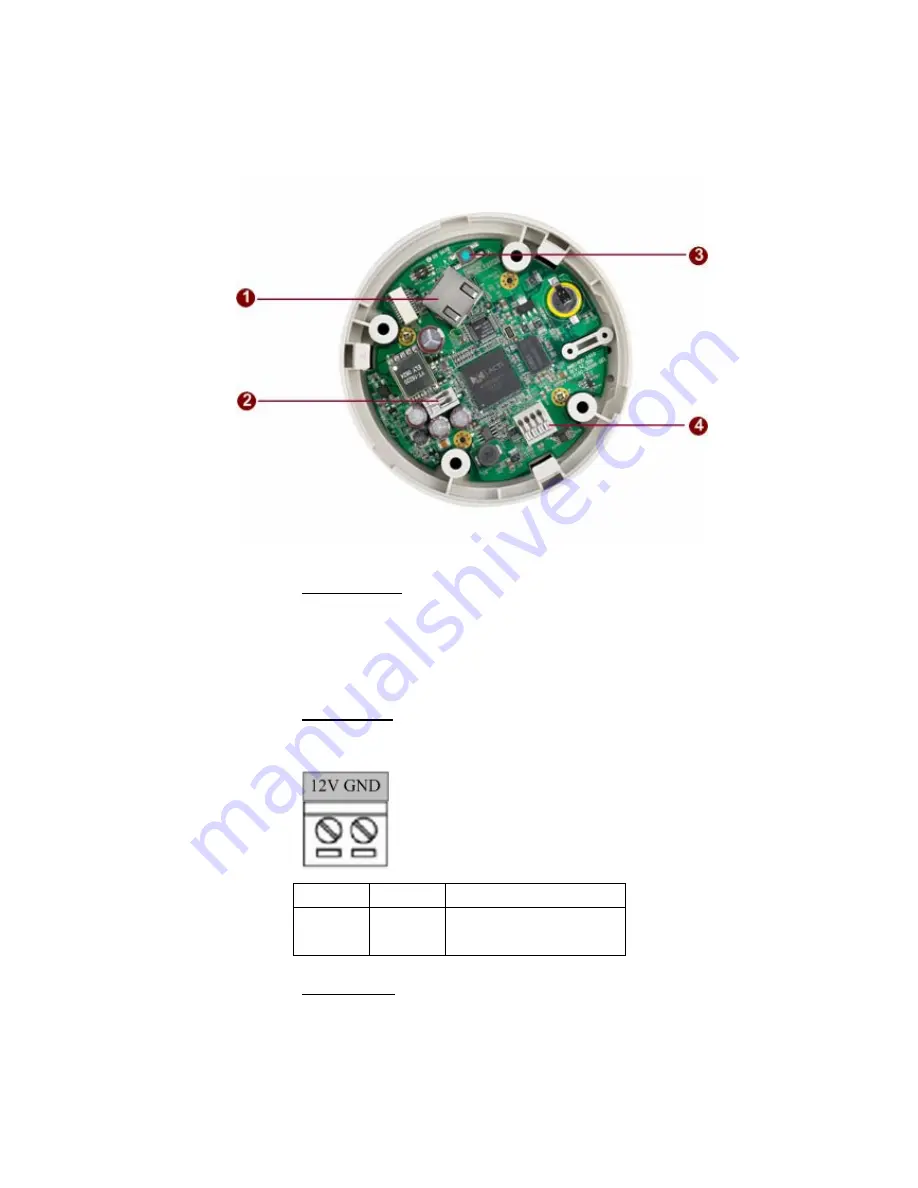
Ethernet Port


The IP device connects to the Ethernet via a standard RJ45 

connector. Supporting NWAY, this IP device can auto detect the 

speed of local network segment (10Base-T/100Base-TX 

Ethernet). 

2.


Power Input 

If your power input is DC12V. Please follow the description on 

the connector to connect to power. 


3.


Reset Button 

Step 1: 

Switch off IP device by disconnecting the power cable 

PIN NAME  DESCRIPTION 

12V 

DC Power Input 

2 GND 

Ground 

Pin 

Summary of Contents for ACM-3210 Series

Page 1: ...3 Axis Indoor IR Dome with DC 12V PoE ACM 3210 series Ver 081016 Hardware User s Manual ...

Page 2: ...o product yourself as opening or removing covers may expose you to dangerous voltage or other hazards Refer all servicing to qualified service personnel Trademarks All names used in this manual for hardware and software are probably registered trademarks of respective companies Liability Every care has been taken during writing this manual Please inform your local office if you find any inaccuraci...

Page 3: ... in accordance with the instruction manual may cause harmful interference to radio communications Operation of this equipment in a residential area is likely to cause harmful interference in which case the user will be required to correct the interference at his own expense ...

Page 4: ...ures and Benefits ____________________________________________ 1 2 1 3 Safety Instructions ______________________________________________ 1 4 1 4 Physical Description _____________________________________________ 1 6 1 5 Basic Connections _______________________________________________ 1 8 1 6 Installation Procedure ___________________________________________ 1 9 1 6 1 Ceiling Mount ______________...

Page 5: ...1 1 1 INTRODUCTION 1 1 Package Contents ACM 3210 series Power Adaptor Option DC12V PoE Product CD Accessory Warranty Card Drill Template Drill template 1 ...

Page 6: ...l Time Code Embedded The Digital Time Code Embedded function is to embed the recording time in the MPEG bit stream Therefore each image frame has its respective time when it was recorded It is very useful when users want to find the video at an exact time or between a certain time intervals z DDNS Supported This IP device supports DDNS Dynamic Domain Name Server users can set this IP device at a v...

Page 7: ...instant warning makes you responsive in every condition Quick and simple search and playback function lets you easily find the images you want z Software Development Kit Support This IP device can be integrated or controlled by user s application program through the Streaming Library or ActiveX control With its high level programming interface software developer s time and efforts to is highly red...

Page 8: ...near a bathtub washbowl kitchen sink or laundry tub in a wet basement or near a swimming pool and the like z Don t use accessories not recommended by the manufacturer z Only install this device and the power supply in a dry place protected from weather z Servicing Do not attempt to service this video product yourself as opening or removing covers may expose you to dangerous voltage or other hazard...

Page 9: ... as an improper adjustment Other controls may result in damage and will often require extensive work by a qualified technician to restore the video product to its normal operation z Safety Check Upon completion of any service or repairs to this video product ask the service technician to perform safety checks to determine that the video product is in proper operating condition ...

Page 10: ... IP device can auto detect the speed of local network segment 10Base T 100Base TX Ethernet 2 Power Input If your power input is DC12V Please follow the description on the connector to connect to power 3 Reset Button Step 1 Switch off IP device by disconnecting the power cable PIN NAME DESCRIPTION 1 12V DC Power Input 2 GND Ground Pin ...

Page 11: ...er cable while continuing to hold the reset button Step 3 Keep holding the reset button depressed for a while release the reset button The unit will start up with factory default settings 4 Audio Input Output The IP device supports audio input and output with terminal block ...

Page 12: ... adaptor to IP device 3 Connect IP device s ethernet port to an Ethernet RJ45 connectors If your IP device has PoE built in you can regard it as a PD and connect it directly to a PSE device like PoE switch 4 Connect a PC to the Ethernet hub RJ45 connectors NOTE You may find a support package to help you getting familiar with PoE Please visit our web site and get the support document TS 00040 ...

Page 13: ...1 9 1 6 Installation Procedure 1 6 1 Ceiling Mount 1 6 1 1 Use the drill template and drill a hole with φ35 on the ceiling 1 6 1 2 Tighten the plate to ceiling with M4 20 screws ...

Page 14: ...1 10 1 6 1 3 Connect cables through the hole on the ceiling and plate or on the side of casing 1 6 1 4 Fasten the camera to ceiling ...

Page 15: ...racket to the wall by 3 PAN Head Tapping screws 3 PAN HEAD SCREW TAPPING 1 6 2 2 Tighten the plate to wall mount bracket with M4 10 screws and connect all necessary cables through the hole on the plate and wall mount kit 2 FLAT HEAD SCREW TAPPING M4x10 ...

Page 16: ... 1 6 2 3 Note that there s a triangle mark on both plate and wall mount kit Those triangle marks need to fix on the same direction 1 6 2 4 Fasten the camera to wall mount kit by turning clockwise direction ...

Page 17: ...1 13 1 6 3 Camera Adjustment 3 axis design enables easily adjustment in every angle 1 6 3 1 X axis Panning View with angle range 0 360 1 6 3 2 Y axis Tilting View with angle range 0 180 ...

Page 18: ...1 14 1 6 3 3 Z axis Rotating View with angle range 0 360 ...

Page 19: ...1 15 1 7 Product Specification ...

Reviews: