background image


1-6


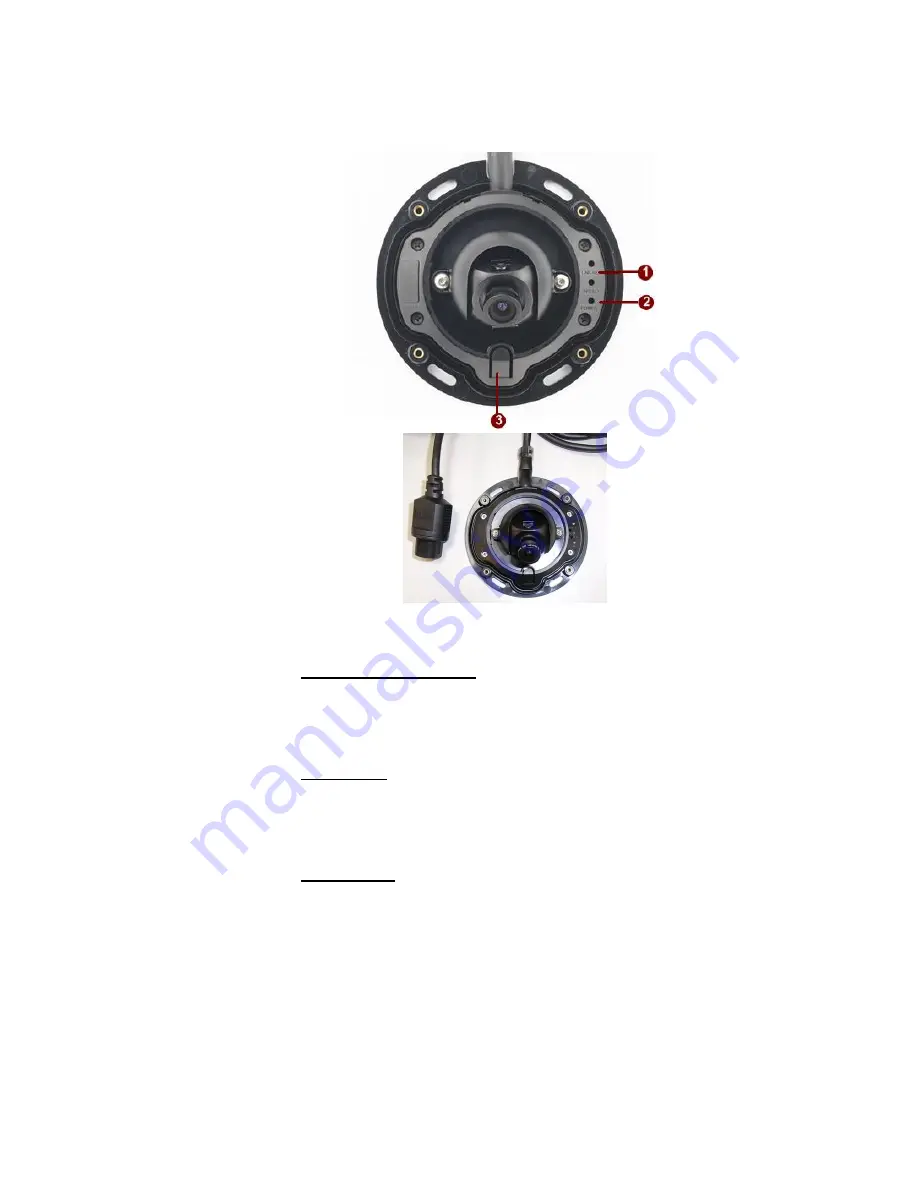
1.4  Physical Description 


1.


Ethernet Indicator LED 

The LED will indicate ethernet speed and active states after IP 

camera has connected completely.     


2.


Power LED 

The LED will light up after IP camera has successfully completed 

the boot process


3.


Reset Button 

Step 1: 

Switch off IP device by disconnecting the power cable 

Step 2: 

Press and continue to hold the Reset Button. Reconnect 

the power cable while continuing to hold the reset button. 

Step 3: 

Keep holding the reset button depressed around 16 

seconds, release the reset button. The unit will start up with 

factory default settings. 

Summary of Contents for ACM-3701E

Page 1: ...Megapixel IP Vandal Proof PoE Indoor Mini Dome ACM 3701E Ver 120803 Hardware User s Manual ...

Page 2: ......

Page 3: ...o product yourself as opening or removing covers may expose you to dangerous voltage or other hazards Refer all servicing to qualified service personnel Trademarks All names used in this manual for hardware and software are probably registered trademarks of respective companies Liability Every care has been taken during writing this manual Please inform your local office if you find any inaccuraci...

Page 4: ... in accordance with the instruction manual may cause harmful interference to radio communications Operation of this equipment in a residential area is likely to cause harmful interference in which case the user will be required to correct the interference at his own expense ...

Page 5: ..._______________________ 1 1 1 2 Features and Benefits ____________________________________________ 1 2 1 3 Safety Instructions ______________________________________________ 1 4 1 4 Physical Description _____________________________________________ 1 6 1 5 Basic Connections _______________________________________________ 1 8 1 6 Installation Procedure ___________________________________________ 1 ...

Page 6: ......

Page 7: ...1 1 1 INTRODUCTION 1 1 Package Contents ACM 3701E Product CD Warranty Card Drill Template Mount Screws Allen Hex Key RJ45 Field Installable Feed Through Adaptor 1 ...

Page 8: ... also offers up to 7 frames per second in SXGA 1280x1024 Digital Time Code Embedded The Digital Time Code Embedded function is to embed the recording time in the MPEG bit stream Therefore each image frame has its respective time when it was recorded It is very useful when users want to find the video at an exact time or between a certain time intervals DDNS Supported This IP device supports DDNS D...

Page 9: ... disk Reliable and accurate motion detection with instant warning makes you responsive in every condition Quick and simple search and playback function lets you easily find the images you want Software Development Kit Support This IP device can be integrated or controlled by user s application program through the Streaming Library or ActiveX control With its high level programming interface softwa...

Page 10: ...o not attempt to service this video product yourself as opening or removing covers may expose you to dangerous voltage or other hazards Refer all servicing to qualified service personnel Damage Requiring service Disconnect this video product from the power supply immediately and refer servicing to qualified service personnel under the following conditions 1 When the power supply cord or plug is da...

Page 11: ...1 5 Safety Check Upon completion of any service or repairs to this video product ask the service technician to perform safety checks to determine that the video product is in proper operating condition ...

Page 12: ...IP camera has successfully completed the boot process 3 Reset Button Step 1 Switch off IP device by disconnecting the power cable Step 2 Press and continue to hold the Reset Button Reconnect the power cable while continuing to hold the reset button Step 3 Keep holding the reset button depressed around 16 seconds release the reset button The unit will start up with factory default settings ...

Page 13: ...r 4 Ethernet Port The IP device connects to the Ethernet via a female RJ 45 industrial connector The Ethernet port supporting Power over Ethernet Supporting NWAY this IP device can auto detect the speed of local network segment 10Base T 100Base TX Ethernet ...

Page 14: ...evice s ethernet port to an Ethernet RJ45 IP device has only PoE built in you must regard it as a PD and connect it directly to a PSE device like PoE switch 2 Connect a PC to the Ethernet hub NOTE You may find a support package for help you getting familiar with PoE Please visit our web site and get the support document TS 00040 ...

Page 15: ...he 4 screws holding the cover and remove it 1 6 1 Ceiling Mount Surface Mount 1 6 1 1 Route the cable through a ceiling use the drill template and drill a Through hole for cable withφ28 00 on the ceiling Or cut out the cable exit hole at the rear of the cover Drill Template ...

Page 16: ...1 Adjust position Using the supplied allen hex key lossen the locking screws move the lens to the desired position and gently retighten the locking screws 2 Adjust focus Using the supplied allen hex key lossen the focus lock screw Manually rorate the lens to adjust the focus until the image is satisfactory ...

Page 17: ...1 11 1 6 1 4 Replacing the cover tighten the cover to ceiling with hold screws 1 6 1 5 Done NOTE Camera shooting direction adjustment along with the cover installation Also the tips for adjustment ...

Page 18: ...nstallable through adaptor to achieve system warterproof completely 1 6 2 1 RJ45 Field installable Through Adaptor Connnect Industrial RJ 45 Ethernet hub using shielded cables is recommended Assemble the installable feed through adaptor Insert the RJ 45 cable Connect to the RJ 45 Connector ...

Page 19: ...1 13 1 7 Product Specification ...

Reviews: