background image

Vll

19

Configuring File and Print Sharing

Vll

18

Configuring File and Print Sharing

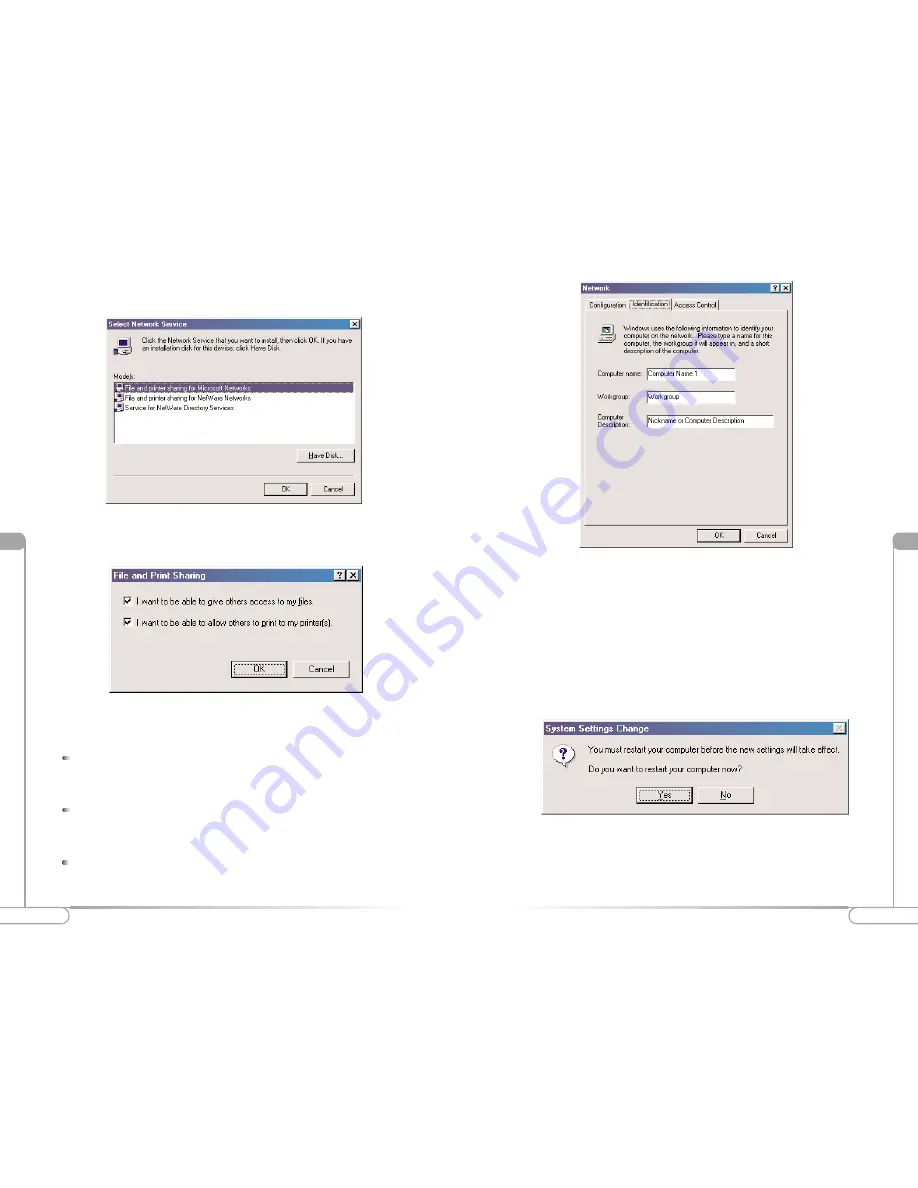
4.

In the following screen please select 

File and printer sharing for Microsoft

Networks

from the given list.

5.

In the “File and Print Sharing” screen make sure that both of the selection have a
check mark beside them. If they do not please click on the box next to each state-
ment and then click 

OK

.

6.

After you have clicked OK you will return to the network screen from step 2. Please
click on the 

Identification 

tab (see the first image on page 26). 

Computer Name: 

In this field you can type any name you want. (i.e. My

Computer, John, CPU654) Do not use the same name for each computer you
wish to have on your network. 

Workgroup: 

This field enables you to set a unique name for your network. This

name must be set up on every other computer you wish to have on your net-
work.

Computer Description: 

You can enter anything you wish. Traditionally, the

location name or main user’s name is used in this field.

7.

Click on the 

Configuration 

tab. This will take you back to the screen from step 2.

In the “Primary Network Logon:” box, located just above the “File and Print
Sharing” button, make sure that 

Client for Microsoft Networks

is selected. If it is

not then click the down arrow and select it from the given list. Click 

OK

.

8.

A screen will appear asking you to restart your computer. Click 

Yes 

to restart the

computer. If you do not see this screen please restart your computer manually. After
your computer restarts you will be asked to supply a User Name and Password.
Enter whatever you would like but be sure to write down these values, as they will
enable you to access your network. 

Summary of Contents for USB Wireless Adapter 802UI3(b)

Page 1: ... that it will not be copied or reproduced in whole or in part nor used in any manner except to meet the purposes for which it was delivered The information in this document is subject to change without notice and should not be construed as a commitment by Actiontec the manufacturer Although Actiontec the manufacturer will make every effort to inform users of substantive errors Actiontec the manufa...

Page 2: ...less Adapter is easy to use and easy to setup If you are tired off all those messy wires just to connect a laptop to your Home network then take your networking to the next level with the Actiontec USB Wireless Adapter You will be able to share files printers and even your High Speed Internet access all without wires Package Contents Make sure the following items came in this package USB Wireless ...

Page 3: ...o turn on your computer 2 Insert the Actiontec USB Wireless Adapter into the appropriate USB slot on either the front or the back of your PC Connecting the Actiontec USB Wireless Adapter For Windows 98 1 After you have installed the USB Wireless Adapter your computer will display an Add New Hardware Wizard screen Click Next Installing the Actiontec USB Wireless Adapter 2 In the next screen select ...

Page 4: ...ROM drive Select CD ROM Drive and then click Next 4 Your computer will locate the correct drivers named AEIWLNIC inf Click Next to install the drivers 5 The USB Adapter s properties screen will appear Note The SSID must be the same as the ESSID on your Home Gateway or Access Point Click OK to com plete the installation process 6 The installation is now complete Please click Finish ...

Page 5: ...mputer manu ally Windows ME 1 After you have installed the USB Wireless Adapter your computer will display an Add New Hardware Wizard screen Click Automatic search for a better driver Recommended Then click the Next button 2 The USB Adapter s properties screen will appear Note The SSID must be the same as the ESSID on your Home Gateway or Access Point Click OK to com plete the installation process...

Page 6: ...ption Search for the best driver for your device and then click the Next button lV 10 Installing the Actiontec USB Wireless Adapter 4 It will be necessary for you to shut down your computer Please click OK to restart your computer If this screen does not appear please restart your computer manu ally 3 Please insert the Actiontec USB Wireless Adapter Installation CD into your CD ROM drive Select CD...

Page 7: ...drivers 5 The Wireless LAN Configuration Utility screen will appear Note The SSID must be the same as the ESSID on your Home Gateway or Access Point Click OK to continue the installation process 6 If you have configured any Encryption capabilities in your Home Gateway or Access Point then complete the following screen accordingly Otherwise please click Finish to complete the installation process ...

Page 8: ...must be sure to use the same Encryption WEP keys for your USB Wireless Adapter Please follow these steps to set this feature up 1 Right click on the Actiontec USB Adapter Status Icon A list will appear as shown in the picture on the previous page Then select Advanced Configuration from the given list 2 Click on the Encryption tab 3 You can either select 64 bit or 128 bit Encryption depending on yo...

Page 9: ...dHoc Enter an SSID value in the given field The SSID value should be the same on each computer that you want to network together Then in the AdHoc Channel box select a channel between the numbers 1 11 This value also must be the same on each computer that you wish to network Finally click Apply and OK to activate the settings Be sure to repeat this for each computer you want to net work If you hav...

Page 10: ... you to set a unique name for your network This name must be set up on every other computer you wish to have on your net work Computer Description You can enter anything you wish Traditionally the location name or main user s name is used in this field 7 Click on the Configuration tab This will take you back to the screen from step 2 In the Primary Network Logon box located just above the File and...

Page 11: ...users on your network to view and read the file or drive you selected They will not be able to modify it in any way You can fur ther restrict their privlidges by entering a password in the appropriate field Full This will allow other users on your network to read modify move and delete any information in the shared drive or file You can further restrict their privlidges by entering a user name and...

Page 12: ...kgroup settings All the computers on your network must have the same workgroup name but different computer names To check or change this locate the My Computer icon on your desktop Right click on it and select Properties from the given list 2 In the System Properties click on the Network Identification tab If the Workgroup name is already the same as all the other computers on your network then yo...

Page 13: ...24 Notes ...
Reviews: