background image

ADJUSTING 

THE HIP GUIDE


The  hip  guide  can  be  adjusted  for  height  by  releasing  the  hand 
wheel as shown. 
 
 
INCREASING WIDTH OF HIP GUIDE 
 
To  increase  or  decrease  the  seat  width,  the  hip  guides  can  be 
pulled  outwards.    This  is  achieved  by  using  a  hand  wheel  which 
grips the main attaching bar of the hip guide to the base of the seat. 
This handwheel is found underneath the seat.  The hand wheel can be loosened and the hip guide 
will  then  slide  out  to  the  preferred  position.    The  hip  guides  will  slide  out  individually  to  fit  the 
occupant.  The hand wheel will then need to be tightened in the new position before use. 
 

MOVING THE POMMEL 

 
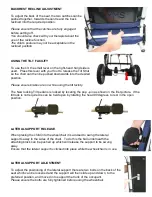
The pommel can be taken off the seat to assist with putting the 
child  in  the  wheelchair.    This  can  be  done  by  loosening  the 
screw fitting in the centre (on the underneath of the chair) at the 
front.    When  the  screw  is  loosened,  the  pommel  bar  will  slide 
out  of the bar attached to the base,  and the pommel will come 
off  the  chair.    This  can  be  replaced  by  sliding  back  into  the 
holder and the screw tightened. 

Ensure the pommel is firmly secured before setting off. 
 

THE DOUBLE FOOTREST  

 
The double footrest is made up of two separate footholders with a back support and a grip base to 
ensure the child’s foot is secure.  Each foot piece is angle adjustable. 
 

THE SINGLE FOOTREST 

 
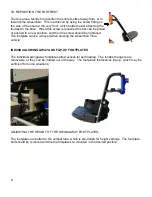
The  angle  of  the  footrest  can  be  adjusted  by  using  the  lever 
handle  on  the  bar  underneath.    When  this  lever  handle  is 
unwound, the footrest can be tipped back or forward to re-position 
it.   When  the  preferred  position  is  obtained the  lever  handle  can 
be tightened.  To re-position the handle, the centre button can be 
pushed in and the handle moved to a different position. 
 
 
TO LOWER THE FOOTREST 
 
If the footrest is too high or too low for the child this can be 
adjusted by loosening the bolt on the end of the bar which is 
attached to the chair.  Then the bar can be lowered or raised to 
suit the child.  When re-positioned, the bolt should be tightened 
and the footrest is ready to use. 


Summary of Contents for Corgi Sprint

Page 1: ...USER GUIDE FOR THE NEW CORGI SPRINT Issued 27th November 2008...

Page 2: ......

Page 3: ...otes 2 Operating Instructions 3 9 Using your Wheelchair 10 Basic Technical Data 11 Occupied transport in a suitably modified vehicle 12 Details of attachment points 13 Key points relating to transport...

Page 4: ...ure that children are clear of moving parts before making adjustments Activate and your dealer cannot accept responsibility for the use of accessories other than those supplied by them Full concentrat...

Page 5: ...ns FOLDING OF THE CORGI SPRINT To fold or unfold the Corgi Sprint the seat is removed The seat is removed by releasing the lever as shown The Seat unit will then tilt backwards and can be lifted off t...

Page 6: ...re When replacing the wheel you should clip it on and give it a shake to make sure that catch has engaged Locking the front castors The front castors can be fixed so that they are in line with the rea...

Page 7: ...g Tilt pedal is is locked by locating the pop pin as shown in the first picture If the tilt lock is not required is can be held open by rotating the head 90 degrees to rest in the open position LATERA...

Page 8: ...le can then be moved to the desired position and the buttons released The locaters inside the knuckle will click into place automatically to secure the new position ADJUSTING THE ARMREST To adjust the...

Page 9: ...bar attached to the base and the pommel will come off the chair This can be replaced by sliding back into the holder and the screw tightened Ensure the pommel is firmly secured before setting off THE...

Page 10: ...ightened The footplate can be removed when stowing the wheelchair into a vehicle INDIVIDUAL SWINGAWAY AND FLIP UP FOOTPLATES The individual swingaway footplates allow access for self loading The footr...

Page 11: ...Ensure that the headrest adjusting handle is fully tightened before use so the best position is secured for the occupant TO SET THE HEADREST To move the headrest to the perfect position for the postur...

Page 12: ...n the rear wheels Lower the wheelchair over the kerb on the rear wheels returning the front wheels to the ground when you have reached the lower level NEVER TIP A WHEELCHAIR FORWARDS AT A KERB ALWAYS...

Page 13: ...380 Seat to footplate 300 420 300 420 330 450 Overall width 470 470 530 Handle height 980 1040 980 1040 980 1040 Seat height to floor 520 520 520 Recline range degrees 14 14 14 Tilt max degrees 30 30...

Page 14: ...nts relate to the safety of the occupant Check that occupant weighs no more than 35kg Make sure that the seat base is at 90 degrees to the seat back The seat back should be as upright as possible No a...

Page 15: ...ttachment points The Front Restraints are attached as shown on the picture on the right The Rear Restraints are attached to the bracket as shown below Or the more recent models have a tiedown bracket...

Page 16: ...t training INFORMATION ONLY The Corgi wheelchair has been crash tested in accordance with the International Standard ISO7176 Part 19 and it passed This dynamic wheelchair test is a voluntary one and i...

Page 17: ...your dealer Only genuine Colombo parts should be used when your wheelchair is repaired Regular lubrication of moving parts will extend the life of your wheelchair and will make adjusting parts easier...

Page 18: ......

Page 19: ......

Page 20: ......

Reviews: