PHYSIO 8
5 Imbottitura schienale
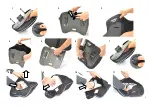
Rimozione dell’imbottitura
1)
Inserire la mano tra l’imbottitura ed il guscio fino
raggiungere una delle due doppie linguette
A
. Unire le due
linguette e spingerle fuori.
2)
Sollevare l’imbottitura e, ora con maggior facilità,
sganciare il secondo punto di fissaggio a doppia linguetta.
3)
Lo schienale alto 52 cm presenta il fissaggio doppia
linguetta nella parte inferiore ed un fissaggio calzante nella
part superiore. Una volta sganciata la doppia linguetta come
descritto sopra,
l’imbottitura si sfila subito.
Montaggio dell’imbottitura
4)
Fare attenzione alla parte alta e bassa dell’imbottitura che
deve corrispondere con quella del guscio.
5)
Unire la doppia linguetta
A
di uno dei due risvolti, inserirla
nella rispettiva asola e divaricarla per ottenere il fissaggio.
6)
Accompagnare l’imbottitura verso l’altra estremità, portare
il risvolto verso l’esterno del guscio, unire le due linguette,
farle passare attraverso l’asola e mantenerle in posizione.
7)
Inserire la mano
tra l’imbottitura ed il guscio fino
raggiungere la doppia linguetta e divaricarla per ottenere il
fissaggio.
Per lo schienale alto 52 cm, fissare la parte inferiore con la
doppia linguetta come descritto sopra e poi calzare la parte
alta.
Rimozione e inserimento della gomma schiuma
8)
Per estrarla, aprire la tasca nella parte posteriore della
fodera per inserire una mano.
9)
Afferrare la gomma schiuma, avvicinare le due estremità
laterali della stessa e tirarla fuori.
10)
Per inserirla, aprire la tasca, arrotolare la gomma
schiuma e spingerla all’interno della fodera.
11)
Distribuire uniformemente la gomma schiuma per tutto il
perimetro interno della fodera.
5 Backrest upholstery
Removing the upholstery
1)
Insert your hand between the upholstery and the shell until
you reach one of the two double tabs
A
. Join the two tabs
and push them out.
2)
Lift the padding and, now with greater ease, release the
second double tab fastener.
3)
The 52 cm high backrest has a double fastening tab in the
lower part and a fitting fastening in the upper part. Once the
double tab has been released as described above, the
padding comes off immediately.
Mounting the upholstery
4)
Pay attention to the upper and lower part of the upholstery
which must correspond with that of the shell.
5)
Join the double tab
A
of one of the two flaps, insert it in the
respective slot and spread it apart to fasten it.
6)
Lead the upholstery towards the other end, bring the flap
towards the outside of the shell, join the two tabs, pass them
through the slot and hold them in place.
7)
Insert your hand between the upholstery and the shell until
you reach the double tab and spread it apart to fasten it.
For the 52 cm high backrest, fasten the lower part with the
double tab as described above and then put on the upper
part.
Removing and inserting the foam pad
8)
To remove it, open the pocket in the back of the cover to
insert a hand.
9)
Grasp the foam rubber, gather its two side and pull it out.
10)
To insert it, open the pocket, roll up the foam and push it
inside the cover.
11)
Evenly distribute the foam around the inside perimeter of
the cover.
5 Rembourrage du dossier
Retirer le rembourrage
1)
Insérez votre main entre le rembourrage et la coque
jusqu'à ce que vous atteigniez l'une des deux doubles
languettes
A
. Joignez les languettes et poussez-les.
2)
Soulevez le rembourrage et, maintenant avec plus de
facilité, libérez la deuxième fixation à double languette.
3)
Le dossier haut 52 cm présente une fixation à double
languette dans la partie inférieure et une fixation a raccord
dans la partie supérieure. Une fois que le double languette a
été libéré comme décrit ci-dessus, le rembourrage se
détache immédiatement.
Montage du rembourrage
4)
Faites attention à la partie supérieure et inférieure du
rembourrage qui doit correspondre à celle de la coque.
5)
Joignez la double languette
A
de l'un des deux rabats,
insérez-la dans la fente correspondante et écartez-la pour la
fixer.
6)
Accompagner le rembourrage vers l'autre extrémité,
amener le rabat vers l'extérieur de la coque, joindre les deux
pattes, les passer à travers la fente et les maintenir en place.
7)
Insérez votre main entre le rembourrage et la coque
jusqu'à atteindre la double languette et écartez-la pour la
fixer.
Pour le dossier de 52 cm de hauteur, fixez la partie inférieure
avec la double languette comme décrit ci-dessus puis placez
la partie supérieure.
Retrait et insertion de la mousse
8)
Pour le retirer, ouvrez la poche à l'arrière de la garniture
pour insérer une main.
9)
Saisissez le caoutchouc mousse, rapprochez les deux
extrémités de celui-ci et retirez-le.
10)
Pour l'insérer, ouvrez la poche, enroulez la mousse et
poussez-la à l'intérieur de la garniture.
11)
Répartissez uniformément la mousse sur le pourtour
intérieur de la housse.


