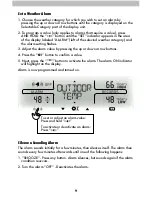
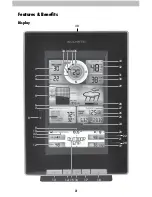
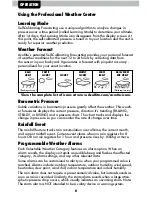
background image

3

1.  Peak Wind Speed 


Highest speed from past 60 minutes.

2.  Wind Speed Alarm On Indicator
3.  Average Wind Speed  


of all speeds from past 2 minutes.

4.  Pressure History Graph 


Current pressure on right with trend  


(Rising, Steady or Falling).

5.  Historical Barometric Pressure


 Pressure reading 12 hours ago.

6.  Storm Alert Alarm On Indicator
7.  Weather Select 


Heat index, dew point, wind chill,  


indoor temperature / humidity, and   


rainfall rate (inches of rain per hour)

8.  Weather Select Button  


Press to change the Weather Select  


category data being displayed.

9. Clock
10. Outdoor Sensor Signal Strength
11.  Alarm On/Off Indicator 


for Selectable Category (#15)

12. Programmable Alarm Setting
13. Alarm On/Off Button 


Activate alarm; press and hold to  


adjust alarm values.

14. DOWN Button 


Press to select Category (shown in  


#15) and change settings.

15. Selectable Category
16. Settings Button
17.  UP Button 


Press to select Category (shown in  


#15) and change settings.

18. All-Time Records Button 


Press for all-time low and date  


recorded for current category  


selected on display (#15). Press twice  


for all-time high and date recorded.

19. Record Low 


Shown for current category selected  


on the display (#15).

20. Clear Button 


Deletes record low (#19) shown.

21. Record High 


Shown for current category selected  


on the display (#15).

22. Clear Button


 Deletes record high (#21) shown.

23. Date
24. Current Month Total Rainfall
25. All-Time Total Rainfall
26. Rainfall Alarm On Indicator
27. Current Rainfall 


Accumulates data during rainfall. 

28. Learning Mode Icon 


Disappears after weather forecast  


self-calibration is complete.

29. 12 to 24 Hour Weather Forecast 


Self-Calibrating Forecasting pulls  


data from your 5-in-1 sensor to  


generate your personal forecast.

30. Current Outdoor Humidity 


Arrow icon indicates the direction the  


humidity is trending.

31. Outdoor Humidity Alarm On  

 Indicator
32. Outdoor Temperature Alarm On  

 Indicator
33. Current Outdoor Temperature  


Arrow icon indicates direction the  


temperature is trending. 

34. Previous 2 Wind Directions
35. Current Wind Speed
36. Current Wind Direction
37. Sensor Low Battery Indicator
38. Momentary Backlight Button 


Lights display for 5 seconds (only  


applicable while on battery power).

Summary of Contents for 1602RX

Page 1: ...AcuRite com Display for 5 in 1 Weather Sensor model 1602RX PRODUCT REGISTRATION Register online to receive 1 year warranty protection www AcuRite com IMPORTANT PRODUCT MUST BE REGISTERED TO RECEIVE WARRANTY SERVICE Register a Product Package Contents 1 Display unit with tabletop stand 2 Power adapter 3 Instruction Manual ...

Page 2: ...2 Features Benefits Display 10 37 11 12 9 28 29 31 32 30 33 1 3 4 5 7 8 6 2 19 20 21 22 23 25 26 27 24 36 35 38 13 14 16 15 17 18 34 34 ...

Page 3: ...nd date recorded for current category selected on display 15 Press twice for all time high and date recorded 19 Record Low Shown for current category selected on the display 15 20 Clear Button Deletes record low 19 shown 21 Record High Shown for current category selected on the display 15 22 Clear Button Deletes record high 21 shown 23 Date 24 Current Month Total Rainfall 25 All Time Total Rainfal...

Page 4: ...easy wall mounting 3 Battery Compartment Cover 4 A B C Switch ID code that must match 5 in 1 sensor s A B C switch to ensure units synchronize 5 Clear Today Clears data recorded since 12 00am 6 Reset Full reset to factory defaults 7 Clear All Clears all data recorded 8 Battery Compartment 9 Plugin for Power Adapter 10 Power Adapter 8 1 9 4 10 3 5 7 6 2 ...

Page 5: ...ries IMPORTANT Batteries are a backup power source to preserve records in the event of a power outage Power adapter is recommended as the primary power source to enjoy the full functionality of this product 2 Plug in Power Adapter PLEASE DISPOSE OF OLD OR DEFECTIVE BATTERIES IN AN ENVIRONMENTALLY SAFE WAY AND IN ACCORDANCE WITH YOUR LOCAL LAWS AND REGULATIONS BATTERY SAFETY Clean the battery conta...

Page 6: ...firm hour selection 5 Press the up or down arrows to adjust minutes 6 Press the button to confirm minute selection The clock is now set Set the Date 1 Press the up or down arrow buttons until SET DATE is displayed on the Selectable Category part of the display unit 2 Press the button to set the date 3 Press the up or down arrows to adjust the month 4 Press the button to confirm month selection 5 P...

Page 7: ...rs are sensitive to surrounding environmental conditions Proper placement of both the display unit and the sensor are critical to the accuracy and performance of this product Display Unit Placement Place the display unit in a dry area free of dirt and dust To ensure accurate temperature measurement place out of direct sunlight and away from heat sources or vents Display unit stands upright for tab...

Page 8: ...ks and displays the change in pressure so you can monitor the rate of change over time Rainfall Event The rainfall feature tracks rain accumulation over all time the current month and current rainfall event Current event clears when no rain registers for 8 hours OR no rain registers for 1 hour and pressure rises by 03inhg or more Programmable Weather Alarms Each Selectable Weather Category feature...

Page 9: ...hes 3 Adjust the alarm value by pressing the up or down arrow buttons 4 Press the button to confirm a value 5 Next press the button to activate the alarm The alarm ON indicator will highlight on the display Alarm is now programmed and turned on Silence a Sounding Alarm The alarm sounds initially for a few minutes then silences itself The alarm then sounds every few minutes afterwards until one of ...

Page 10: ...racy 1 Choose the weather category you wish to calibrate by pressing the up or down arrow buttons until the category is displayed on the Selectable Category part of the display unit 2 Press AND HOLD the up and down arrow buttons and the button all at the same time for 15 20 seconds The display unit beeps and all display data is hidden except for the value being calibrated CAL calibrate and arrows ...

Page 11: ...ent from that to which the receiver is connected Consult the dealer or an experienced radio TV technician for help NOTE The manufacturer is not responsible for any radio or TV interference caused by unauthorized modifications to this equipment Such modifications could void the user authority to operate the equipment This device complies with Industry Canada licence exempt RSS standard s Operation ...

Page 12: ...t manufactures which have received normal wear and tear been damaged including by acts of nature tampered abused improperly installed damaged in shipping or repaired or altered by others than authorized representatives of Chaney The above described warranty is expressly in lieu of all other warranties express or implied and all other warranties are hereby expressly disclaimed including without lim...

Reviews: