background image

COSMO 

40

НАЧАЛО РАБОТЫ

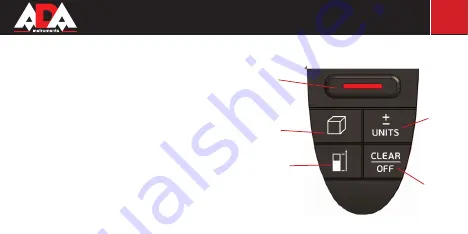
Клавишная панель

1) Кнопка включения/измерения

2) Площадь/объем/косвенные измерения 

    (по теореме Пифагора)

3) Выбор точки отсчета

4) Стереть/выключить

5) Сложение/вычитание/изменение единиц 

измерения

1

2

3

4

5

Summary of Contents for Cosmo 40

Page 1: ...seinstrumenti ru instrument izmeritelnyj lazernye_dalnomery ada lazernyj_dalnomer_ada_co smo_40_a00376 http www vseinstrumenti ru instrument izmeritelnyj lazernye_dalnomery ada lazernyj_dalnomer_ada_c...

Page 2: ...Operating manual Laser distance meter Model COSMO 40 Manufacturer ADAINSTRUMENTS Address WWW ADAINSTRUMENTS COM...

Page 3: ...art up 5 3 Menu functions 7 4 Measurements 8 5 Functions 9 6 Message codes 15 7 Techical data 17 8 Measuring conditions 19 9 Precautions 20 10 Warranty Exceptionsfromresponsibility 22 Appendix 1 Certi...

Page 4: ...oring measurements The safety regulations and instructions along with the operating manual should be read carefully before initial operation The person responsible for the instrument must ensure that...

Page 5: ...aser beam can lead to eye injury even from greater distances Do not aim laser beam at persons or animals Opening of the equipment by using tools screwdrivers etc as far as not specifically permitted f...

Page 6: ...is a laser class 2 laser product with power 1 mW and wavelength 635 nm Laser is safety in ordinary conditions of usage START UP Keypad 1 ON Measure 2 Area Volume Pythagorean measure 3 Reference 4 Clea...

Page 7: ...COSMO 40 Display 1 Laser ON 2 Reference front rear 3 Area volume Pythagorean 4 Main line 5 Line 2 6 Line 1 7 Units 8 Battery level 9 Error 1 2 3 9 6 5 4 8 7...

Page 8: ...Batteries should be removed in case of danger of corrosion if the device will not be used for a long time MENU FUNCTIONS Swtich on and off Press the button 1 to switch on the instrument and laser Pres...

Page 9: ...the reference symbol on the display Selecting Units Press and hold the button 5 for 2 sec until the desired unit is displayed Clear Key Cancel the last action Press button 4 MEASUREMENTS Single distan...

Page 10: ...inimumvalues Pressandhold down the button 1 until you will hear acoustical signal Then slowly sweep the laser back and forth and up and down overthe desired target point e g into the corner of a room...

Page 11: ...to take the first measurement for example length Measured value is displayed in the second line Press button 1 to take the second measurement for example width Measured value is displayed in the seco...

Page 12: ...substraction to continue calculations Volume For volume measurements press button 2 twice until the indicator for volume measurement appears on the display Press button 1 to take the first measuremen...

Page 13: ...a horizontal or vertical plane The best results are achieved when the instrument is rotated about a fixed point e g with the positioning bracket fully folded out and the instrument placed on a wall o...

Page 14: ...button 2 3 times The symbol triangle is displayed The distance to be measured is blinking in the symbol triangle Press button 1 to take distance measuring hypothenuse of triangle The result is displa...

Page 15: ...king in the symbol triangle Press button 1 to take distance measuring side of the triangle The result of the function is displayed in the second line This measurement can be taken in the mode of conti...

Page 16: ...asuring distance within measuring range 252 Temperature too high Cool down instrument 253 Temperature too low Warm up instrument 255 Receiver signal too weak Use target plate MESSAGE CODES All message...

Page 17: ...late grey side 257 Wrong measurement Use target plate brown side 258 Wrong initialization Switch on off the instrument Hardware error Switch on off the device several times and check if the symbol sti...

Page 18: ...L DATA Range without target m 0 05 to 40 Accuracy mm 1 5 Smallest unit displayed 1 mm Laser class 2 Laser type 635 nm 1 mW IPrating IP54 Automatic switch off 3 minutes of inactivity Battery life 2 xAA...

Page 19: ...re range Storage Operating 25 to 70 10 to 50 In favourable conditions good target surface properties room temperature Maximum deviation occurs under unfavorable conditions such as bright sunlight or w...

Page 20: ...ease the measurement range during daylight or if the target has a bad reflection Measuring Surfaces Measuring errors can occur when measuring toward colorless liquids e g water or dust free glass styr...

Page 21: ...ote the instrument should be dry Care and cleaning Do not immerse the instrument in water Wipe off dirt with a damp soft cloth Do not use aggressive cleaning agents or solutions Specific reasons for e...

Page 22: ...C It cannot be completely excluded that this instrument will disturb other instruments e g navigation sys tems will be disturbed by other instruments e g intensive electromagnetic radiation nearby ind...

Page 23: ...se of a defect please contact the dealer where you originally purchased this product The warranty will not apply to this product if it has been misused abused or altered Withiut limiting the foregoing...

Page 24: ...rd party and or a usage in other than usual conditions The manufacturer or its representatives assumes no responsibility for any damage and loss of profits due to a change of data loss of data and int...

Page 25: ...________________ _______________ name and model of the instrument Corresponds to ________________________________________________________________ designation of standard and technical requirements Dat...

Page 26: ...r is obligatory Technical examination of instruments for fault identification which is under the warranty is made only in the authorized service center In no event shall manufacturer be liable before...

Page 27: ...ce by anyone other than an authorized service center 5 Damage to products or parts caused by misuse including without limitation misapplication or nrgli gence of the terms of service instruction 6 Pow...

Page 28: ......

Page 29: ...COSMO 40 ADAINSTRUMENTS WWW ADAINSTRUMENTS COM...

Page 30: ...COSMO 40 29 1 31 2 33 3 35 4 37 5 39 6 46 7 48 8 50 9 54 10 55 1 2...

Page 31: ...COSMO 40 30 ADA COSMO 40 ADA COSMO 40...

Page 32: ...COSMO 40 31...

Page 33: ...COSMO 40 32 2 1 mW 635...

Page 34: ...COSMO 40 33 1 2 3 4 5 1 2 3 4 5...

Page 35: ...COSMO 40 34 1 2 3 4 5 2 6 1 7 8 9 1 2 3 9 6 5 4 8 7...

Page 36: ...COSMO 40 35 180 1...

Page 37: ...COSMO 40 36 4 2 3 5 2 4...

Page 38: ...COSMO 40 37 1 1 1...

Page 39: ...COSMO 40 38 1 1...

Page 40: ...COSMO 40 39 5 5 1 1 2 4 2 1 2...

Page 41: ...COSMO 40 40 1 2 1 5 5 2 1 1 1 5 5...

Page 42: ...COSMO 40 41 2 1 2 1 2 1 1 2 1...

Page 43: ...COSMO 40 42...

Page 44: ...COSMO 40 43 2 1 2 1 2 1 1 1 2 1...

Page 45: ...COSMO 40 44 2 1 2 1 2 1 2 1...

Page 46: ...COSMO 40 45 1 2 1 2 1 1 2 1 2 1 1...

Page 47: ...COSMO 40 46 Info 204 205 252 InFo...

Page 48: ...COSMO 40 47 253 255 256 257 258...

Page 49: ...COSMO 40 48 0 05 40 1 5 1 2 635 1 IP 54 180 2 5 000...

Page 50: ...COSMO 40 49 114 50 25 120 25 70 10 50...

Page 51: ...COSMO 40 50 40...

Page 52: ...COSMO 40 51...

Page 53: ...COSMO 40 52 EMC ADA COSMO 40 2 DIN IEC 60825 1 2007...

Page 54: ...COSMO 40 53...

Page 55: ...COSMO 40 54 2...

Page 56: ...COSMO 40 55...

Page 57: ...1 2 3 4 5 6 7...

Page 58: ...8 9...

Page 59: ..._______________________________________________________________________ ______________________ ________________________________________ ___________________ 24 II 454 491 ______________________________...

Page 60: ...__________________________ _____________________________________________________________________________ _______________ _______________________________________________________________________________...

Page 61: ......

Reviews: