background image

5

English

OPERATION

1. Open battery compartment cover. Insert 4 batteries with proper polarity 
into the holder. Contacts of the holder (batteries) or Li-batteries must coincide 
with contacts of the battery compartment. Close the battery cover.

2.  Place the instrument on the tripod or floor. When using tripod, place the 
instrument on the tripod and screw the centering screw into the center hole.

3.  Switch On the instrument by rotating the switch (2) counterclockwise until 
its clicking position. Green LED will flash. If the battery power is low, green 
color of the indicator will be changed into red. 

4.       The instrument works in slope mode in the first position of the switch 
(X). It is possible to project laser lines  at any angle. In the position ON the 
pendulum will be unlocked and laser lines will be automatically self-leveled. 

5.   If there is a sound signal and laser lines begin to blink while switching on 
the instrument, that means that the instrument is out of range more than 
±3°. Adjust the position of the instrument by means of the bubble level with 
the help of legs or tripod. 

6.   Aim  the down point  on the required point on the floor. Rotate the upper 
part of the instrument to adjust vertical lines. Then adjust the position of 
the instrument  with the help  of  fine adjustment screw.

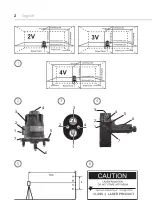
7. Line laser has several operating modes. Press button (1) to select laser 
lines. Variants of projections: - horizontal beam and down point;- horizontal 
beam and vertical beam, down point; - horizontal beam and 3 vertical beams, 
down point. - orizontal beam and 4 vertical beams, down point.

         DETECTOR (IS NOT SUPPLIED WITH THE TOOL)

1. On/Off button
2. Signal LEDs

4

Summary of Contents for ULTRALINER 360 2V

Page 1: ...Line Laser OPERATING MANUAL ULTRALINER 360 2V 3V 4V adainstruments com...

Page 2: ...2 English 1 5 2 3 4 6 1 2 3 4 5 6 7 1 2 4 3 1 2 3 4 5 6 7...

Page 3: ...d also to transfer the angle of inclination of the structural part to similar parts during construction and installation works SPECIFICATIONS Laser beam 2V 3V 4V1H1D depends on the model Light sources...

Page 4: ...ore than 3 5 Rotating fine adjustment mechanism makes it easy to find objects 6 Built in locking system automatically locks the compensator when the power is OFF It protects the compensator from vibra...

Page 5: ...angle In the position ON the pendulum will be unlocked and laser lines will be automatically self leveled 5 If there is a sound signal and laser lines begin to blink while switching on the instrument...

Page 6: ...middle signal LED will flash With the help of bubble level check the leveling of the receiver housing Mark the surface Place the detector on the staff with the help of clamp TO CHECK THE ACCURACY OF...

Page 7: ...f the tool is 7 years The battery and the tool should never be placed in municipal waste Date of production manufacturer s contact information country of origin are indicated on the product sticker CA...

Page 8: ...to DIN IEC 60825 1 2014 It is allowed to use unit without further safety precautions SAFETY INSTRUCTIONS Please follow up instructions given in operators manual Do not stare into beam Laser beam can l...

Page 9: ...s expected to carry out periodic checks of the product s accuracy and general performance The manufacturer or its representatives assumes no responsibility of re sults of a faulty or intentional usage...

Page 10: ...ervice by anyone other than an authorized service center 5 Damage to products or parts caused by misuse including without lim itation misapplication or nrgligence of the terms of service instruction 6...

Page 11: ...of thr seller is obligatory Technical examination of instruments for fault identification which is under the warranty is made only in the authorized service center In no event shall manufacturer be l...

Page 12: ...12 Russian 1 5 2 3 4 6 1 2 3 4 5 6 7 1 2 4 3 1 2 3 4 5 6 7...

Page 13: ...13 Russian ADA ULTRALiner 360 2V 3V 4V 2V 3V 4V1H1D 635 2 0 2 1 V 0 3 1 H 3 20 70 360 4 x AA Li ion 8 5 8 10 C 40 C 0 9...

Page 14: ...14 Russian 1 2 3 4 V 1 360 2 70 3 3 4 3 5 6 7 1 2 3 4 5 6 7 2...

Page 15: ...15 Russian 1 V 2 3 D 4 1 4 2 3 2 4 ON 5 3 3...

Page 16: ...16 Russian 6 7 1 4 1 2 3 4 5 6 7 3 4...

Page 17: ...17 Russian 5 90 D h D h 6 h 6 5...

Page 18: ...18 Russian 5 2 5 3 10 50 7...

Page 19: ...19 Russian 2 2 DIN IEC 60825 1 2014 6...

Page 20: ...20 2...

Page 21: ...21...

Page 22: ...22 Russian 1 2 3 4 5 6 7 8 9...

Page 23: ...23 Russian _______________________________________ ___________________ _______________________ ________________________________ 24 II 454 491 _________________________________...

Page 24: ...adainstruments com ADA International Group Ltd No 6 Building Hanjiang West Road 128 Changzhou New District Jiangsu China Made In China...

Reviews: