background image

6

2

1

3

4 of 4

4

7

10

10

12

13

14

5

9

8

11

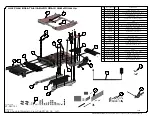
ITEM

PART NUMBER

QTY

DESCRIPTION

1

LK-SILC14L-01

1

Outside Floor Adapter   -Left-

2

LK-SILC14L-02

1

Inside Floor Adapter   -Left-

3

LK-SILC14LB-05

1

Floor Adapter Trim   -Left-   Black

4

LK-SILC14LB-11

1

Seat Trim   -Left-   Black

5

LK-SILC14L-AB

1

Air Bag Link Kit   -Left-

6

LK700B

1

Link Covert  -Black-

7

LK720LB

1

Pivot Motor Cover  -Left-  Black

8

LK960

1

LINK Wired Control

9

EW-CK-00

1

12V Power Supply Wiring Kit

10

L-LK-UNI-250

2

Fixing Spacer

11

LK-UNI-650

1

Manual Backup Tool Kit

12

PRD 332-164P

4

Socket Head Cap Screw Zinc Plated 3/8-16 x 7/8

13

PRD 332-166P

4

Socket Head Cap Screw Zinc Plated 3/8-16 x 1 1/4

14

PRD 22136

1

Flat Socket Cap Screw  M10-1.25 x 40mm G10.9

LK-SILC14L

ADAPT SOLUTIONS

|tech@adaptsolutions.ca|866.641.0419|418.889.9838 fax

PART NUMBER

LINK Chevrolet Silverado Crew Cab 2014 & Up   -Left-

DESCRIPTION

LINK CHEVROLET SILVERADO CREW CAB 2014 & Up

Summary of Contents for LINK LK-SILC14L

Page 1: ...LINK INSTALLATION MANUAL LK SILC14L Silverado Suburban Tahoe Sierra Yukon Escalade 2014 2018 DRIVER SIDE FRONT...

Page 2: ...k 11 LK731LB 1 Intside Cover Left Black 12 PRD 251 177 4 Trim Panel Clip 1 4 x 3 4 Black 13 LK700B 1 Link Covert Black 14 LK720LB 1 Pivot Motor Cover Left Black 15 LK960 1 LINK Wired Control 16 LK SIL...

Page 3: ...cknut 5 16 18 9 PRD 337 213P 3 Button head socket cap screw Zinc Plated 5 16 18 x 3 4 10 PRD 339 116P 1 Socket Shoulder Screw Zinc Plated 5 16 x 1 2 x 1 4 20 THD 11 PRD 339 135P 1 Socket Shoulder Scre...

Page 4: ...able Support 8 PRD 110 106 2 Round washer head tapping screw 8 x 3 4 9 PRD 130 110 4 Slotted Hexagon Washer Head Tapping Screw 8 x 3 4 10 PRD 251 177 4 Trim Panel Clip 1 4 x 3 4 Black 11 PRD 333 107 4...

Page 5: ...or Cover Left Black 8 LK960 1 LINK Wired Control 9 EW CK 00 1 12V Power Supply Wiring Kit 10 L LK UNI 250 2 Fixing Spacer 11 LK UNI 650 1 Manual Backup Tool Kit 12 PRD 332 164P 4 Socket Head Cap Screw...

Page 6: ...at The wiring harness is then extended from this point under the seat PLEASE NOTE If the ignition is turned on while extending a wire harness that includes airbags this may cause the airbag light to s...

Page 7: ...he driver seat When installing the LINK with hand controls hand controls should be installed after the LINK 1 Remove the driver side OEM seat and place it on a workbench or table To do this start by d...

Page 8: ...n Tahoe Sierra Yukon Escalade 2014 2018 Driver FRONT p 4 2 Remove all the plastic trims off both sides of the seat 3 Disconnect and remove the seat belt pre tensioner and the seat belt receiver from e...

Page 9: ...eat base To do this disconnect the seat back wiring connectors and remove the hooks that keep the fabric flap in place Then remove the bolts on either side to remove the seat back 5 Now remove the sea...

Page 10: ...f plastic and the seat pan Be sure to detach the wire harness from the seat pan NOTE In some models the seat pan is spot welded onto the seat base If this is the case use a drill to remove the 6 spot...

Page 11: ...n Tahoe Sierra Yukon Escalade 2014 2018 Driver FRONT p 7 8 Remove the wiring harness from the seat base 9 Remove the seat trim support from the left side of the seat base it will be reinstalled on to...

Page 12: ...ery to the LINK To do this thread the red power cable under the doorstep molding and through the firewall Make sure you pass through a grommet in the firewall to prevent the cable from chaffing Instal...

Page 13: ...and extension For best results extend one wire at a time Test continuity of each wire through the extension to avoid errors If you wish to keep a record of your wire extensions for reference you will...

Page 14: ...LINK Silverado Suburban Tahoe Sierra Yukon Escalade 2014 2018 Driver FRONT p 10 2018 MODEL BEFORE WIRE EXTENTION...

Page 15: ...LINK Silverado Suburban Tahoe Sierra Yukon Escalade 2014 2018 Driver FRONT p 11 2018 MODEL AFTER EXTENTION...

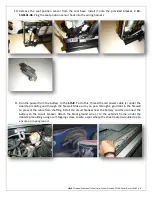
Page 16: ...the floor connector at this time Part LK SILC14L 01 installs towards the exterior of the vehicle near the door Tighten it in place with the provided M10 X 40mm flat head bolt Install part LK SILC14L 0...

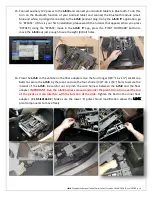
Page 17: ...LINK IT app press the PIVOT OUTWARD button to move the LINK out just enough to see the eight 8 bolt holes 16 Place the LINK in the vehicle on the floor adapters Use the four longer 3 8 16 x 1 socket c...

Page 18: ...LINK out of the vehicle Install the OEM wire cushion support and seat pan onto the LINK seat adapter using the two provided x 1 x 3 8 shoulder bolts Install the two brackets parts LK SILC14 04 with th...

Page 19: ...rol box for the seat memory it will have to be relocated into the seatback 20 Install the seatbelt receiver onto the LINK seat adapter using the provided 7 16 20 x 1 bolt and lock nut place a washer o...

Page 20: ...fied to allow clearance Turn the seat cushion over and locate the fan duct in the seat cushion Trace around the outside of the vent Remove the vent and cut out enough foam so that the vent is embedded...

Page 21: ...seat has a control box this will have to be relocated into the seat back and the wires routed accordingly Punch four holes in the fabric flap of the seat back to be able to attach the flap under the...

Page 22: ...provided replacement left hand side seat trim 27 Attach the control box and extended wire harness into the seat back and fasten it in place with zip ties Make sure to leave enough loose in the extens...

Page 23: ...g the rigid seat back cover the fabric flap at the bottom will have to be modified Cut off the corners as shown Then drill 3 holes to receive zip ties These must be attached up and under the seat onto...

Page 24: ...ges Use additional zip ties if required to secure any loose material Properly doing this step will ensure that the fabric does not impede the LINK s movements over time 30 Modify the left hand side se...

Page 25: ...Bluetooth module The connector can be attached with Velcro under the modified shroud Knowing that there are many moving parts under the seat verify the positioning of the wire to make sure there is no...

Page 26: ...modified seat trim Re install the seat belt and the recline handle or reconnect the seat switches if applicable 34 It is possible that the side trim may be slightly loose Depending on the seat model I...

Page 27: ...dify the right hand side seat trim Cut along dotted line as shown in pictures Then cut off the point of the trim reinstall onto the seat 36 Reconnect the main harness plug to the floor connector Insta...

Page 28: ...an 60 second tutorial video for a reminder of how to properly perform a reset It is vital that the LINK be exactly at the HOME position before moving on to the next step If the LINK is slightly off it...

Page 29: ...the 9V battery To do this on the tablet under INFO LINK MANAGEMENT DIAGNOSTIC The real voltage will be listed Unplug the Bluetooth module and plug in the hand pendant Make sure the LINK hand pendant i...

Page 30: ...it pivots out of the vehicle If this is the case we have provided four 4 shims part LK UNI 250 Note two shims may be sufficient one on either side If additional space is required the shims can be dou...

Page 31: ...possible T his b ac kup syste m is to e nsure tha t the LINK s pro g ra mming se que nc e re mains in the me mo ry o f the unit BEEP BEEP BEEEEEP BEEEEEP Re se t T o a le rt yo u tha t the LINK ha s R...

Page 32: ...he last LINK cycle 11V Power level normal 10V 11V Power level fluctuation verify battery reliability Less than 10V Defective battery consider replacing 12V battery Entering Error Code Diagnostic Error...

Page 33: ...o ntra c t wa rra nty to rt inc luding ne g lig e nc e stric t lia b ility o r pro duc t lia b ility All implie d wa rra ntie s inc luding a ny wa rra nty o f me rc ha nta bility o r fitne ss fo r a...

Page 34: ...LINK Silverado Suburban Tahoe Sierra Yukon Escalade 2014 2018 Driver FRONT p 30...

Reviews: