background image

Field Service Documentation

3

Copyright © 2007, Adaptec, Inc. All rights reserved. Information in this document is subject to change without notice and does not represent 
a commitment on the part of Adaptec or any of its subsidiaries.

Snap Server 4200/4500 Series

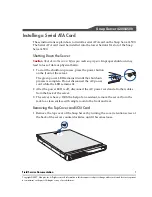
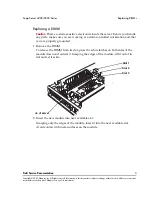
Press firmly to be sure the card is seated properly in its slot. Avoid contact with 

metal surfaces on the card. Grasp or press the edges only.

4

Replace the removed PCI retention clip. The PCI retention clip is the plastic 

component that you removed in Step 1.

Replacing the Top Cover

Be sure to replace the top cover. Do not operate the server without the top cover in 

place.

1

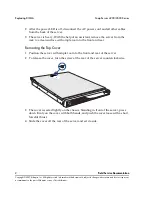
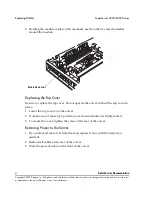
Lower the top cover onto the server.

2

From the rear of the server, push the cover forward until it is firmly seated.

3

To secure the cover, tighten the screw at the rear of the server.

Restoring Power to the Server

1

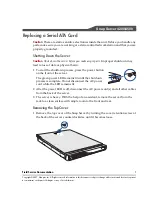
Reattach the disconnected the cable(s) to the server. 

2

Connect the power cord.

3

Press the power button on the front of the server.

Summary of Contents for 5325301728 - Snap Server 4200 NAS

Page 1: ... the Front Bezel Note These instructions apply to multiple models illustrations may vary slightly Removing the Front Bezel 1 Press the latches one on each side of the front bezel 2 Still holding the latches in the release position pull the bezel away from the chassis Replacing the Front Bezel 1 Position the new bezel so the tabs line up to slide under the top edge of the cover 2 Press firmly to at...

Page 2: ...fails the status light below the failed drive glows amber Overview of the Procedure Back up your system contents Remove the front bezel Physically remove the failed disk drive from its bay in the server and install a replacement Replace the front bezel Configure the replacement disk drive Status Light Activity Light Condition of Disk Drive Green Amber flashing Disk drive installed and being access...

Page 3: ...iaries Removing the Front Bezel 1 Press the latches one on each side of the front bezel 2 Still holding the latches in the release position pull the bezel away from the chassis Hot Swapping Removing and Replacing a Failed Disk Drive 1 Check the LEDs under the disk drive to verify that you are physically removing the failed drive The left LED should glow amber and the right LED should not be lit 2 ...

Page 4: ...atch on the new disk drive and open its handle The handle must be open for you to insert the disk drive all the way into its bay Note In these instructions a new disk drive is one that has never been installed in a Adaptec NAS server before 5 Insert the new disk drive into the empty drive bay pushing it all the way forward before you press the handle into place Replacing the Front Bezel 1 Position...

Page 5: ...the shutdown process press the power button on the front of the server The green power LED remains lit until the shutdown process is complete Do not disconnect the AC power cord while the LED remains lit 2 After the power LED is off disconnect the AC power cord and all other cables from the back of the server 3 The server is heavy With the help of an assistant remove the server from the rack to a ...

Page 6: ...sis Standing in front of the server press down firmly on the cover with both hands and push the cover loose with a short forceful thrust 4 Slide the cover off the rear of the server and set it aside Replacing the Fan 1 Assembly 1 Remove the old Fan 1 assembly Grasp the old fan assembly and lift it straight up Notice the locating pin on the floor of the server chassis 2 Lower the new fan assembly i...

Page 7: ...diaries Snap Server 4200 4500 Series Replacing a Fan Assembly Replacing the Fan 2 Assembly 1 Remove the old Fan 2 assembly Grasp the old fan assembly and lift it straight up Notice the three locating pins on the floor of the server chassis 2 Lower the new fan assembly into place being careful to align it with the connector 3 Press down on the fan assembly to ensure that it is seated securely Fan a...

Page 8: ... the server chassis 2 Lower the new fan assembly into place being careful to align it with the connector 3 Press down on the fan assembly to ensure that it is seated securely Replacing the Top Cover Be sure to replace the top cover 1 Lower the top cover onto the server 2 From the rear of the server push the cover forward until it is firmly seated 3 To secure the cover tighten the screw at the rear...

Page 9: ...t the shutdown process press the power button on the front of the server The green power LED remains lit until the shutdown process is complete Do not disconnect the AC power cord while the LED remains lit 2After the power LED is off disconnect the AC power cord and all other cables from the back of the server 3 The server is heavy With the help of an assistant remove the server from the rack to a...

Page 10: ...ive electronics inside the server Before you handle any parts make sure you are working at a static controlled workstation and that you are properly grounded Replacing a Power Supply Enclosure 1 Remove the power supply clip Grasp the plastic clip with your index finger and lift it out of the server 2 Remove the old power supply 3 Grasp the top of the power supply and pull it toward the rear of the...

Page 11: ...s on top and press down firmly until it snaps into place Replacing the Top Cover Be sure to replace the top cover Do not operate the server without the top cover in place 1 Lower the top cover onto the server 2 From the rear of the server push the cover forward until it is firmly seated 3 To secure the cover tighten the screw at the rear of the server Restoring Power to the Server 1 If you removed...

Page 12: ...front of the server The green power LED remains lit until the shutdown process is complete Do not disconnect the AC power cord while the LED remains lit 2 After the power LED is off disconnect the AC power cord and all other cables from the back of the server 3 The server is heavy With the help of an assistant remove the server from the rack to a clean surface with ample room to the front and rear...

Page 13: ...rd 1 Remove the PCI retention clip The PCI retention clip is the plastic component located at the rear of the chassis Lift the clip out of the server and set it aside 2 Remove the metal protective plate from the SCSI port opening To release the plate use your thumb to slide the plate towards the corner of the chassis and lift it from the enclosure Store the plate in a safe place so you can use it ...

Page 14: ...es on the card 4 Replace the removed PCI retention clip The PCI retention clip is the plastic component that you removed in Step 1 Replacing the Top Cover Caution Be sure to replace the top cover Do not operate the server without the top cover in place 1 Lower the top cover onto the chassis 2 From the rear of the chassis push the cover forward until it is firmly seated 3 To secure the cover tighte...

Page 15: ...n the front of the server The green power LED remains lit until the shutdown process is complete Do not disconnect the AC power cord while the LED remains lit 2 After the power LED is off disconnect the AC power cord s and all other cables from the back of the server 3 The server is heavy With the help of an assistant remove the server from the rack to a clean surface with ample room to the front ...

Page 16: ...and does not represent a commitment on the part of Adaptec or any of its subsidiaries Removing and Replacing the SCSI Card 1 Remove the PCI retention clip The PCI retention clip is the plastic component located at the rear of the server Lift the clip out of the server and set it aside 2 Remove the failed SCSI card from its slot 3 Install the new SCSI card Back right corner of server back view ...

Page 17: ...e edges only 4 Replace the removed PCI retention clip The PCI retention clip is the plastic component that you removed in Step 1 Replacing the Top Cover Be sure to replace the top cover Do not operate the server without the top cover in place 1 Lower the top cover onto the server 2 From the rear of the server push the cover forward until it is firmly seated 3 To secure the cover tighten the screw ...

Page 18: ... make any repairs Improper shutdown may lead to loss of data or physical harm 1 To start the shutdown process press the power button on the front of the server The green power LED remains lit until the shutdown process is complete Do not disconnect the AC power cord while the LED remains lit 2 After the power LED is off disconnect the AC power cord and all other cables from the back of the server ...

Page 19: ...side Remove the plastic PCI retention clip from the right rear corner of the server by lifting it out of the chassis 3 If a SCSI card is installed remove the card and set it aside Avoid contact with metal surfaces on the card Installing the Serial ATA Card and Reinserting the SCSI Card Caution PCI cards are seated properly only when you hear a distinct snap sound 1 Remove the metal protective plat...

Page 20: ...lace 4 Do one of the following If reinserting the SCSl card to the upper PCI slot grasp only the edges of the card and press firmly until it snaps into place If you do not have a SCSI card be sure to replace the metal protective plate on the top PCI port 5 Replace the plastic PCI retention clip in the server chassis 6 Replace the top cover of the Snap Server by lowering it onto the server and push...

Page 21: ...nge without notice and does not represent a commitment on the part of Adaptec or any of its subsidiaries Replace the Snap Server in the rack and reconnect the cables Restoring Power to the Server 1 If you removed the server from the rack replace it now with the help of an assistant 2 Reattach all cables to the rear of the server 3 Press the power button on the front of the server ...

Page 22: ...before you make any repairs Improper shutdown may lead to loss of data or physical harm 1 To start the shutdown process press the power button on the front of the server The green power LED remains lit until the shutdown process is complete Do not disconnect the AC power cord while the LED remains lit 2 After the power LED is off disconnect the AC power cord s and all other cables from the back of...

Page 23: ...ng the Serial ATA Card Caution PCI cards are seated properly only when you hear a distinct snap sound 1 Remove the PCI retention clip The PCI retention clip is the plastic component located at the rear of the server Lift the clip out of the server and set it aside 2 Remove the failed Serial ATA card from its slot 3 Install the new Serial ATA card 4 Replace the plastic PCI retention clip in the ser...

Page 24: ...ut notice and does not represent a commitment on the part of Adaptec or any of its subsidiaries Snap Server 4200 4500 Series Replacing a Serial ATA Card Restoring Power to the Server 1 If you disconnected the cable s reattach them to the server 2 Connect the power cord 3 Press the power button on the front of the server Power button ...

Page 25: ...IMMs supplied by Adaptec may seriously impact data availability could potentially lead to data loss and corruption and will void your warranty Do not install DIMMs of different capacity on the same Snap Server Each DIMM you install must carry the same capacity For example if your Snap Server came with a single 512MB DIMM installed you could install two more 512MB DIMMs for total of 1 5GB of RAM To...

Page 26: ... the server 3 The server is heavy With the help of an assistant remove the server from the rack to a clean surface with ample room to the front and rear Removing the Top Cover 1 Position the server with ample room to the front and rear of the server 2 To release the cover turn the screw at the rear of the server counterclockwise 3 The cover is seated tightly on the chassis Standing in front of the...

Page 27: ...ide the server Before you handle any parts make sure you are working at a static controlled workstation and that you are properly grounded 1 Remove the DIMM To release the DIMM from its slot press the white latches on both sides of the module down and outward Grasping the edges of the module lift it out of its slot and set it aside 2 Insert the new module into next available slot Grasping only the...

Page 28: ...hes around the module Replacing the Top Cover Be sure to replace the top cover Do not operate the server without the top cover in place 1 Lower the top cover onto the server 2 From the rear of the server push the cover forward until it is firmly seated 3 To secure the cover tighten the screw at the rear of the server Restoring Power to the Server 1 If you removed the server from the rack replace i...

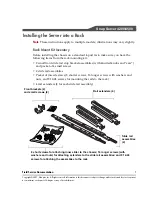
Page 29: ...re you have the following items from the rack mounting kit 2 small front slide rail stop bracket assemblies with knurled knobs and ears and packet of 4 small screws 2 slide rail assemblies Packet of mixed screws 8 shorter screws 16 longer screws with washers and nuts and 8 12 24 screws for mounting the rails to the rack 4 rail extenders 2 for each slide rail assembly Front brackets 2 and small scr...

Page 30: ...a rail extender to the front of each slide rail assembly using 2 screws washers and nuts for each rail extender Attach the slide rail assemblies to the rack Attach the front brackets with ears to the chassis Attach the inner sliders to the sides of the chassis using 3 of the shorter screws Mount the chassis onto the slide rail assemblies in the rack Attach the front brackets to the rack securing t...

Page 31: ...Slide Rail Assemblies 1 Place the slide rail assembly on a flat surface 2 Grasp the inner slider and slide it toward the front of the assembly as shown in the picture below 3 When the inner slider cannot move any farther press the release button toward the front The inner slider comes all the way out of the assembly 4 Repeat the procedure with the second slide rail assembly Set both inner sliders ...

Page 32: ... and rear posts on your rack When attached to the slide rail assembly the rear rail extenders are fixed but you can make small adjustments to the position of the front rail extenders which you attach in the next section 1 Slide open the slide rail assembly to expose the rear screw holes 2 Place the rear end of a slide rail assembly into a rail extender as shown in the picture below The inner mecha...

Page 33: ...re with the second slide rail assembly Attaching Front Rail Extenders to the Slide Rail Assemblies The rail extenders allow you to adjust the overall length of the slide rails to fit the distance between the front and rear posts on your rack The rear rail extenders which you attached in the previous section are fixed but you can adjust the front rail extenders to different lengths 1 Press firmly o...

Page 34: ...t end to rear matches the distance on the rack 5 Carefully turn the assembly over maintaining the front to rear distance you measured 6 Align a screw hole in the slide rail assembly with the appropriate slot in the extender This may take a bit of trial and error handling Hold the slide rail assembly and extender to maintain the overall length of the assembly as determined by the front to back dist...

Page 35: ... Series Installing the Server into a Rack 8 Carefully turn the assembly on its side for access to the protruding end of the screw 9 Attach a washer and nut to the screw end on the outside of the extender Note Leave the screw loose enough for slippage if necessary when you attach the assembly to the rack 10 Align a second screw hole in the slide rail assembly with the appropriate slot in the extend...

Page 36: ...ice and does not represent a commitment on the part of Adaptec or any of its subsidiaries 12 Attach a washer and nut to the end of the second screw on the outside of the extender Note Leave the screw loose enough for slippage if necessary when you attach the assembly to the rack 13 Repeat the procedure attaching the two remaining rail extenders to the front and rear of the second slide rail assemb...

Page 37: ...itment on the part of Adaptec or any of its subsidiaries Snap Server 4200 4500 Series Installing the Server into a Rack Attaching the Slide Rail Assemblies with Extenders to the Rack Use the 12 24 screws provided to attach both slide rail assemblies to the rack Now that the rack is ready with slide rail assemblies in position you need to prepare the chassis for mounting ...

Page 38: ...ts at the front of the chassis side panel Note The brackets are oriented so one goes on the left side and the other goes on the right side 2 Insert 2 small screws to attach each bracket to the chassis and tighten them firmly Attaching the Inner Sliders to the Chassis 1 Position an inner slider behind an ear bracket at the front of the chassis side panel Be sure to position the inner slider with th...

Page 39: ...ttach the inner slider to the other side of the chassis Mounting the Chassis onto the Rack Caution The chassis with disk drives inserted weighs 27 pounds To avoid accidents have another person help you support the weight of the chassis as you slide it into the rack 1 Align the inner sliders attached to the chassis with the front ends of the slide rail assemblies attached to the rack 2 As you push ...

Page 40: ...ument is subject to change without notice and does not represent a commitment on the part of Adaptec or any of its subsidiaries Connecting and Restarting the Server Once you have mounted the server chassis in a rack restart the system 1 Attach the cable s 2 Connect the power cord 3 Press the power button on the front of the server ...

Page 41: ...verview of the Procedure To install the chassis on a rack with the L shaped brackets you perform the following tasks Shut down the chassis and disconnect the power cord and Ethernet cable s Attach the brackets to the chassis Attach the bracket ears to the rack Connect the cables and power cord and restart the server Shutting Down the Server Caution Shut down the server before you make any repairs ...

Page 42: ...the brackets to the front of the chassis as shown in the illustration below Or you can attach the brackets farther back so the ears are in the middle of the chassis 2 Lift the chassis and align the ears with the posts on the rack You may want another person to support the chassis in position For a standard 4 post rack align the ears with the front posts For a Telco rack align the ears with the 2 r...

Reviews: