background image

24

Device Connections

Notes of connection  


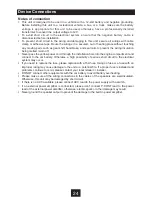
 This unit is designed to be used in a vehicle with a 12-volt battery and negative grounding. 

Before installing this unit to a recreational vehicle, a bus, or a truck, make sure the battery 

voltage is appropriate for this unit to be used, otherwise, have a professionally installed 

transformer to convert the output voltage to 12V.

•   To  avoid  short  circuit  in  the  electrical  system,  ensure  that  the  negative  battery  cable  is 

disconnected before installation.


 To prevent short circuit in the wiring and damaging to this unit, secure all wirings with cable 

clamp or adhesive tape. Route the wirings in a secured, out of heating place without touching 

any moving parts such as gear shift, handbrake, and seat rails to prevent the wiring insulation  

being melted / worn off.


 Never pass the yellow power cord through the installation hole into the engine compartment and 

connect to the car battery. Otherwise, a high possibility of serious short circuit to the electrical 

system may occur.


 If you need to replace the fuse, please replace with a 15A fuse. Using no fuse or a fuse with an 

improper rating may cause damage to the unit or a potential fire. If a proper fuse is installed and 

problems continue to occur, please contact your local retailer or installer.


 DO NOT connect other equipments with the car battery to avoid battery overheating.


 Please make sure all the wiring connections & the cables of the speakers are well-insulated. 

Otherwise, this unit may be damaged by short circuit.


 If there is no ACC available, please connect ACC lead to the power supply with a switch.


 If an external power amplifier is connected, please don't connect P.CONT lead to the power 

lead of the external power amplifier, otherwise, electric spark or other damage may result.


 Never ground the speaker output to prevent the damage to the built-in power amplifier.

Summary of Contents for AN6Q24

Page 1: ...AN6Q24 OWNER S MANUAL 2 Din DVD Multimedia Station Built in Navigation Bluetooth ...

Page 2: ...smell Only connect the unit to a 12 volt power supply with proper negative grounding MUTE OK MUTE OK Never install this unit where the operation and condition for driving safely is compromised MUTE OK MUTE OK Never use the video display while the car is in motion The use of video playback while driving is a violation of traffic laws and increases the risk of traffic accidents MUTE OK MUTE OK MUTE ...

Page 3: ...tergent can be used 3 When playing a new disc New disc may have some rough spots around the inner and outer edges If such a disc is used remove these rough spots with a pencil or ball point pen etc Precautions Contents Precautions 1 Control Panel 3 Remote Control 4 Basic Operations 6 Turn On Off the Power 6 Mute 6 Adjust the Volume 6 Playing Source Selection 6 When Vehicle is Put in Reverse 6 When...

Page 4: ...etter Quality Internal Mic is just for urgent use in case of External Mic broken 9 HOME Button Show main menu MENU Button Show MENU options BACK Button Back to previous MENU Control Button Touch to show hide the Control Buttons Touch and hold to move icons 10 Map Card Slot 11 Disc Slot Insert the disc with label side facing up 12 Remote Sensor Default Path 1 Path of USB 5 mnt sdcard external_usb 2...

Page 5: ...the cursor up down left right Up down Manual tuning 14 Numeric keys 15 Mute the volume 16 Unit power 17 Select DVD subtitle language 18 Select DVD angle 19 Show exit home menu 20 Return to previous display 21 Clear information 22 Hang up 23 Previous Next Auto tuning long press Fast backward forward long press 24 Display settings 25 Adjust volume 26 Stop playback Rear zone not used 27 Change next r...

Page 6: ...ons If the remote control doesn t work change the battery 5 Use button shaped lithium battery CR2025 3V only 6 DO NOT recharge disassemble heat or expose the battery to fire 7 Insert the battery in proper direction according to the and 8 Store the battery out of children reach it can be hazardous if swallowed to avoid the risk of accident Uninstall Battery Slide out the battery compartment tray at...

Page 7: ...he unit automatically switches to CAMERA source during reverse driving The unit returns to the previous source after the vehicle has been taken out of reverse When Parking Brake Applied 1 If PRK SW cable is connected to hand brake switch the video display of the TFT monitor will be controlled by driving status system setup and input video sources 2 When the car is moving forward and a video source...

Page 8: ... the button on the panel to exit Disc Operation Insert a Disc Insert a disc into the slot and the unit will change to disc mode automatically Notes Please confirm whether there is a disc in the unit before you insert another one The unit will exit current playing source and enter DVD mode when one disc is inserted The following disc formats are supported CD R CD RW DVD R DVD R DVD RW DVD RW Eject ...

Page 9: ... will need to choose Music Video Photo for playback 1 2 3 4 5 6 1 Return to home menu 2 Show more control buttons 3 Previous track Fast backward long press 4 Play Pause 5 Next track Fast forward long press 6 Repeat play 7 8 9 10 7 Show file list 8 Hide the second line of control buttons 9 Shuffle play 10 Enter EQ menu Mixed Disc Playback When inserting a mixed disc the unit will read the disc and ...

Page 10: ...ote If you do not select Repeat on when the entire disc or TITLE playback has finished the system will stop If no other control after 5 minutes the unit will turn into standby mode Random Track Playback for CD VCD MP3 WMA Only You can play all the tracks in random order 1 During playback press button on the screen to select random playback 2 Press again to select normal playback Search For DVD VCD...

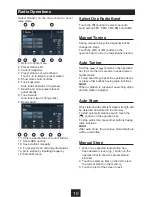
Page 11: ...e frequency will be changed in steps Touch the or button on the operation bar to tune in a lower higher station Auto Tuning Hold the or button on the operation bar for more than 2 seconds to seek a lower higher station To stop searching repeat the operation above or press other buttons having radio functions Note When a station is received searching stops and the station is played Auto Store Only ...

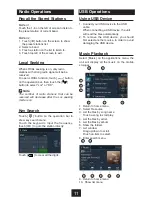
Page 12: ...he operation bar to show key search menu Touch the keypad to input the frequency touch OK to goto the station directly Touch to clear all the digits USB Operations Using USB Device 1 Connect your USB device to the USB cable When connecting a USB device the unit will read the files automatically 2 To remove the USB device you should first select another source in order to avoid damaging the USB dev...

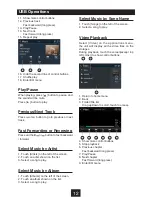
Page 13: ...f the screen 2 Touch an artist shown on the list 3 Select a song to play Select Music by Album 1 Touch Albums on the left of the screen 2 Touch an album shown on the list 3 Select a song to play Select Music by Song Name 1 Touch Songs on the left of the screen 2 Select a song to play Video Playback Select Video on the applications menu the unit will display all the video files on the storages Duri...

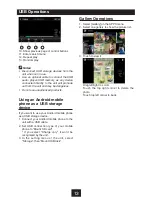
Page 14: ... Android mobile phone as a USB storage device If you want to use your Android mobile phone as a USB storage device 1 Connect your Android mobile phone to the unit with a USB cable 2 Set USB connection type of your mobile phone to Mount SD card If you select Charge only it won t be recognized by the unit 3 In the setting menu of the unit select Storage then Mount USB disk Gallery Operations 1 Selec...

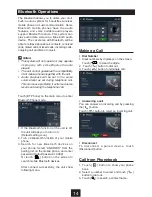
Page 15: ... telephone call Touch BT Phone on the main menu to enter Bluetooth Phone mode 1 If the Bluetooth function of the unit is off the unit will ask you to turn it on Default setting is on 2 Turn on Bluetooth function of your mobile phone 3 Search for new Bluetooth devices on your phone Select ANDROID from the pairing list on the mobile phone and enter password Default password 0000 Or touch button on t...

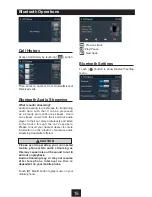
Page 16: ...essly and listen to the tracks through the car s speakers Please consult your nearest dealer for more information on the product of wireless audio streaming transmitter offered CAUTION Please avoid operating your connected mobile phone while audio streaming as this may cause noise or the sound to cut in and out on playback Audio streaming may or may not resume after telephone interrupt as this is ...

Page 17: ...le Touch iPod on the main menu to enter iPod menu If iPod isn t on the current menu slide the bottom bar left or right to find it Pausing play 1 Touch the button on the bottom of the screen to pause play PAUSE appears in the display and button becomes 2 Touch button to resume play Selecting a track Track up Touch the button to move to the beginning of the next track Track down 1 Touch the button t...

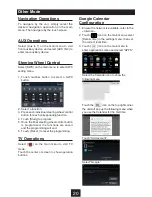
Page 18: ...Mobile network to enter the Mobile network settings 5 Click the Access Point Names 6 Press the button on the front panel then click the New APN Internet 7 Must setup following options Name APN MCC MNC Touch the dialogue box to show keypad and input your desired name APN according to the operator to determine The unit will detect your 3G module to determine the MCC and MNC 8 Then press the button a...

Page 19: ...the top right corner of the screen Now you can access internet Create Wi Fi Hotspot User can use the unit to create a personal Wi Fi hotspot All your other Wi Fi enabled devices will then be able to connect to this hotspot and share the primary internet connection 1 Connect the Wifi and 3G dongle to the USB slots on the rear of the unit Refer to Device Connections 2 Touch the icon on the main menu...

Page 20: ...t or sign into an existing account Enter your Email address and password Then you can send receive E mails through the unit If your device can t connect to the Wi Fi hotspot 1 Check the Wi Fi network The icon will appear on the top left of the screen after setting successfully If not check your Wi Fi dongle connection and the Hotspot settings 2 Check the 3G network If the signal indicator on the t...

Page 21: ...elect the desired navigation application on the main menu Then navigate by the touch screen AUX Operations Select Aux In 1 on the main menu to visit front auxiliary device and select AUX IN 2 to enter rear auxiliary device Steering Wheel Control Select SWC on the main menu to enter SWC setting menu 1 Touch number button to select a SWC button 2 Select a function 3 Press each individual steering wh...

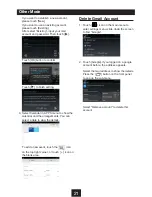
Page 22: ...d the arrangements You can select a date to view the details To add a new event touch the icon on the top right corner or touch icon on the blank area Delete Gmail Account 1 Touch icon on the main menu to enter settings menu slide down the screen to find Google 2 Touch Google if you logged on a google account before the address appears Select the mail address to show the details Press the button o...

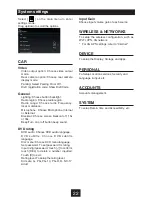
Page 23: ...sound DVD rating DVD audio Choose DVD audio language DVD subtitle Choose DVD subtitle language Disc menu Choose DVD menu language Set password To set password for rating Input 4 digit password touch to confirm touch DEL to delete a number inputted Touch X to exit Rating level To setup the rating level Kid safe G PG PG 13 PG R R NC 17 Adult System settings Input Gain Choose input volume gain of eac...

Page 24: ...nd Jazz Touch or to adjust the level Frequency and Q for Bass Mid Treb Touch to enter Fader Balance Subwoofer setting menu Touch or to setup Balance touch or to setup Fader Sub Woofer Sub woofer Turn on off the sub woofer playback Sub woofer filter Touch or to select subwoofer Filter Sub woofer Level Touch or to adjust subwoofer Level Sound setting ...

Page 25: ...d through the installation hole into the engine compartment and connect to the car battery Otherwise a high possibility of serious short circuit to the electrical system may occur If you need to replace the fuse please replace with a 15A fuse Using no fuse or a fuse with an improper rating may cause damage to the unit or a potential fire If a proper fuse is installed and problems continue to occur...

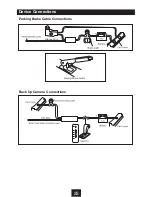
Page 26: ...25 Parking Brake Cable Connections Back Up Camera Connections Device Connections Orange Wire ...

Page 27: ...Front L 7 Rear L 8 Rear L GPS ANTENNA MICROPHONE RADIO ANT Black Black Black 3G WIFI 3G WIFI Black Orange Pink Black PARKING REVERSE SWC Key A Key B GND DTV BUS optional Brown Sold separately TV BOX AUX IN Red Red R Blue Yellow Yellow Yellow White L Red R White L Red R White L Green White FRONT OUT Black REAR OUT Grey VIDEO OUT Black VIDEO IN Black CAMERA VIDEO Black SUB WOOFER Black ...

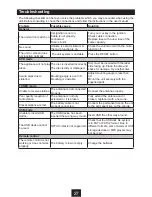
Page 28: ...damage Try another disc Sound skips due to vibration Mounting angle is over 30 Mounting is unstable Adjust mounting angle to less than 30 Mount the unit securely with the supplied parts TUNER mode Unable to receive stations The antenna is not connected properly Connect the antenna properly Poor quality reception of radio station The antenna is not fully extended or it is broken Fully extend the an...

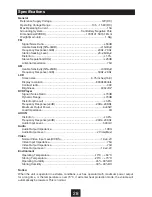
Page 29: ...DVD Player Signal Noise Ratio 70dB Dynamic Range 70dB Distortion line out 0 8 Frequency Response 3dB 20Hz 20KHz Maximum Output Power 4 45W Load Impedance 4Ω AUX IN Distortion 0 8 Frequency Response 3dB 20Hz 20KHz Audio Input Level 500mV Audio Audio Output Impedance 10KΩ Audio Output Level 2Vrms Max Video Normal Video Input Level CVBS 1 0 0 2V Video Input Impedance 75Ω Video Output Impedance 75Ω Vi...

Page 30: ...P N 127075006299 CLASS 1 LASER PRODUCT ...

Reviews: