background image

3

JRV9100

 FCC  STATEMENT

This device complies with Part 15 of the FCC Rules. Operation is subject to the 

following two conditions:

 (1)This device may not cause harmful interference, and

 (2)This device must accept any interference received, including interference that 

may cause undesired operation.

Changes or modifications not expressly approved by the party responsible for 

compliance could void the user’s authority to operate the equipment.

NOTE: 

 This equipment has been tested and found to comply with the limits for a Class 

B digital device, pursuant to Part 15 of the FCC Rules. These limits are designed 

to provide reasonable protection against harmful interference in a residential 

installation.

 This equipment generates uses and can radiate radio frequency energy and, if 

not installed and used in accordance with the instructions, may cause harmful 

interference to radio communications. However, there is no guarantee that 

interference will not occur in a particular installation. If this equipment does cause 

harmful interference to radio or television reception, which can be determined 

by turning the equipment off and on, the user is encouraged to try to correct the 

interference by one or more of the following measures:

•   Reorient or relocate the receiving antenna.

•   Increase the separation between the equipment and receiver.

•   Connect the equipment into an outlet on a circuit different from that to which the 

receiver is connected.

•   Consult the dealer or an experienced radio/TV technician for help.

 FCC Radiation Exposure Statement

This equipment complies with FCC radiation exposure limits set forth for an 

uncontrolled environment. This equipment should be installed and operated with 

minimum distance 20cm between the radiator & your body.

This unit supports only the following iPhone models:

iPhone X

iPhone 8 Plus

iPhone 8

iPhone 7 Plus

iPhone 7

iPhone SE

iPhone 6s Plus

iPhone 6s

iPhone 6 Plus

iPhone 6

iPhone 5s

“Made for iPod” and “Made for iPhone” mean that an electronic accessory has been 

designed to connect specifically to the iPod or iPhone, respectively, and has been 

certified by the developer to meet Apple performance standards.

Apple is not responsible for the operation of this device or its compliance with safety 

and regulatory standards. Please note that the use of this accessory with iPod or 

iPhone may affect wireless performance.

iPod  and  iPhone  are  trademarks  of  Apple  Inc.,  registered  in  the  U.S.  and  other 

countries.

Summary of Contents for JRV9100

Page 1: ...JRV9100 Operating Instructions 6 75 Double DIN Multimedia Receiver Built In BT Technology iPhone iPod MHL HDMI USB AV In ...

Page 2: ... Contents FEATURES 4 CONTROLS AND INDICATORS 6 Basic Operations 7 Radio Mode 9 Playback Mode 10 Bluetooth Mode 12 Apple CarPlay 14 Android Auto 14 Settings 15 Other Modes 16 Specifications 17 Wire Connections 18 ...

Page 3: ...f and on the user is encouraged to try to correct the interference by one or more of the following measures Reorient or relocate the receiving antenna Increase the separation between the equipment and receiver Connect the equipment into an outlet on a circuit different from that to which the receiver is connected Consult the dealer or an experienced radio TV technician for help FCC Radiation Expos...

Page 4: ...l Distance Auto Store Preview Scan iPod iPhone iPod iPhone via USB High Speed Direct Connect Interface to Access iPhone and iPod Playlists Artists Albums Power Management Charges iPhone iPod while Connected Chassis Fixed Front Panel High Definition TFT LCD General Beep Tone Confirmation ON OFF Option BT Hands Free operation for safety and convenience and A2DP for streaming music from your smartpho...

Page 5: ...dent except when using for rear view video camera never use the video display function while driving the vehicle This is a violation of federal law WARNING Never disassemble or adjust the unit WARNING To prevent injury from shock or fire never expose this unit to moisture or water WARNING Using an improper fuse may cause damage to the unit and result in fire ...

Page 6: ...Button Show main menu 4 Button Return to previous menu 5 Rotary pushbutton Switch on device In operation Mute audio source short press Increase Decrease the volume rotate Switch off device long press 6 Reset Button Reset the unit 7 USB slot 8 AUX in Jack CONTROLS AND INDICATORS ...

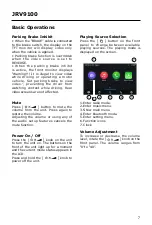
Page 7: ...unit Press again to restore the volume Adjusting the volume or using any of the audio setup features cancels the mute function Power On Off Press the knob on the unit to turn the unit on The buttons on the front of the unit light up for a moment and the current mode status appears in the LCD Press and hold the knob to power off the unit Basic Operations Playing Source Selection Press the button on...

Page 8: ...aturewill selectively boost certain bass and treble frequencies Volume distribution fader balance You can adjust the volume distribution in the vehicle for all sources 1 Press the button The menu for fader and balance is displayed 2 Adjust fader and balance with or Set Date Time 1 Touch 2 Touch Time The date time setup menu is displayed Set Date 1 Touch Date 2 Touch the date information on the scr...

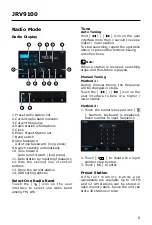
Page 9: ...e Auto Tuning Hold icon on the user interface more than 1 second to seek a higher lower station To stop searching repeat the operation above or press other buttons having radio functions Note When a station is received searching stops and the station is played Manual Tuning Method 1 During manual tuning the frequency will be changed in steps Touch the icon on the user interface to tune in a higher...

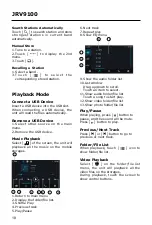
Page 10: ...iles on the storages During playback touch the screen to show control buttons Search Stations Automatically Touch to search station and store strongest stations in current band automatically Manual Store 1 Tune to a station 2 Touch to display the 2nd menu 3 Touch Recalling a Station 1 Select a band 3 To u c h t o s e l e c t t h e corresponding stored station Playback Mode Connect a USB Device Ins...

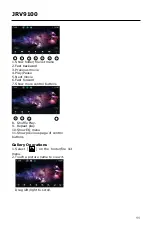
Page 11: ...vie 4 Play Pause 5 Next movie 6 Fast forward 7 Show more control buttons 8 11 10 8 Shuffle Play 9 Repeat play 10 Show EQ menu 11 Show previous page of control buttons Gallery Operations 1 Select on the folder file list menu 2 Touch a picture name to view it Drag left right to scroll ...

Page 12: ...er with the unit Audio playback will be set to the same volume level as set during telephone call This can cause problems if extreme volume level is set during the telephone call Touch on the main menu to enter Bluetooth Phone mode Establish a connection Delete the Bluetooth device from the list 1 Turn on Bluetooth function of your mobile phone 2 Search for new Bluetooth devices on your phone Sele...

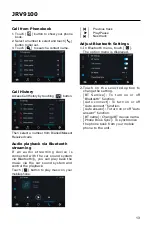
Page 13: ...k Sync To synchronize the phone book from your mobile phone to the unit Call from Phonebook 1 Touch button to show your phone book 2 Select a number to select and touch button to dial out 3 Touch to search a contact name Call History Access Call History by touching button Then select a number from Dialled Missed Received calls Audio playback via Bluetooth streaming If an audio streaming device is ...

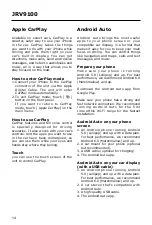
Page 14: ...ntrol CarPlay Android Auto Android Auto brings the most useful apps to your phone screen or your compatible car display in a format that makes it easy for you to keep your main focus on drving You can control things like navigation and maps calls and text messages and music Prepare your phone Make sure your phone is running Android 5 0 Lollipop and up For best performance we recommend Android 6 0 ...

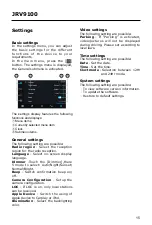
Page 15: ...he Dimmer there 5 mode to select Auto Night Sunset Normal Bright Beep Switch confirmation beep on off Camera Configuration Setup the camera configuration LOC If LOC is on only local stations can be received Apple Device Switch the using of Apple device to Carplay or iPod Illumination Select the backlighting color Video settings The following setting are possible Parking If Parking is activated vid...

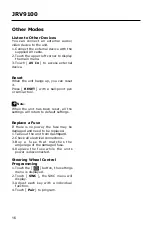
Page 16: ...te When the unit has been reset all the settings will return to default settings Replace a Fuse If there is no power the fuse may be damaged and need to be replaced 1 Take out the unit from dashbpard 2 Check all electrical connections 3 B u y a f u s e t h a t m a t c h e s t h e amperage of the damaged fuse 4 Replace the fuse while the units power is disconnected Steering Wheel Control Programmin...

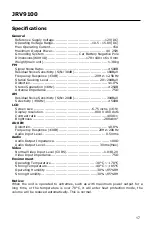
Page 17: ...dB 30dBμV Selectivity 9KHz 50dB LCD Screen size 6 75 inchs 16 9 Display resolution 800 X 480 dots Contrast ratio 4000 1 Brightness 280cd m2 AUX IN Distortion 0 8 Frequency Response 3dB 20Hz 20KHz Audio Input Level 0 5Vrms Audio Audio Output Impedance 100Ω Audio Output Level 3Vrms Max Video Normal Video Input Level CVBS 1 0 0 2V Video Input Impedance 75Ω Environment Operating Temperature 30 C 70 C ...

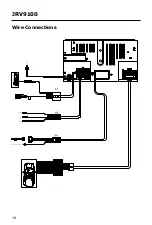
Page 18: ...18 JRV9100 Wire Connections ...

Page 19: ...COM 2019 Printed in China JRV9100 Common Replacement Parts Microphone 4M mating harness 31914310B Remote Control PXRV10REM Wire Harness Bulk Pack separately for ASA 30314310 Operation manuals and other material online at https www asaelectronics com manuals guides ...

Reviews: