background image

www.addonics.com

Technical Support (M-F 8:30am - 6:00pm PST)   

Phone: 408-453-6212 

Email: www.addonics.com/support/query/

Quick Guide

Installing the 1:7 optical duplicator

Step 1

Insert the 1:7 Blu-Ray / DVD Duplicator into standard 5.25” drive bay.

Step 2

Connect the power cable from you system to the 4-pin floppy power connector.

Step 3

Connect the source drive to the source SATA port via SATA cable and the target 

drives to the destination SATA port via SATA cable.


Step 4

Screw the duplicator into the drive bay with 4 screws (2 on each side).

Duplicating drive(s) 

Make sure the source and target drives are connected to the proper ports.  

When the duplicator is on, it will go through the steps below.

Step 1

Duplicator LED will light up and the device will beep.

Step 2

LCD will display initial steps:


1.  

Duplicator Ver:

 - Displays duplicator version


2.  

Initializing SDRAM


3.  

Detect Source/Target

 - Will detect the type of source/targets 


4.  

Copy

 - Defaults to the first function which is to copy

Step 3

Once the duplicator gets to the copy menu, press ENT to begin copying.  The 

duplicator will auto-detect the drive and display its information on the LCD.  Make 

sure that the power LEDs of the flash reader are blinking, the blinking indicates 

drive activity.

You can find the complete user manual of the 1:7 Blu-Ray / DVD Duplicator panel 

on the driver disk under user guides.  You can also download it from our website at 

www.addonics.com/support/user_guides/


Summary of Contents for DDU7SAS

Page 1: ...assistance to get your unit functioning properly please have your product information ready and contact Addonics Technical Support at Hours 8 30 am 6 00 pm PST Phone 408 453 6212 Email http www addon...

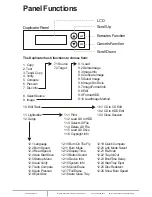
Page 2: ...e 408 453 6212 Email www addonics com support query Diagram ENT ESC Duplicator Panel LCD Scroll Up Scroll Down Executes Function Cancels Function ENT ESC 7 Destination SATAPorts Source SATAPort top po...

Page 3: ...proper ports When the duplicator is on it will go through the steps below Step 1 Duplicator LED will light up and the device will beep Step 2 LCD will display initial steps 1 Duplicator Ver Displays...

Page 4: ...mageFormat Info 9 8 Edit 9 9 Format HDD 9 10 LoadImage Method 10 1 CD to CD Edit 10 2 CD to HDD Edit 10 3 Close Session 11 1 Print 11 2 Load LSI to HDD 11 3 Select LSI File 11 4 Delete LSI File 11 5 L...

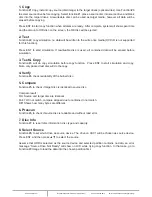
Page 5: ...before simulation 3 Test Copy Function 3 will do copy simulation before copy function Press ENT to start simulation and copy Note only passed test disc will do the copy 4 Verify Function 4 check reada...

Page 6: ...rmation Compare result OK Source and target disc are identical Fail TOC not match compare skipped due to contains not match Diff shows how many bytes are different 9 5 Select Image This function is to...

Page 7: ...up press ENT again will cancel the selection After selection use move to the End which is between 1st track and last track Press ENT to end of selection and use to confirm Yes or No Press ENT after bu...

Page 8: ...is function is to select source drive in order to load LSI File into a particular partition 11 6 Coypright Info This function is to see the LightScribe copyright information 12 Setup To change the def...

Page 9: ...Fly Burn On The Fly means data will be copied directly from the source disc to the target disc When the setting is Off the data will be loaded into temporary partition of HDD first then copy from HDD...

Page 10: ...n By default this is set to No Use to choose Yes then press ENT to scan the chosen connected tower 12 22 Tray In Out Lets you control the drive tray ejecting The default is All Once and there have Div...

Reviews: