Instruction Manual DPY351_R11
Page 3
2.5
Power On Configuration
2.5.1
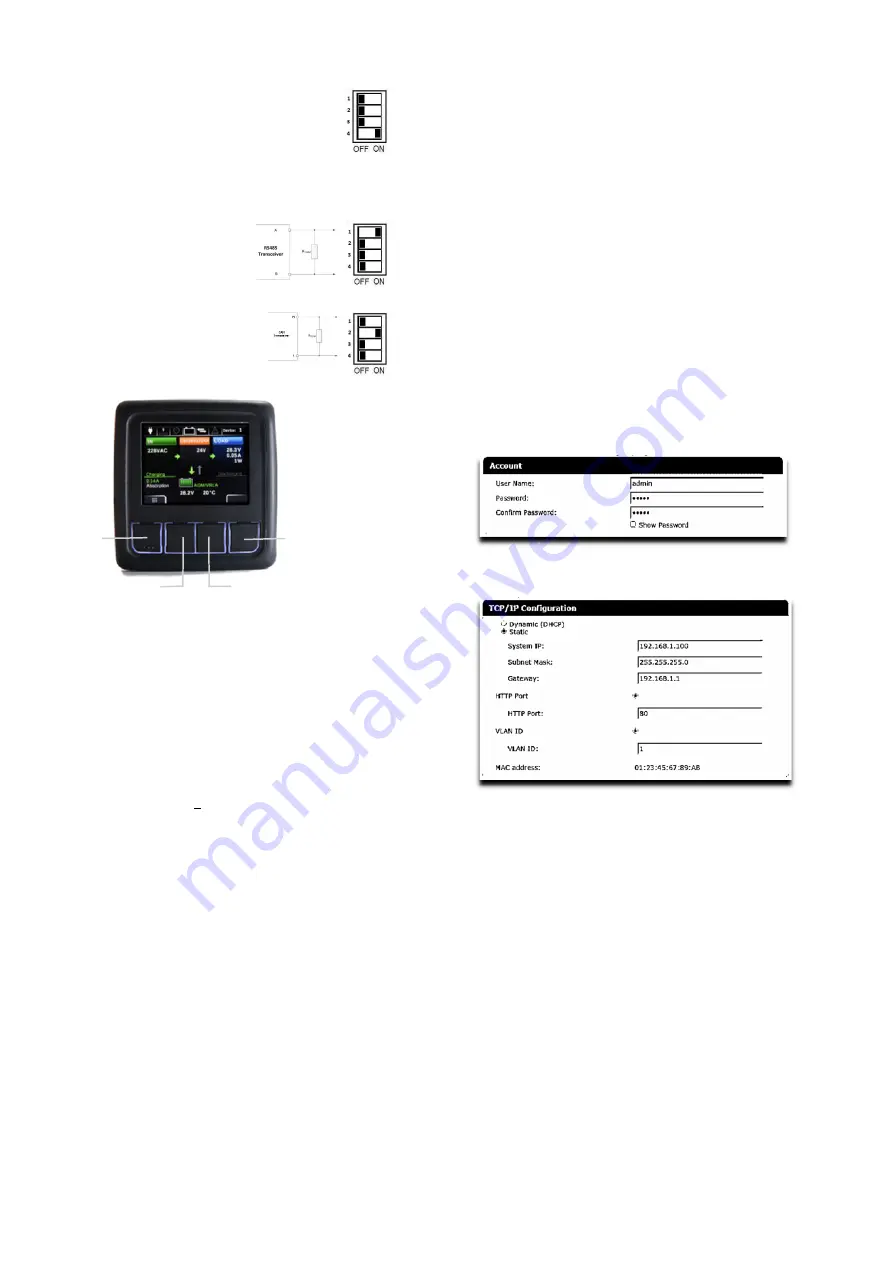
Automatic Power On Display (AUX6)
Dipswitch 4 is in position OFF, the Power On
button must be pressed to Turn ON the device.
When the dipswitch 4 is in the ON position, the
DPY351 Turn ON automatically when power is
provided. In both cases the device can be
subsequently powered off by pressing the front
panel Power On button for more than 3s. The automatic power on
feature is useful in the case of supply outages: the DPY351
automatically powers on when power becomes available again.
2.6
Hardware configurations RS485 and CAN bus
2.6.1
RS 485 Terminations (AUX6)
Modbus
(RTU)
standard
protocol. Termination 120
Ω
for the CBI’s connection if
DPY351 is the last device.
It is necessary put in position
ON dipswitch 1.
2.6.2
Can Terminations (AUX6)
For CAN bus protocol. Used for
the new CBI’s connection need,
termination 120
Ω if DPY351 is
the last device.
It is necessary put in position
ON dipswitch 2.
2.7
Keyboard
Fig. 5 – Keyborard Display
3
ADELBus Connections
ADELBus is the ADELSystem network to interconnect devices via Modbus and
CANBUS protocols.
ADELBus is used as power management system for all connected equipment,
such as the DC-Ups, Battery Charger, Power Supply.
Every compatible device
with ADELBus is equipped with one or two data ports. The devices are simply
chained together, forming a local data network. Monitoring panels such as the
DPY351 can be used for monitoring and control all connected ADELBus
equipment.
CAUTION:
Never connect a non ADELBus device to the ADELBus network
directly! This will void the warranty of all the ADELBus devices connected.
3.1
Event based commands
With the ADELBus, a device can be programmed to initiate an action at another
connected device. This is done by means of event-based commands.
3.2
How to set up an ADELBus network
Connections between the devices are made by standard straight ADELBus
cables. ADELSystem can supply these cables. These (CAT5) cables are also
commonly available at computer supply stores. For the CAN connection in some
devices it is recommended to use twisted pair cable with shield.
Up to 32 ADELBus devices can be connected together.
The power for the network can be provided directly the connected devices
through the ADELBus cable. Otherwise, if that is not sufficient, it is necessary
to connect the device by the + and – terminals of connector AUX5 as described
in section 2.5.3
ADELBus needs a terminating impedance on both ends of the network: for that
purpose a switch termination on the Device, which can be enabled by means of
the dipswitch 1 (for the Modbus) and 2 (for the CAN Bus) of Ref. 6 is available
3.3 How to set an ADELBus network with more than one
DPY351 (Modbus View Mode)
In a Modbus network there can only be one master. Normally the DPY351 is the
master, it polls the network and it receives information from other ADELSystem
devices, which are the slaves. If it is necessary to connect
N
DPY351 in the
same ADELBus network, then
N-1
displays shall be configured in View Mode.
In this case only one DPY351 is a master and it polls the devices, the other
DPY351s receive the data from the Bus and they take the information into
consideration only if these parameters are originated from a device in their list,
otherwise they ignore the information.
View Mode is useful also when the master of the network is an external device
as a PC but there is the need to monitor the status of the network from several
places
To configure the DPY351 in View Mode it is necessary to go in:
Menu>Menu Config>Other Settings>Modbus View Mode.
4
Ethernet Configuration
Configuration of the Ethernet interface by HTTP server via the Web browser:
4.1.1
Connect HTTP server for the first time
To connect DPY351 to a network a standard CAT5e or higher LAN cable must
be connected to the AUX2 connector (RJ45) on the back of the unit, as shown
in Fig.2. The DPY351 is configured to operate with a fixed IP address
(192.168.1.100) and to reply at the standard HTTP port (number 80) by default.
A different static IP address can be assigned to the DPY351 or a dynamic IP
address can be assigned using the DHCP protocol. The network configuration
can
be
effected
from
the
Network
menu
page:
Menu>Display
Configuration>Network.
See section 3.4. 2. The address assigned to the
DPY351 by the DHCP server can be read on the display at the page:
Menu>Display Configuration>Information.
he same configurations can be done using the internal webserver, which in
addition allows remote controlling the display and downloading the data and
event logs. Type the IP address of the DPY351 into any browser’s address bar
(as an example "192.168.1.100") then the login page appears requesting the
username and the password .
To access the internal webserver, at the login page, the following credentials
must be used:
Username:
admin
Password:
admin
4.1.2
Customizing the ethernet interface and services
In the setup page, the following groups of parameters are displayed:
Account
TCP/IP Configuration
SNMP v2c
Other settings/actions
Account:
The Account group (Fig. 6) allows the customization of the data for
the HTTP server login page.
Fig. 6 – Account settings
TCP/IP Configuration
Fig. 7 shows the TCP/IP Configuration group of parameter default values. They
allow unique identification of the unit in the network.
Fig. 7 – IP settings
If “Dynamic (DHCP)” is selected, the IP address is automatically assigned by a
DHCP server, that must be active on the network, and the System IP, Subnet
Mask and Gateway textboxes are not available.
HTTP Port allows redirecting the HTTP traffic to a port different than the TCP
port 80, which is the one devoted to HTTP. In the case “HTTP Port” checkbox
is not selected, the HTTP protocol will be run on port 80 and the “HTTP Port”
textbox will be hidden. If “HTTP Port” checkbox is selected, then the “HTTP Port”
textbox should be populated with the TCP
port number the HTTP traffic must be redirected to. In such a case, access to
the HTTP server from a browser must be made according to the following
syntax:
http://ipaddress:portnumber
.
As an example, if the IP address is 192.168.1.100 and the selected HTTP port
is 5678 then the following IP string should be entered in the browser
http://192.168.1.100:5678.
The DPY351 supports access using the Virtual LAN protocol. In the case “VLAN
ID” checkbox is not selected the “VLAN ID” textbox will be hidden and DPY351
will not operate in the VLAN. If “VLAN ID” checkbox is selected then the “VLAN
ID” textbox should be populated with the ID. The VLAN ID can be set in the
range 1 thru 4094 and it must match that of the VLAN the unit is operating in.
SNMP v2c
The DPY351 can act as a gateway between an ADELsystem power device
(such as the CBI Size 3 and 4) and a SNMP manager. An ADELsystem MIB
table is provided which consists of a list of parameters of the connected power
device that can be remotely read, or read-written through the SNMP. Each
parameter, (OID), is mapped one-to-one to a Modbus RTU holding register.
Refer to the document Adelsystem parameter table for the description of each
power device parameter and the corresponding OID for the SNMP.
Save
Clear
Select
Alarm
Edit
>
Select
<
Back
Menu
Back
Power
On


