K5756 2/05 Rev. A
ADEMCO 5805BDV
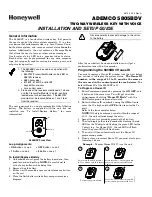
TWO-WAY WIRELESS KEY WITH VOICE
INSTALLATION AND SETUP GUIDE
General Information
The 5805BDV is a four-button wireless key that permits
the user to control the alarm system remotely. It is a two-
way device that sends commands (e.g., Arm, Disarm, Panic)
to
the alarm system, and receives current status
from
the
system. Additionally, the unit contains a Message Mode
that allows the user to leave or retrieve voice messages.
One bi-color status LED and a speaker indicate status.
Each button can be programmed for any zone response
type, but is typically used for arming, disarming, panic, and
output relay operation.
1. The 5805BDV can be used in conjunction with
the following:
•
5800TM (Transmitter Module) and a 5881 or
5881EN receiver
•
5883 transceiver
•
6128RF, 6150RF, or 6160RF
keypad/transceivers
•
Lynx control panel.
2. Place one of the receivers mentioned in 1 above
and the Transmitter Module in a high, centrally
located area for best reception. The 5800TM
module must be located between 1 and 2 feet
from the receiver.
The unit is powered by a single, replaceable, AAA, Alkaline
battery. The battery is supplied with the unit but not
installed (see “To Install/Replace Battery” for more
information).
5805BD
V
-001-V0
Speaker
LED
Microphone
ON
OFF
1
2
5805BDV Front View
Loop Assignments:
•
ON
Button = Loop 3
•
OFF
Button = Loop 2
•
1
Button = Loop 4
•
2
Button = Loop 1
To Install/Replace Battery
1. On backside of unit, press the battery door down, then
push forward and pull up.
NOTE:
Be careful not to
activate any buttons while doing this.
2. Remove the old battery.
3. Either wait 20 seconds, or press and release any button
on the unit.
4. Place the AAA battery into battery compartment (see
diagram).
!
Observe polarity to prevent damage to the unit or
to the battery.
5805BD
V
-002-V0
After the new battery has been installed, you will get a
confirmation tone within five seconds.
Programming the 5805BDV House ID
You must program a House ID number into the unit before
you can use it to display the system status.
The House ID
number, in the range of 01 to 31, must be the same as
the one used in the control panel for each device.
The
default House ID of the 5805BDV is 10.
To Program a House ID
1. Enter Programming mode by pressing the
ON
,
OFF
, and
1
buttons at the same time.
You will get an audio
announcement stating
“
House ID Mode”
with the
LED flashing red and green alternately.
2. Enter the House ID number by using the
ON
button to
enter the 10’s digit and the
OFF
button to enter the 1’s
digit.
Refer to the four examples below.
NOTE:
If the digits entered are not within the range of
01-31, the unit will
not
accept the entry.
3. Accept the entry entered by pressing the 2 button.
4. The unit displays the stored number by flashing the red
LED for the 10’s
digit and flashing the green LED for the
1’s digit (e.g., for House ID 21, the red LED will flash
twice, the green LED will flash once).
5. The unit will then automatically exit the House ID
programming mode.
6. If you enter an incorrect House ID, you must start again
from step 1 above.
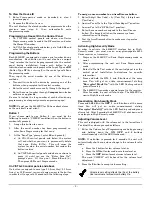
Example:
To enter House ID # 17 into the unit:
5805BD
V
-003-V0
Enter House ID mode: Press ON +
OFF + 1 buttons until LED flashes
House ID
will be shown by flashing LED.
Unit automatically exits
House ID
mode.
To accept entry, press 2 button.
Enter House ID #17: Press & release ON
button once, press & release OFF button
7 times.
1
2
4
3


