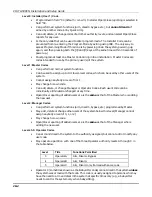
Section 28 - User Access Codes
28-3
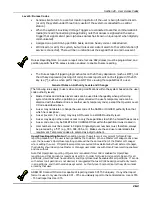
Level 6: Duress Codes
•
Sends a silent alarm to a central monitoring station if the user is being forced to disarm
(or arm) the system under threat (only useful if the system is connected to a central
station).
•
When the system's Auxiliary Voltage Triggers are connected to another communication's
media (Derived Channel/Long Range Radio), note that duress is signaled on the same
trigger that signals silent panic (whereas duress has its own unique report when digitally
communicated).
•
Assigned on a partition-by-partition basis, and can be any code or codes desired.
•
Will disarm (or arm) the system, but will also send a silent alarm to the central station (if
service is connected). There will be no indication at the keypad that an alarm was sent.
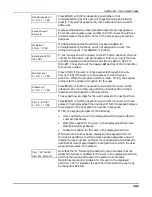
Duress Reporting Note: A non-zero report code for zone 992 (duress) must be programmed, and
partition-specific field *85 duress location enabled, to enable Duress reporting.
•
The Duress report-triggering logic activates on the 5th key depression (such as OFF), not
the 4th key depression (last digit of code). Duress reports will not be triggered if the 5th
key is a [*], such as when performing a GOTO or viewing the capabilities of a user.
General Rules on Authority Levels and Changes
The following rules apply to users when making modifications within the system based on the user
code authority levels:
•
Master Codes and all lower-level codes can be used interchangeably when performing
system functions within a partition (a system armed with a user's temporary code can be
disarmed with the Master Code or another user's temporary code), except the Operator Level
C Code described above.
•
A user may not delete or change the user code of the SAME or HIGHER authority than that
which he is assigned.
•
A user (levels 0, 1 & 2 only) may only ADD users to a LOWER authority level.
•
A user may assign other users access to only those partitions to which he himself has access.
•
A user code can only be DELETED or CHANGED from within the partition it was created in.
•
User numbers must be entered in 3 digits. Single-digit user numbers must, therefore, always
be preceded by a "00" (e.g., 003, 004, 005, etc.). Make sure the end user understands this
requirement. Temporary codes are entered as 4-digit numbers.
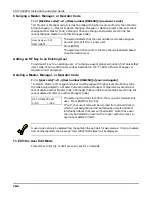
Open/Close Reporting Note: When adding a user, the system will only prompt for Open/Close
reporting capability if the user is being added by the Installer. When a Master or Manager adds a new
user, the new user's Open/Close reporting enable will be the same as that of the Master or Manager
who is adding the user. If Open/Close reports are required to be selectable by the Master or Manager,
the Installer should assign two Master or Manager user codes: one with Open/Close reporting enabled,
and one without.
Note that Open/Close reporting of Quick Arm is enabled if User 002 is enabled for Open/Close
reporting, and that Quick Arm reports as User 000. In order for Quick Arm reports to be sent for all
partitions, User #002 must have authority and Open/Close must be enabled for all partitions. If a code
with access to all partitions is not desired, it is suggested that user #002 be assigned authority level 5
in all partitions, and that the code be kept secret. Authority level 5 cannot disarm the system unless
armed by that user.
ADEMCO Contact ID format is capable of reporting Users 001-150 uniquely. If any other report
format is used, only user numbers 001 - 015 can uniquely report to the central station. Users 016
- 150 will report as User 015.
Summary of Contents for VISTA-50PEN
Page 2: ...ii...
Page 10: ...VISTA 50PEN Installation and Setup Guide x...
Page 26: ...VISTA 50PEN Installation and Setup Guide 3 4...
Page 42: ...VISTA 50PEN Installation and Setup Guide 6 6...
Page 56: ...VISTA 50PEN Installation and Setup Guide 8 8...
Page 82: ...VISTA 50PEN Installation and Setup Guide 13 4...
Page 110: ...VISTA 50PEN Installation and Setup Guide 18 8...
Page 118: ...VISTA 50PEN Installation and Setup Guide 20 4...
Page 138: ...VISTA 50PEN Installation and Setup Guide 22 18...
Page 166: ...VISTA 50PEN Installation and Setup Guide 25 6...
Page 172: ...VISTA 50PEN Installation and Setup Guide 27 2...
Page 186: ...VISTA 50PEN Installation and Setup Guide 29 8...
Page 192: ...VISTA 50PEN Installation and Setup Guide 30 6...
Page 197: ...B 1 A P P E N D I X B DIP Switch Tables...
Page 200: ...VISTA 50PEN Installation and Setup Guide B 4...
Page 214: ...l K3271 1BX 9 00 165 Eileen Way Syosset NY 11791 Copyright 2000 PITTWAY Corporation...

