29-1
S E C T I O N 2 9
Keypad Functions
• • • • • • • • • • • • • • • • • • • • • • • • • • • • • • • • • • • • • • • • • • • • • • • • •
In This Section
♦
General Information
♦
Arming Commands
♦
Access Control
♦
Delaying Closing Time
♦
Partition "Go To" Command
♦
Viewing Capabilities of a User
♦
Viewing Zone Descriptors
♦
Viewing Downloaded Messages
♦
Using the Built-in User's Guide
♦
Panic Keys
♦
Speed Key [D] (Macros)
♦
Manual Relay Activation Mode (#70 Mode)
♦
Instant Activation Mode (#77 Mode)
• • • • • • • • • • • • • • • • • • • • • • • • • • • • • • • • • • • • • • • • • • • • • • • • •
General Information
The keypad allows the user to arm and disarm the system, and perform other system
functions, such as bypassing zones, viewing messages from the central station, and
displaying zone descriptors. The system conditions are shown in the display window.
When an alarm occurs, keypad sounding and external sounding will occur, and the zone(s) in
alarm will be displayed on the keypad. Disarming the system (enter the security code and
press the OFF key) will silence both keypad and external sounders. After the system is
disarmed, the system displays any zones that were in an alarm condition during the armed
period. To clear this display, simply repeat the disarm sequence.
The keypads also feature chime annunciation, and 3 panic keys (for silent, audible, fire or
personal emergency alarms) which can notify the central station of an alarm condition, if
that service is connected.
Arming Commands
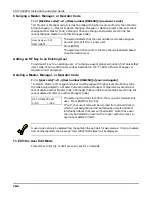
The following is a brief list of arming commands. For detailed information concerning these
functions, refer to the User's Manual.
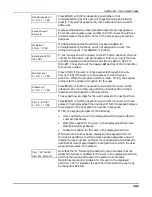
Display Faulted
Zones
To arm the system must be in the READY condition (all zones
must be intact). If the "NOT READY" message appears, press the
READY * key to display faulted zones.
Arming Away
Enter code + 2 (AWAY)
Arming Stay
Enter code + 3 (STAY) (all zones designated as zone types 4 and 10
will be automatically bypassed).
Arming Instant
Enter code + 7 (INSTANT) (same as STAY without entry delay).
Arming Maximum
Enter code + 4 (MAXIMUM) (same as AWAY without entry delay).
Disarming
Enter code + 1 (OFF).
Quick Arming
Note that if QUICK ARM is enabled (field *29), the # key can be
pressed instead of entering the security code, for any of the arming
procedures (Away, Stay, Instant, Maximum, etc.).
Summary of Contents for VISTA-50PEN
Page 2: ...ii...
Page 10: ...VISTA 50PEN Installation and Setup Guide x...
Page 26: ...VISTA 50PEN Installation and Setup Guide 3 4...
Page 42: ...VISTA 50PEN Installation and Setup Guide 6 6...
Page 56: ...VISTA 50PEN Installation and Setup Guide 8 8...
Page 82: ...VISTA 50PEN Installation and Setup Guide 13 4...
Page 110: ...VISTA 50PEN Installation and Setup Guide 18 8...
Page 118: ...VISTA 50PEN Installation and Setup Guide 20 4...
Page 138: ...VISTA 50PEN Installation and Setup Guide 22 18...
Page 166: ...VISTA 50PEN Installation and Setup Guide 25 6...
Page 172: ...VISTA 50PEN Installation and Setup Guide 27 2...
Page 186: ...VISTA 50PEN Installation and Setup Guide 29 8...
Page 192: ...VISTA 50PEN Installation and Setup Guide 30 6...
Page 197: ...B 1 A P P E N D I X B DIP Switch Tables...
Page 200: ...VISTA 50PEN Installation and Setup Guide B 4...
Page 214: ...l K3271 1BX 9 00 165 Eileen Way Syosset NY 11791 Copyright 2000 PITTWAY Corporation...

