Section 5 - Installing The Keypads
5-3
Addressing the Keypads
•
The keypads will not operate until they are physically addressed and enabled in the system's
Device Programming
in the
#93 Menu Mode
.
•
Each keypad must be assigned a different address.
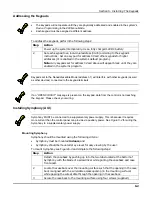
To address the keypads, perform the following steps:
Step
Action
Power up the system temporarily. Use a fully charged 12VDC battery.
2
Set each keypad to an individual address (00-30) according to the keypad's
instructions. Set one keypad for address 00 and other keypads for higher
addresses (01 is enabled in the system's default program).
Note: Any keypads set for address 02 and above will appear blank until they are
enabled in the system's program.
Keypads set to the Nonaddressable Mode (address 31) will interfere with other keypads (as well
as other devices) connected to the keypad terminals.
If an “OPEN CIRCUIT” message is present on the keypad, data from the control is not reaching
the keypad. Please check your wiring.
Installing Symphony (AUI)
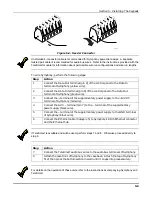
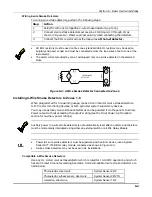
Symphony MUST be connected to a supplementary power supply. This is because it requires
more current than the control panel can provide via auxiliary power. See
Figure 5-2
for wiring the
Symphony to a supplementary power supply.
Mounting Symphony
Symphony should be mounted using the following criteria:
•
Symphony must be mounted indoors, and
•
Symphony should be mounted at eye level for easy viewing by the user.
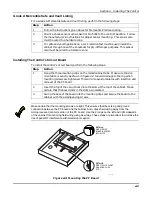
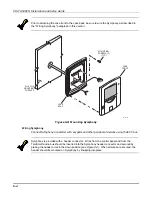
To mount Symphony see Figure 5-3 and complete the following steps:
Step
Action
Detach the case back by pushing up into the two tabs located at the bottom of
Symphony with the blade of a screwdriver while pulling the case back and case
front apart.
2
Locate the case back over the mounting surface such that the opening in the case
back is aligned with the wire/cable access opening (in the mounting surface)
while passing the wires/cable through the opening in the case back.
3
Secure the case back to the mounting surface using four screws (supplied).
Summary of Contents for VISTA-50PEN
Page 2: ...ii...
Page 10: ...VISTA 50PEN Installation and Setup Guide x...
Page 26: ...VISTA 50PEN Installation and Setup Guide 3 4...
Page 42: ...VISTA 50PEN Installation and Setup Guide 6 6...
Page 56: ...VISTA 50PEN Installation and Setup Guide 8 8...
Page 82: ...VISTA 50PEN Installation and Setup Guide 13 4...
Page 110: ...VISTA 50PEN Installation and Setup Guide 18 8...
Page 118: ...VISTA 50PEN Installation and Setup Guide 20 4...
Page 138: ...VISTA 50PEN Installation and Setup Guide 22 18...
Page 166: ...VISTA 50PEN Installation and Setup Guide 25 6...
Page 172: ...VISTA 50PEN Installation and Setup Guide 27 2...
Page 186: ...VISTA 50PEN Installation and Setup Guide 29 8...
Page 192: ...VISTA 50PEN Installation and Setup Guide 30 6...
Page 197: ...B 1 A P P E N D I X B DIP Switch Tables...
Page 200: ...VISTA 50PEN Installation and Setup Guide B 4...
Page 214: ...l K3271 1BX 9 00 165 Eileen Way Syosset NY 11791 Copyright 2000 PITTWAY Corporation...

