7-1
S E C T I O N 7
2-Wire Polling Loop Expansion
• • • • • • • • • • • • • • • • • • • • • • • • • • • • • • • • • • • • • • • • • • • • • • • • •
In This Section
♦
Polling Loop Overview
♦
Common Characteristics of Polling Loop Zones
♦
Installing RPM Devices
♦
Polling Loop Supervision
• • • • • • • • • • • • • • • • • • • • • • • • • • • • • • • • • • • • • • • • • • • • • • • • •
Polling Loop Overview
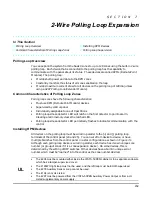
You can expand the system from the basic 9 zones to up to 128 zones using the built-in 2-wire
polling loop. Each device that is connected to the polling loop has the capability to
communicate with the panel about its status. These devices are called RPMs (Remote Point
Modules). The polling loop:
•
Provides both power and data to the RPM zones
•
Constantly monitors the status of all zones enabled on the loop
•
Provides maximum current draw for all devices on the polling loop of 128mA (unless
using a 4297 Polling Loop Extender Module).
Common Characteristics of Polling Loop Zones
Polling loop zones have the following characteristics:
•
Must use RPM (Remote Point Module) devices
•
Supervised by control panel
•
Individually assignable to one of 8 partitions
•
Polling loop smoke detector LED will latch on the first detector to go into alarm.
Clearing alarm memory clears the latched LED.
•
Polling loop smoke detector LED periodically flashes to indicate communication with the
control.
Installing RPM Devices
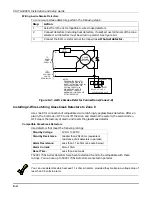
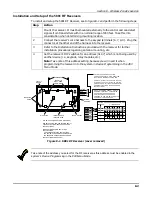
All devices on the polling loop must be wired in parallel to the [+] and [-] polling loop
terminals of the control panel (24 and 25). You can wire from device to device, or have
multiple branches from the control panel in a star configuration as shown in Figure 7-1.
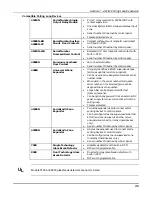
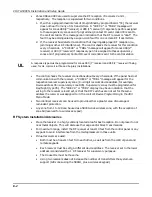
Although each polling loop device is wired in parallel, each device has its own unique zone
number (or group of zones if it is a zone expansion device). On some devices, this is
determined by the setting of DIP switches. Other devices have a built-in unique serial
number which must be "learned" into the control as the zone number desired.
UL
•
The 4208 must be mounted either inside the VISTA-50PEN cabinet or in a separate enclosure
which has a tamper-supervised cover.
•
The 4190WH right loop must not be used, and the left loop must be EOLR-supervised.
•
The 4278 Auxiliary Sensor Loop cannot be used.
•
The 4194 is not UL Listed.
•
The 4297 must be powered from the VISTA-50PEN Auxiliary Power Output or from a UL
Listed supplementary power supply.
Summary of Contents for VISTA-50PEN
Page 2: ...ii...
Page 10: ...VISTA 50PEN Installation and Setup Guide x...
Page 26: ...VISTA 50PEN Installation and Setup Guide 3 4...
Page 42: ...VISTA 50PEN Installation and Setup Guide 6 6...
Page 56: ...VISTA 50PEN Installation and Setup Guide 8 8...
Page 82: ...VISTA 50PEN Installation and Setup Guide 13 4...
Page 110: ...VISTA 50PEN Installation and Setup Guide 18 8...
Page 118: ...VISTA 50PEN Installation and Setup Guide 20 4...
Page 138: ...VISTA 50PEN Installation and Setup Guide 22 18...
Page 166: ...VISTA 50PEN Installation and Setup Guide 25 6...
Page 172: ...VISTA 50PEN Installation and Setup Guide 27 2...
Page 186: ...VISTA 50PEN Installation and Setup Guide 29 8...
Page 192: ...VISTA 50PEN Installation and Setup Guide 30 6...
Page 197: ...B 1 A P P E N D I X B DIP Switch Tables...
Page 200: ...VISTA 50PEN Installation and Setup Guide B 4...
Page 214: ...l K3271 1BX 9 00 165 Eileen Way Syosset NY 11791 Copyright 2000 PITTWAY Corporation...

